![]()

Beacons have been getting a lot of press lately about how they are going to transform retail, but iBeacons are much more than that. You can use them for a bunch of cool stuff with your iPhone, your Mac, and a couple of iBeacons. First, a bit of background. iBeacons are Bluetooth devices that broadcast to your iPhone or iPad to let them know the beacons are nearby.
Here are 10 awesome things you can do right now using iBeacons. All of these work with any iBeacon, but they work great with our Bleu Station iBeacons. Here they are:
- “Auto-Lock and walk” your Mac
- Flip iChat Status to “Out” when stepping away
- Send a notification as you arrive
- Create your own “club card” with passbook
- Remotely snap a webcam photo and email it to yourself
- Light turn on when you arrive
- Post to group chat as staff enter or leave the building
- Make a dramatic entrance as “Eye of the Tiger” starts playing when you walk in.
- Keep a log of when you enter and leave your car in google docs
- Post a message to Twitter when near a beacon
Most of these tips make heavy use of Geohopper for iOS, since it is a great general purpose tool for making things happen when you are near an iBeacon. Geohopper for iOS can be downloaded for free from the App Store. The web services are available as in-app purchases. Initial setup of Geohopper requires email registration and configuration to add your iBeacons to the list of regions. Setup is easy and in a few minutes you’ll be ready to start using iBeacon triggers.
Geohopper for Mac is the sibling of Geohopper for iOS and, as the name states, runs on your Mac. Geohopper for Mac harnesses the capabilities of your Mac for proximity detection and is available on the App Store for just a few dollars.
Let’s get started.
1. “Auto-Lock and walk” your Mac
Wouldn’t it be nice to have your Mac go to a locked screensaver whenever you leave your office space? The screensaver will automatically activate when you exit the proximity of an iBeacon on your desk. It uses both Geohopper for iOS and Geohopper for Mac. When you walk out of range of the iBeacon at your desk, Geohopper for iOS will send a notice to Geohopper running on your Mac which in turn commands the Mac to lock the screensaver.
- First, set up an iBeacon Region for your iBeacon in Geohopper for iOS. Geohopper will send a push notification when your iOS device approaches or leaves the vicinity of the beacon. This short video shows how to do that:
Video 1
- Download the screensaver activation script and add it to ~/Library/Application Scripts/com.twocanoes.macgeohopper/
- Now set up Geohopper for Mac to activate its screen saver when you exit the region around the iBeacon:
Video 2
- Now grab your iPhone and walk out of range of the iBeacon, and your screensaver will activate.
2. Flip iChat Status to “Out” when stepping away
I always forget to change my iChat status when I leave my desk and get a lot of “you there?” messages. Using Geohopper for iOS to trigger an exit event when moving away from an iBeacon, and Geohopper for Mac to update Messages status:
- Set up Geohopper for iOS to notify yourself when exiting proximity to the beacon as shown in video 1 above.
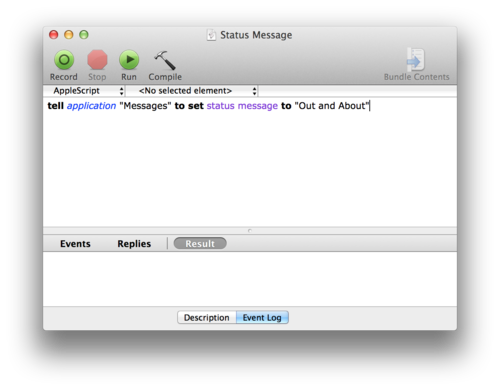
- Create a simple AppleScript to change iChat status and save to ~/Library/Application Scripts/com.twocanoes.macgeohopper/:
- Register Geohopper for Mac with the same email as you did for Geohopper for iOS.
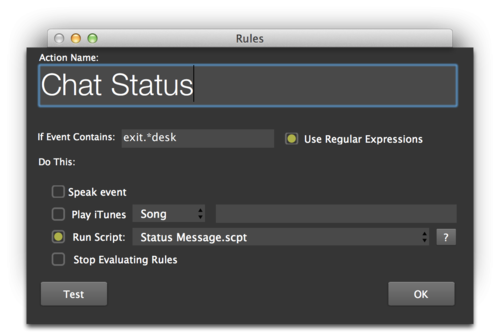
- Select the script in Geohopper for Mac to run when you exit an iBeacon at your desk:
- Now just walk away from your desk, and you iChat status will change automatically.
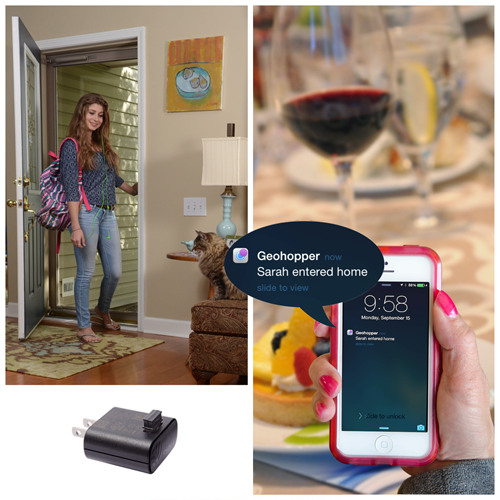
3. Send a notification as you arrive
Geohopper for iOS can notify your selected recipients when you arrive in the office near an iBeacon and then recipients receive a push notification. I use it to keep my wife up to date when I am leaving the office.
4. Create your own “club card” with passbook
Create a beacon-enabled pass for free at http://meetings.twocanoes.com and invite your friends to a party at your house.
5. Remotely snap a webcam photo and email it to yourself
You can use proximity around an iBeacon to trigger a webcam to take a photograph. You don’t have to be anywhere near the camera to take the photo. The photo is taken when you exit the region around an iBeacon.
I set up a simple webcam pointed at main street in Naperville IL from our office window. When I leave my house to go to the office, a Geohopper trigger sends a command to the webcam to snap a photo and email it to my address.
- Get a webcam. I bought a cheap Trendnet webcam that allows you to grab a screen capture when calling http://<IP ADDRESS>/image/jpeg.cgi. I had it require authentication and set up port forwarding so I could get to it on our network. Secure enough for grabbing a photo of a public street.
- I created a web hook on one of our web servers that grabs the photo and emails it back to the caller. It is in ruby using Sinatra, but it just gets a POST and emails the jpeg to the person requesting:
post ’/hook/photo/?’ do
uri = URI.parse(‘http://<IPAddress>/image/jpeg.cgi’)
req=Net::HTTP::Get.new(uri.path)
req.basic_auth ’photo’, ’pass’
res = Net::HTTP.start(uri.host, uri.port) {|http|
http.request(req)
resp = http.request(req)
open(“/tmp/image.jpg”, ”wb”) do |file|
file.write(resp.body)
end
}
body_raw_data=env[‘rack.input’].read
log_message(body_raw_data)
in_data=JSON body_raw_data
puts in_data[“sender”]
options = {
:address => ”email-smtp.us-east-1.amazonaws.com”,
:port => 587,
:user_name => ”Username”,
:password => ”PASS”,
:authentication => :login,
:enable_starttls_auto => true
}
Mail.defaults do
delivery_method :smtp, options
end
mail = Mail.new do
from ’webhook@twocanoes.com’
to in_data[“sender”]
subject ’Webhook Photo’
body ’See attached Photo’
end
mail.add_file(“/tmp/image.jpg”)
mail.deliver
end
- I then set up Geohopper for iOS to call a web hook tied to an iBeacon at address https://serveraddress/hook/photo/:
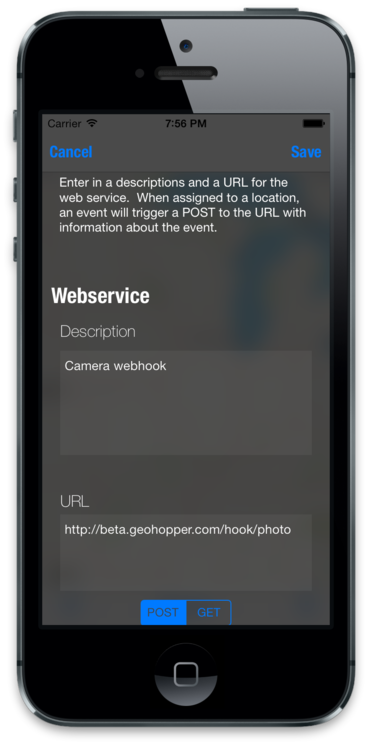
Video 3
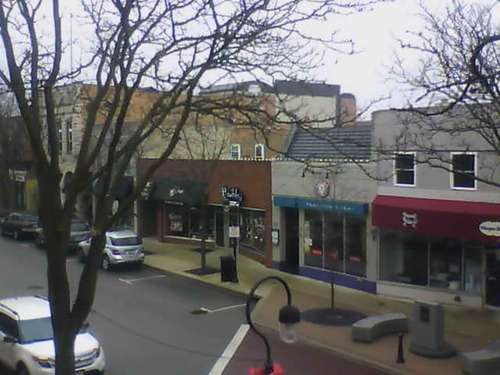
- Now when I leave my house, I can case the situation around the office. Here is what it looks like right now:
- If you want to try out a web hook with our cam, the URL to the camera is at http://108.243.0.231:8081/image/jpeg.cgi, username is ‘photo’, and password is ‘heart’.
6. Light turn on when you arrive
Home automation is another cool possibility for iBeacons. For this one, you’ll need a WeMo or some other device that can be turned on or off over the internet. I used Geohopper for iOS to detect proximity to an iBeacon, and this updates an RSS feed. The online automation site IFTTT can take in an RSS feed and then tell the WeMo to turn on or off.
First, set up Geohopper for iOS to publish an RSS feed with your enter and exit events:
- Next, set up IFTTT to turn on a light switch when a new RSS feed entry matches a value:
- Now grab your iPhone and walk towards your iBeacon. When you get in range, the light turns on! You can extend this to turn the light off as well. I use it to turn the lava lamp on my desk on and off depending on my proximity to the iBeacon on my desk.
7. Post to group chat as staff enter or leave the building
We are pretty casual here at Twocanoes Software, and have more adhoc meetings than formal ones. This can cause issues with remote employees since they are not always aware of who is around. We use iBeacons to notify the group chat room when someone enters or exits the region near an iBeacon in the office. I originally set this one up as a test of integration of Zapier with Geohopper and HipChat chat room we use. What happens behind the scenes is a bit complicated, but Zapier and HipChat make it extremely easy to set up. This video steps you through creating the web hook and getting it all working:
(see this post for another tip using web hooks, Zapier and Geohopper to keep a travel log http://blog.twocanoes.com/post/65704828994/travel-logging-with-geohopper)
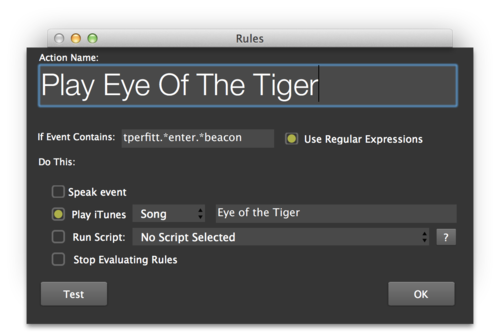
8. Make a dramatic entrance as “Eye of the Tiger” starts playing when you walk in.
This one is actually a variation on an earlier one, but it adds a dramatic flair to your proximity to an iBeacon. When Geohopper for iOS sends a notification that you are near an iBeacon at your desk, Geohopper for Mac receives the push and starts the song. You have to own the song, of course, but if you do this correctly, you will own the song in more ways than one!
9. Keep a log of when you enter and leave your car in google docs
In my old job, I had to keep both a mileage log and an after-action-report for customer visits. This is now much easier if I drop an iBeacon in my car’s USB port and set up a system that automatically adds the enter and exit events to a google docs spreadsheet. Back to Zapier for the glue:
Now at the end of the month, I have a log of when I used the company car.
10. Post a message to twitter
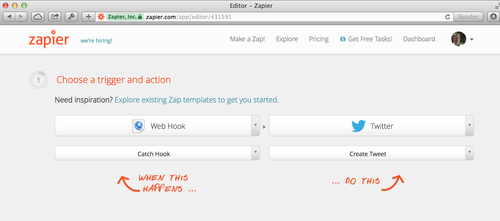
If you want to go social with your proximity to an iBeacon, you can set up an automatic posting to Twitter whenever you get near an iBeacon. This could potentially add to the noise on Twitter, but if we filter it correctly and only post when we go someplace awesome, it can be a nice way to let friends know when you are at a favorite hangout. I created a Twitter account to let those who follow me know when I have arrived. Again we use Zapier for the web hook and Twitter.
First, create a web hook that is triggered by Geophopper for iOS and post to Twitter when this web hook happens:
A web hook URL is generated by Zapier, and I used this web hook URL in Geohopper in the web service section. So I copied the URL here:
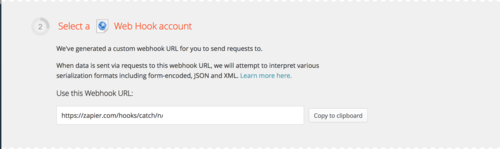
Created a web service in Geohopper, and then added in an iBeacon configuration that triggers the web service when nearby.
Next, I selected the Twitter account to post it to:

Since the web hook will be called for both enter and exit events, I made the filters as strict as possible:
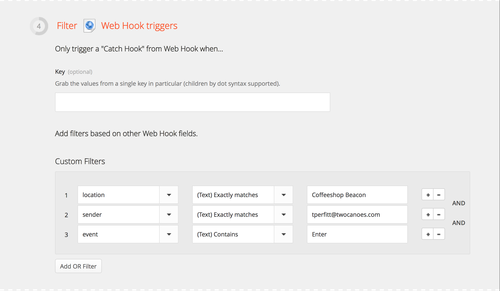
The tweet to tweet:

And then save it.

Now whenever I enter the coffee shop, those folks that follow me on that Twitter feed get notified.