Configure MDS Automaton
The MDS Automaton automates the keyboard presses needed to fully automate a Mac setup using resources from the MDS macOS app. When the MDS Automaton is plugged in to a USB port, it will send the keyboard command to boot to recovery (⌘R) then wait for a default 30 seconds; this is followed by the keyboard commands for opening Terminal and the command to run the workflow selector.
If you purchased the MDS Automaton bundle, your Automaton has been already programmed for you. It can be re-programmed and configured easily in MDS.
Hardware
The MDS Automaton is an Arduino-compatible Adafruit ItsyBitsy inside a custom enclosure. It also includes a short micro-USB to USB-A cable. The micro-USB end plugs into the USB connector on the Automaton; the USB-A end plugs into the Mac that is being set up.
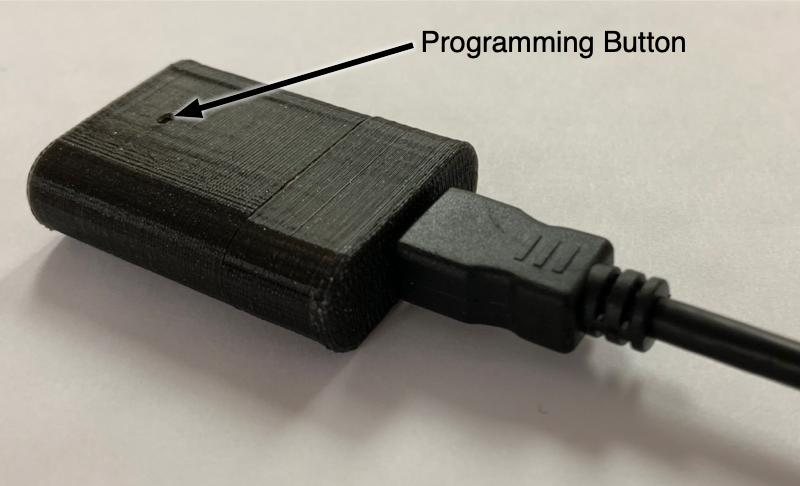
To put the Automaton into programming mode, use a paperclip to press the Programming Button inside the enclosure twice quickly. Note: if it has already been programmed by MDS, this is not needed.
Downloading the macOS Software
Download MDS by going to the MDS product page.
Programming an Arduino (skip if you purchased the MDS Bundle from Twocanoes Software)
If you purchased a compatible Arduino to use as an Automaton with MDS, it must be programmed with the firmware bundled within MDS itself. Programming is simple:
- Click “Create Automaton” in MDS.
- Plug in the Arduino and put it in programming mode. This is usually done by pressing the programming button once/twice or briefly shorting the reset pin to ground. Consult your Arduino’s manual for details.
- Once the flashing is completed, a success dialog will appear. You may now unplug the Automaton.
Note: If the flashing does not start, verify the cable is not a “power only” cable. In order to flash the Arduino, it must show up in macOS under /dev with a name that contains “cu.usbmodem”.
Configuring the Automaton
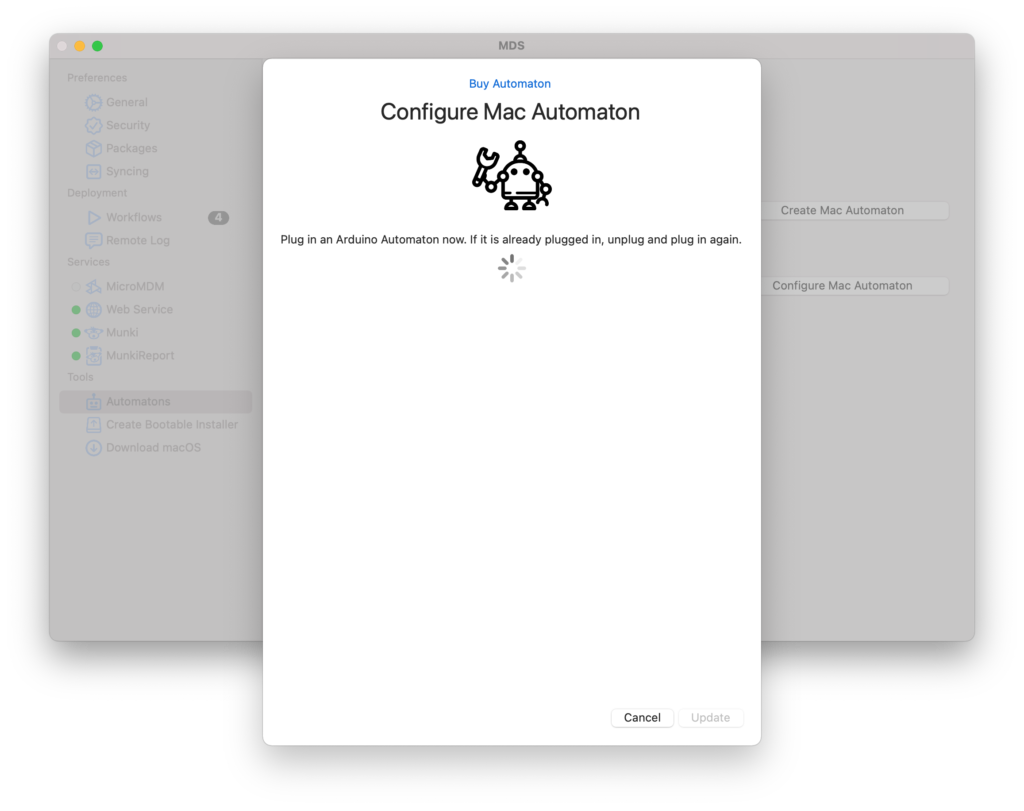
To configure the MDS Automaton, launch MDS and click the “Configure Mac Automaton” button. Once the Configure sheet is displayed, plug in the Automaton using the provided USB cable. Note: the MDS Automaton must be connected when the configuration sheet is shown as it only listens for a connection over a few seconds on initial power.
Settings
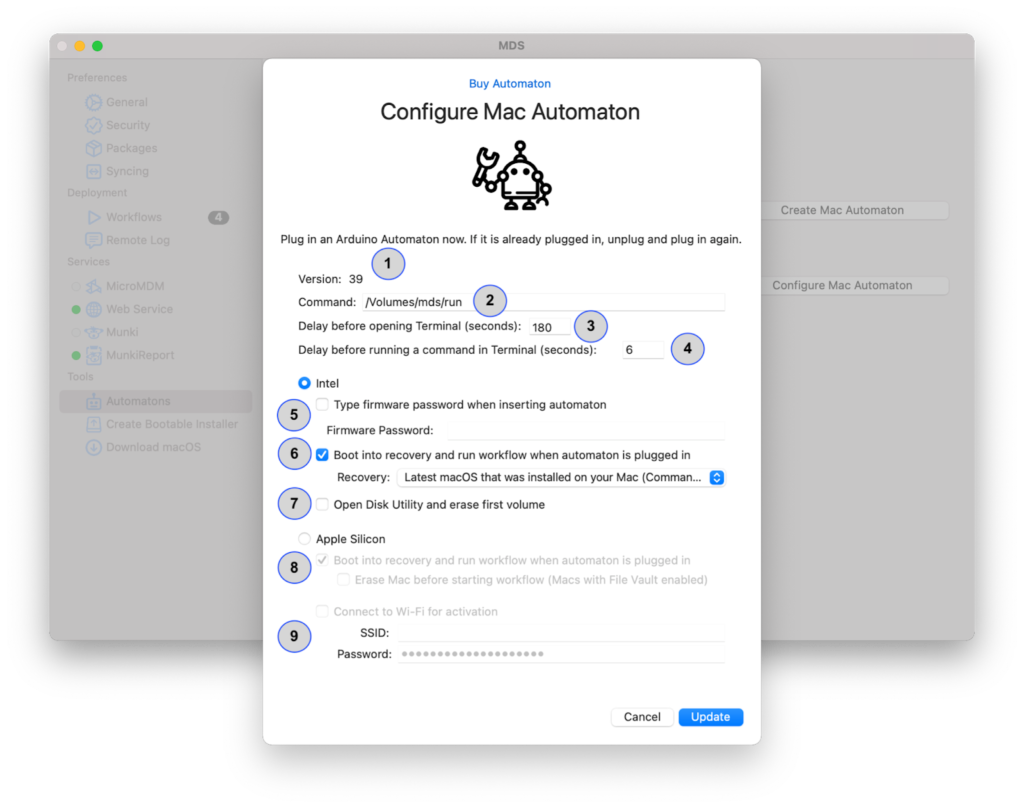
Click “Configure Mac Automaton” to change options.
The Automaton will press ⌘R a few seconds after it has been plugged in. It will then wait for a defined startup delay before issuing the commands for opening Terminal and running the specified command. These values can be adjusted using the Configure Mac Automaton sheet.
- Version: View the current Automaton firmware version. MDS will prompt to update the Automaton if it has older firmware than what is provided in the current MDS version.
- Command: Listed is the command that will run in Terminal in the recovery partition. It should be adjusted to match the name of the external volume (replace “mds” with the name of the volume that contains the MDS resources). Depending on where the resources are located, the command will be different. See below for examples:
External Volume
/Volumes/mds/run
Web Server
hdiutil mount http://imac.local/mds/MDSDiskImage.dmg && /Volumes/MacDeployStickResources/run
SMB Server
mkdir /tmp/mnt && mount_smbfs smb://guest@imac.local/Shared /tmp/mnt && hdiutil mount /tmp/mnt/mds/MDSDiskImage.dmg && /Volumes/MacDeployStickResources/run
- Delay before opening Terminal: The amount of seconds between pressing ⌘R and issuing the commands to open Terminal to run the command.
- Delay before running command in Terminal: Additional time before the command is executed.
Intel Configuration
- Firmware Password: Use only if the target Mac has been configured to use a firmware password. This setting will enter the required firmware password before booting to the recovery partition.
- Boot into recovery: Usually this should be left checked. Unchecking this option will disable the Automaton’s normal function of immediately issuing keyboard commands to boot to the recovery partition. Instead the Automaton will wait to receive commands later using its command line interface. This option can also be configured to boot to the different recovery partition options available (Note: some of these may not be available for older macOS versions):
- Latest macOS that was installed on your Mac (⌘R)
- Latest macOS that is compatible with your Mac (⌥⌘R)
- macOS that came with your Mac, or the closest version still available (⇧⌥⌘R)
- Open Disk Utility and erase first volume: This is for use with volumes that have FileVault enabled. To avoid being prompted for a password when running the workflow, this option will instead have the Automaton open Disk Utility and delete the first volume in the recovery partition prior to running Imagr. A volume with the same name will be created so that Imagr can then proceed normally.
Apple Silicon Configuration
- Boot into recovery: in Apple Silicon, the Automaton can boot into recovery for you to run the workflow. If the Erase Mac option is checked, the Automaton will select the “Erase Mac…” menu option to erase the Mac prior to installing macOS and resources.
- Connect to Wi-Fi for activation: here, you can enter the SSID and password of the Wi-Fi needed for activation, skipping manually entering in the information during the workflow itself.
Using the Automaton
Once the automaton is programmed and configured, you are able to use it right away. After preparing the MDS resource volume or disk image:
- Boot the target Mac by pressing the power button and holding Option (⌥) on an Intel Mac or pressing and holding the power button on an M1 Mac.
- When the boot selector screen appears, insert the Automaton into the USB port. Within 5 seconds, the Mac should start booting to the recovery partition.
- The Automaton will enter the keystrokes to open Terminal and run the command to launch the workflow selector.
MDS Automaton Timing for Intel Macs
The MDS Automaton performs keyboard strokes to boot into the recovery partition and other operations. The timing is very specific for each operation:
(min:sec)
- 0:00 — MDS Automaton is powered on. LED turns on.
- 0:02 — Serial Port turned on and listening for any keystroke over serial to enter admin mode.
- 0:07 — Enter startup mode. Serial port closed. LED turns off. Wait 1 second for serial to close and keyboard mode is engaged.
- 0:08 — ⌘R is pressed for 30 seconds. LED flashes about every ½ second.
- 0:38 — Startup Delay specified in settings starts (default 180 seconds). Flashes LED two times every ½ second.
- 3:38 — Press Space to clear mouse configuration for Mac Mini. Wait 10 seconds for language selector to come up.
- 3:48 — Press Return (↩) to dismiss language dialog. Wait 30 seconds for recovery window to show.
- 4:18 — Press Control-F2 to turn on keyboard navigation. Press Right arrow key 4 times and Down arrow key 4 times.
- 4:20 — Wait for pre-Command delay (default 6 seconds) for Terminal to appear.
- 4:26 — Type specified Terminal command.
- 4:30 — Turn off keyboard, wait 2 seconds.
- 4:32 — Turn on Serial Port and wait for input.