MDS 3 Admin Guide
Note: This unmaintained guide is for an unsupported version of MDS on our website for archival purposes. To view the most recent MDS Admin Guide, visit twocanoes.com/mds-4-guide.
Overview
MDS is a macOS application to create the resources needed to automate the install of macOS and initial software packages. Recent Macs do not support NetBoot or booting to external drives for setup: MDS solves this problem by providing a mechanism for initially installing macOS and software packages via the recovery partition.
Requirements for Installing macOS
Previous versions of macOS and Mac hardware supported block-based imaging to deploy macOS and associated configuration and hardware. Due to the number of Macs that did not have up-to-date firmware, Apple introduced software and firmware limitations that require macOS to be installed with an Apple-provided macOS installer. It also required an internet connection to check for firmware updates during the install process. The macOS installer has an optional feature to install packages after macOS has been installed.
Recent Macs cannot boot from external volumes unless that security setting is disabled in the Startup Security Utility when booted to the recovery partition. This adds additional time for setup and configuration and reduces security if that security feature is not re-enabled after booting from an external volume.
Why MDS?
MDS is based on the idea that you should be able to easily wipe and reinstall a Mac quickly and easily in an automated way. Apple provides the ability to reinstall macOS from the recovery partition, but the installer must be downloaded during the install process, and many manual steps must be taken in the installer screens. This is not difficult for an individual user, but for larger organizations or deployments, it can be cost prohibitive due to the time it takes for setup. Apple also provides the Deployment Enrollment Program (or DEP) for initial setup and enrollment in an MDM service, but that requires both an organization be enrolled in DEP and all Macs purchased and enrolled in DEP. Older machines can only be enrolled in DEP if they were purchased via the correct channel. Finally, even if a Mac is enrolled in DEP, if it needs to be reset and is not able to contact the MDM server: the OS must be manually reinstalled, which can be a labor-intensive process.
How MDS Works
MDS creates all the resources required to reinstall macOS and install software packages for enrolling in MDM. The resources are organized into workflows, which can be selected by the person setting up the Mac computers. The resources and workflows are saved to an external drive or to a disk image for copying to a web server. Once saved, the target Macs are booted to the recovery partition and a script is run from the disk image on the web server or directly from the external drive. To further automate the process, MDS can flash an Arduino to turn it into an MDS Automaton, which gives the keystrokes for automatically selecting the recovery partition and running the script.
Time Savings
Using the Automaton and the resources created by MDS, a new Mac can be set up very quickly. The new Mac is unboxed and powered on with the option key held down. The external drive (optional if using a web server) and Automaton are plugged into the Mac. The Mac will then proceed to erase the internal volume, copy the OS installer and packages to the Mac, and then reboot into the installer. Once this first reboot happens, the Automaton and external volume can be disconnected. So in terms of time for technician interaction with the Mac, it takes just a few seconds to plug in the Automaton and the external drive, hold the option key to start the startup selector, and then return a few minutes later to disconnect the Automaton and external volume. This can dramatically reduce setup time and result in large savings of time and labor costs.
This same process can be used for Macs that need to be re-setup either onsite or offsite.
Main Interface
MDS is organized into a side navigation panel and a main work area. Side navigation has sections for Preferences, Deployment, Services, and Tools.
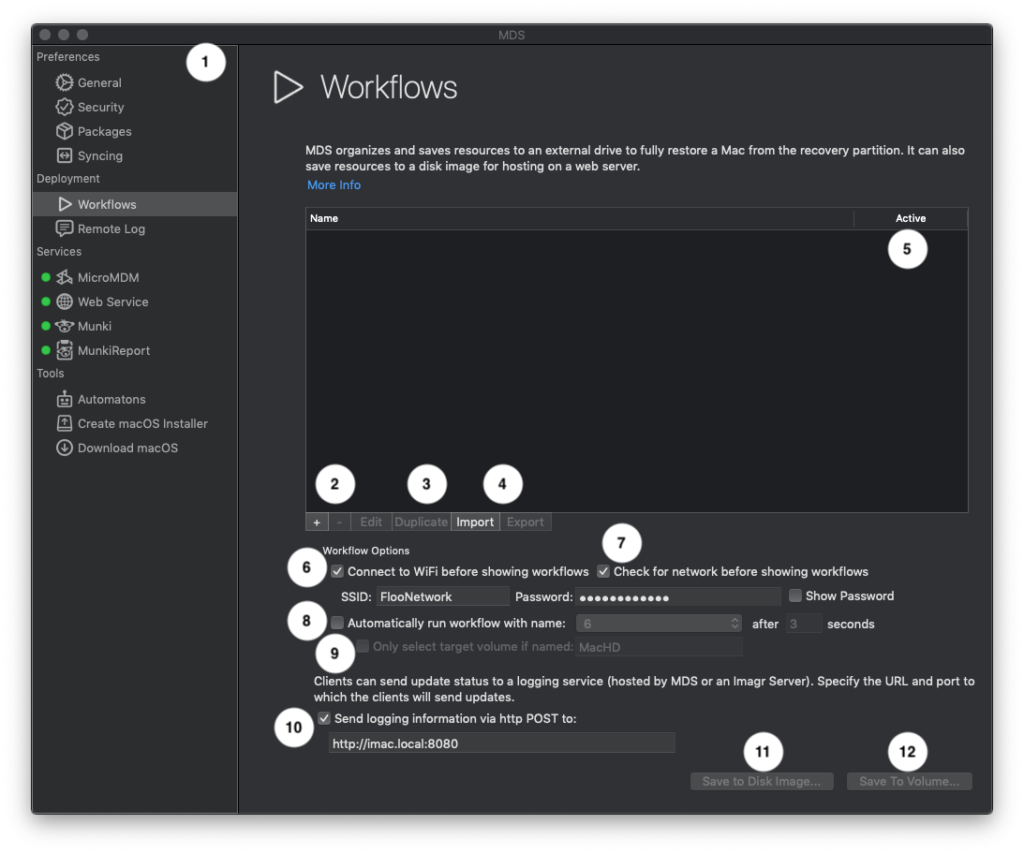
Under Deployment, the Workflows panel is the core of MDS. This panel is used to set the majority of options for organizing and creating the resources for deploying your Macs. A workflow is the collection of steps that are done to erase the volume, install macOS, specify which packages and profiles to install, and specify which scripts to run before or after installation.
- Side Navigation: Select
Deployment > Workflows. - Add, Remove and Edit Workflow: These buttons add, remove, and edit the above workflows. Double-clicking on a workflow will also open the editing sheet.
- Duplicate: Make a copy of the selected workflow(s).
- Import/Export Workflows: Select one or more workflows and click Export to save the workflow settings to a file. Click Import to add these workflows to MDS on another machine or after being removed from the workflow list.
- Activate/Deactivate workflows: If a workflow is not active, it will not be included when the resources are saved. Uncheck a workflow to exclude it when saving to volume or disk image.
- Connect to WiFi: This option will have the target Mac recovery partition connect to Wi-Fi before launching Imagr to run workflows.
- Check for network: This option will have the target Mac recovery partition check for a network connection when first launching Imagr to run workflows.
- Automatically run workflow: Choose a workflow to be run automatically by Imagr after the specified delay period.
- Set target volume name: This is usually not needed since the default volume selected is “Macintosh HD,” but can be useful if a machine has multiple macOS installations and will only run the automatic workflow if the specified alternate volume name is found.
- Send logging information via http Post to: Have target Macs send logging information when running a workflow. This will default to send workflow status logging information to the Remote Log section of MDS on the current machine. If desired, this can instead be set to direct workflow status logging to a separate Imagr logging service when available.
- Save to Disk Image: This will prompt for a name and location to save a new disk image that will contain all the resources and workflows. The disk image can be copied to a web server for deploying Macs. (The disk image volume name can be configured in
Preferences > General) - Save to Volume: This will prompt to select an external HFS+ volume. The resources and workflows will be copied to the selected volume for deployment. A script called “run” will also be created that is used to launch the workflow selector (Imagr).
Workflow Editing
Workflow Description
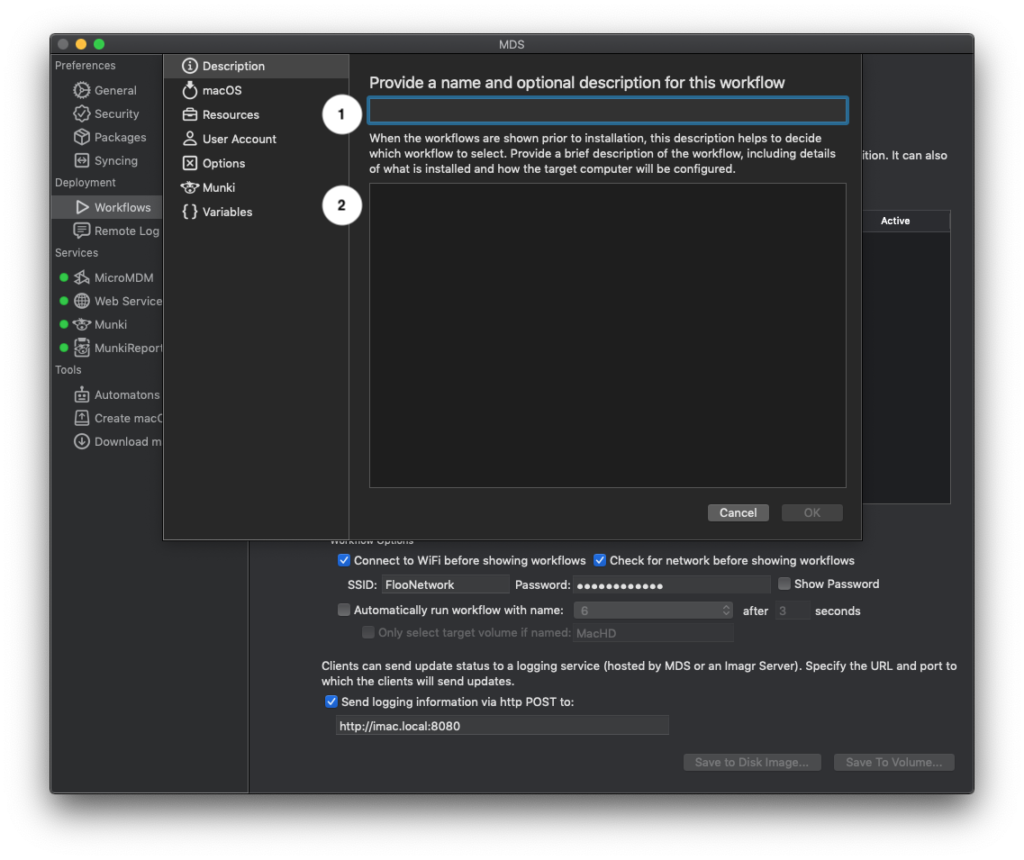
When the workflow is created or edited, a sheet will be shown to edit the workflow.
- Workflow Name: A name for the workflow. This will be shown in the recovery partition when selecting a workflow.
- Workflow Description: A description for the workflow. This will be shown in the recovery partition when selecting a workflow.
Workflow macOS Settings
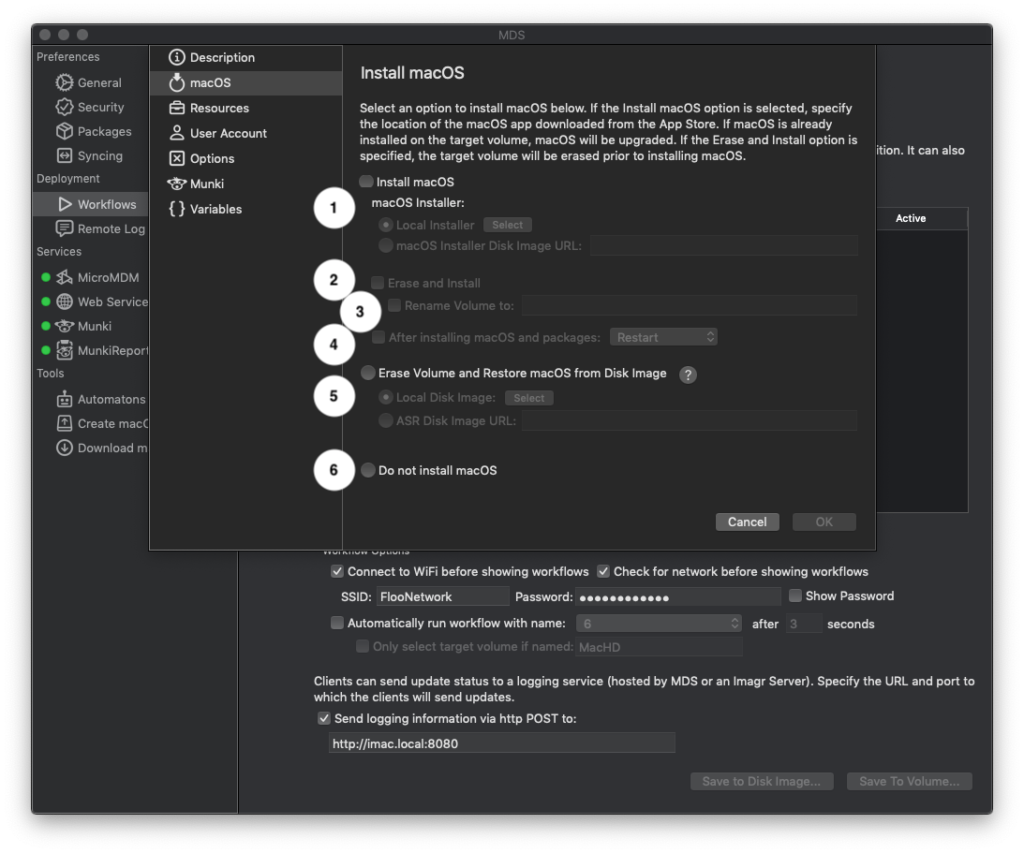
- Install macOS: Select a standard macOS installer downloaded from Apple (.app or .sparseimage), or select a disk image (.dmg) with the macOS installer inside it. Or provide a URL where such a file is hosted.
- Erase and Install macOS: If this option is selected, the selected macOS partition will be erased and the macOS installer will be used to install macOS. Alternatively, to upgrade the current macOS installation without erasing, leave this option unselected.
- Rename volume: Change the volume name to a new value.
- Restart/shutdown: Use this option if an additional restart is needed after the OS and package install process completes, or to shut down the machine after the install process.
- Erase Volume and Restore macOS from Disk Image: Select a file prepared with AutoDMG to reinstall macOS using Apple Software Restore (ASR).
- Do not install macOS: Use this option to only install packages and other content. The current OS will be left on the target volume. This is ideal if you have a new Mac that has the most up-to-date macOS on it and you just want to install packages.
Workflow Resources Settings
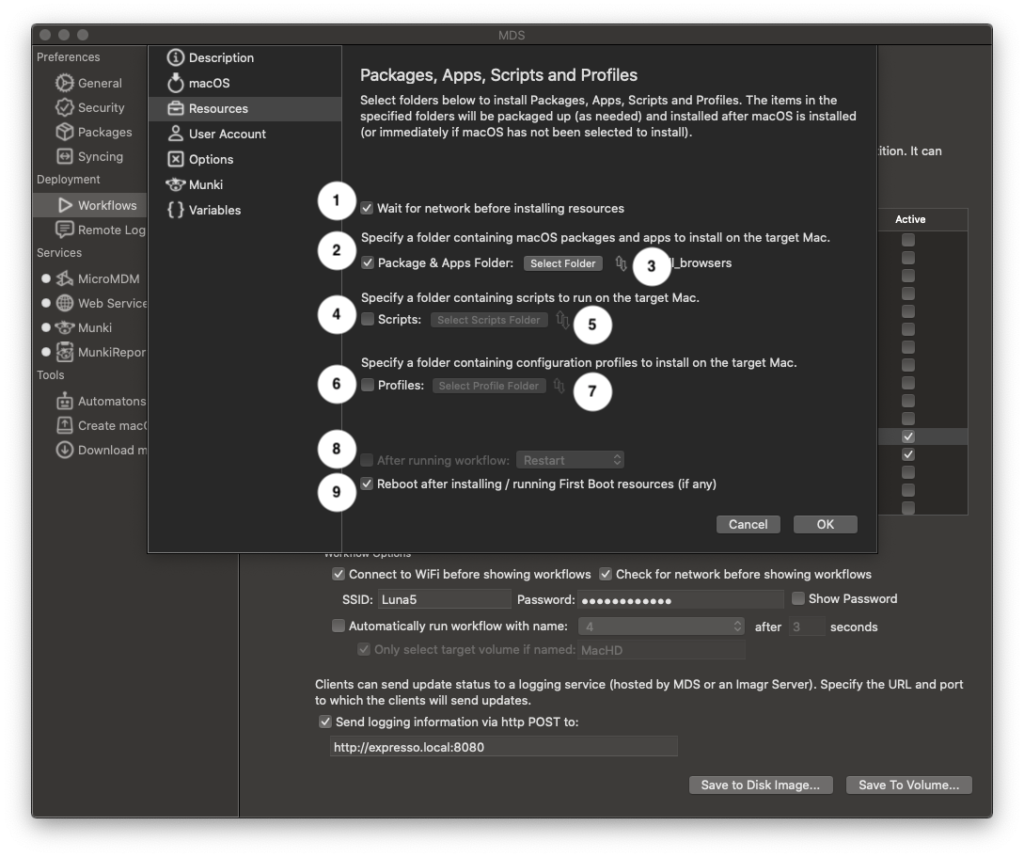
- Wait for network access before installing resources (only needed when a given resource installation requires network access to proceed).
- Package & Apps Folder: Specify a path to a folder with packages that will be installed when the workflow is run. The packages should be standard macOS package format, but it does not matter what the type of package it is (flat, bundle, etc). MDS will convert them when the resources are copied. Any “.app” bundles found will also be converted and installed.
- Choose when to run each package or app: on first boot, when running workflow, or when first user logs in.
- Scripts Folder: Specify a folder containing scripts to run on the target Mac.
- Choose when to run each script: after first boot packages are installed, before packages are installed when running the workflow, or when running workflow.
- Profiles Folder: Specify a folder containing configuration profiles to install on the target Mac.
- Choose when to install each profile: after first boot packages are installed (when not installing macOS), after macOS and packages are installed, or after macOS is installed but before packages.
- After workflow action: When a workflow does not reinstall macOS, choose to either restart or shutdown the machine when the workflow finishes.
- Reboot after first boot: Choose if the Mac should restart after applying the resources that are marked to be installed or run after the first time that macOS finishes booting.
Workflow User Account Settings
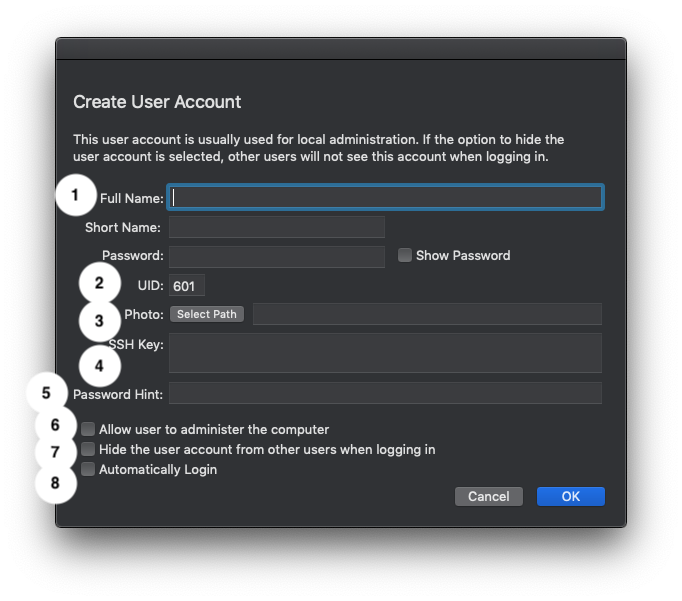
MDS can create multiple user accounts. Click the “+” button on the User Account panel to add one.
- Name, short name, and password: Enter information to create a new user account on the target Mac.
- Set the UID for the user account.
- Set the photo for the user account.
- Set an SSH key for the user account.
- Set the user account password hint.
- Select if the new user account created should be an administrator.
- Hide the new user account when logging in. This may be useful for creating admin management accounts that should not be visible to other users.
- Have the selected user automatically logged in when macOS is started.
Workflow Options Settings
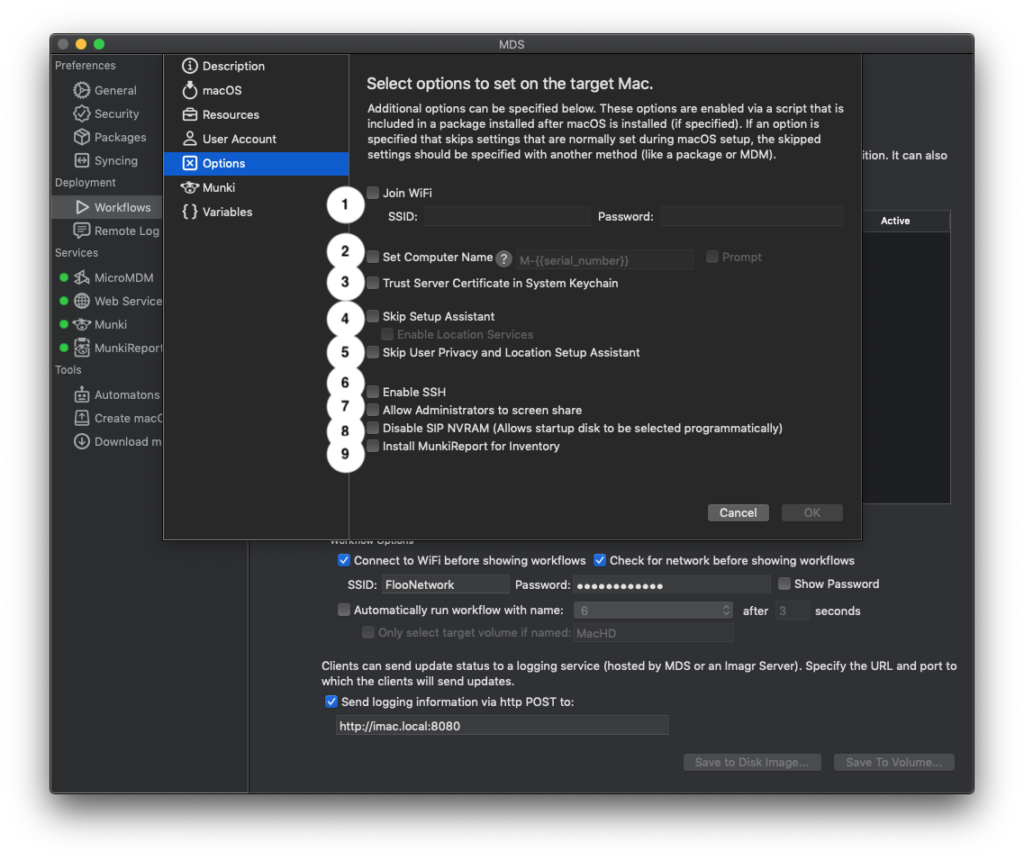
- Join WiFi: Have the target Mac be configured to join WiFi when a user logs in.
- Computer Name: Have Imagr either prompt the admin for a computer name when the workflow is run, or set computer name to the value entered. Include the machine’s serial number if desired by adding {{serial_number}} to the name expression (useful when using MDS to deploy a cluster of Macs and then identify them for remote access, or for sending logging information while the MDS workflow is run on a cluster of Macs).
- Trust Server Certificate: This will use the certificate from “Preferences > Security” so that after the workflow is run, the target machine will be able to use secure Web Services created in MDS.
- Skip Setup Assistant: Choose to skip some of the options usually presented during the initial setup of the target Mac.
- Skip User Privacy and Location Setup Assistant: Skip only these components of Setup Assistant.
- Enable SSH: Enable remote login preferences for administrators.
- Allow Administrators to screen share: Enable screen sharing preferences for administrators.
- Disable SIP NVRAM: Turn off macOS System Integrity Protection.
- Install MunkiReport: Configure the target machine to use MunkiReport if this is set up in MDS Web Services.
Workflow Munki Settings

- Configure Client: Check this box after activating the “Serve Munki” option on the main window and the URL box will be automatically populated with the correct Munki server URL. Make sure to also add the Munki Tools package to the “Resources” panel. When this workflow is run on client machines, they will have an app called “Managed Software Center” installed that will check in with the Munki server to make content available.
- Trust Munki TLS Certificate: Check this box if the option in MDS “Services > Munki” was set to use https for the Munki server. This will configure client machines to correctly trust the certificate used for the secure connection.
Workflow Variables Settings
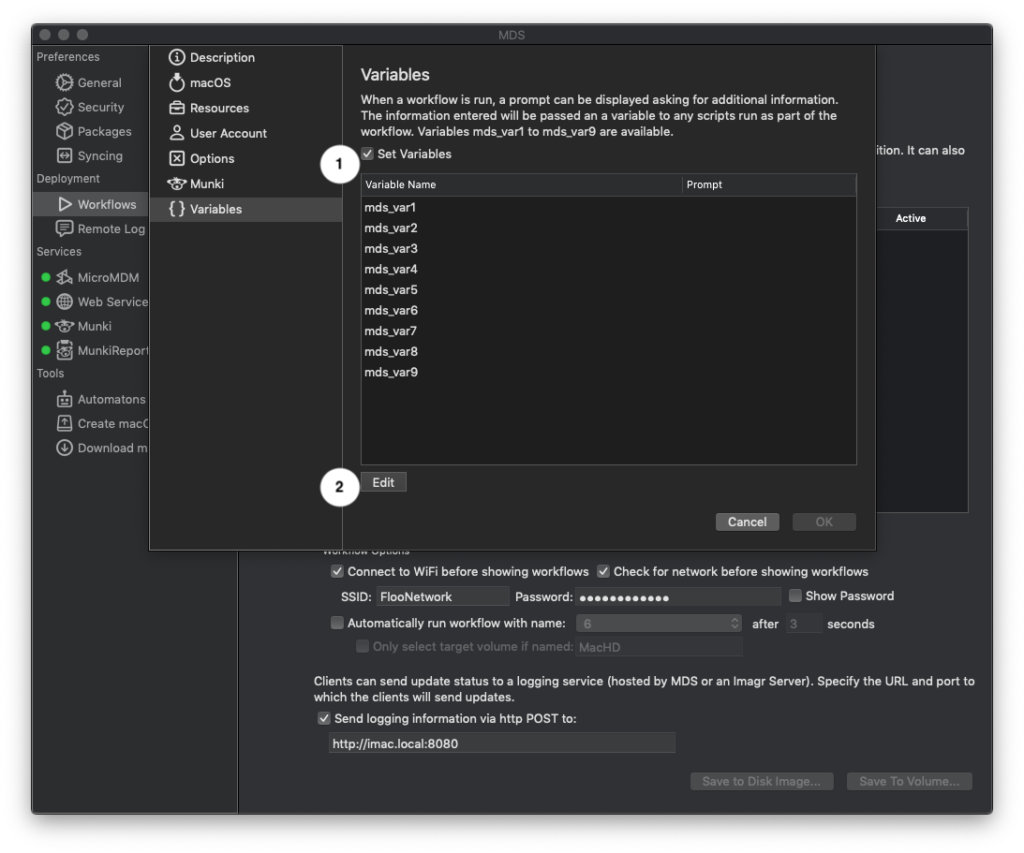
- Click to activate script variables option.
- Click Edit to configure the settings for each variable that will be used.
This will prompt the user running the workflow to enter values. Variable values entered at that time will then be available to scripts added to the Resources section of the workflow. Scripts can reference these values as “mds_var1”, “mds_var2”, etc.
Variables can be set to prompt either for text or provide a popup with multiple choice. When desired, multiple choice can include an “Other” option to enter an answer not provided in the list.
Preferences
General Preferences
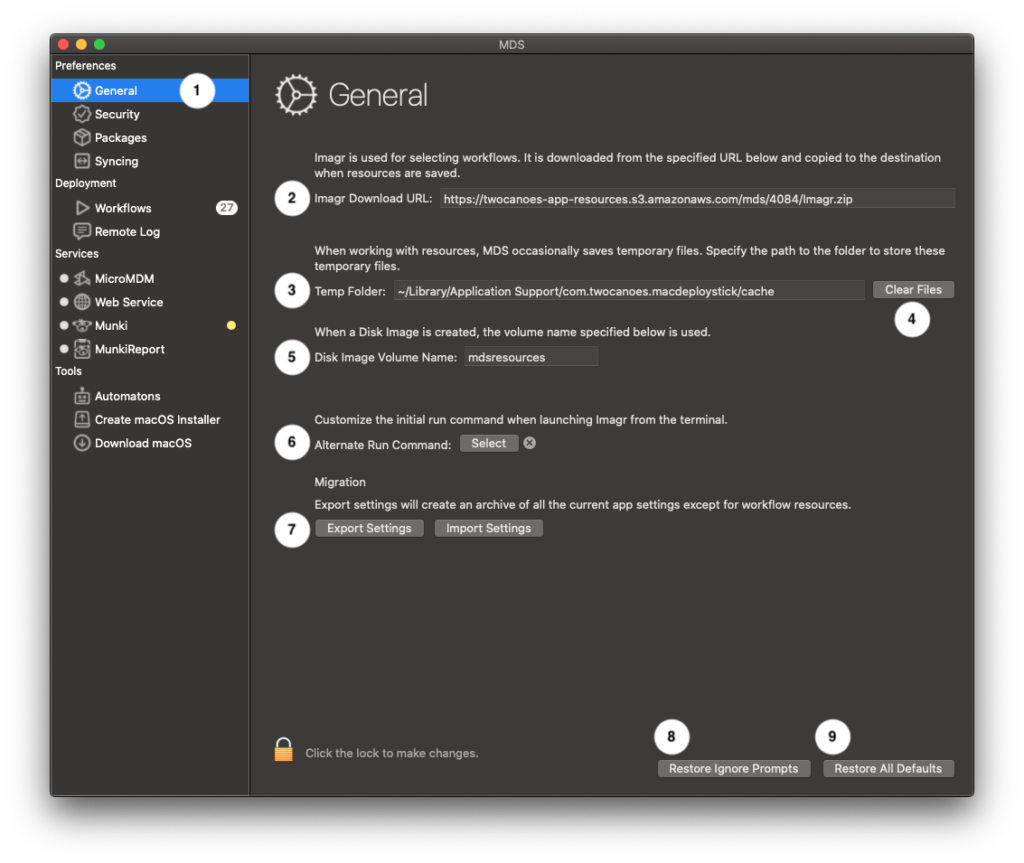
- Preferences is split into multiple sections. The first one is the General tab.
- Imagr URL: Set the URL for downloading the current version of Imagr (usually leave as default).
- Temporary Files: A local file path that MDS will use to store temporary files.
- Clear Files: Clear the temporary files location when indicated.
- Disk Image Volume Name: Change the volume name used when saving workflows to a disk image.
- Alternate Run Command: When saving workflows to a volume or disk image, MDS will usually create a run script to start Imagr and begin the process to run workflows. If any part of this needs to be customized, the user can write a custom run script and add it here.
- Migrate Settings: Export all MDS settings that were set up on one Mac and import them in MDS on another Mac (workflows not included).
- Restore Ignore Prompts: Reset calls for system permissions.
- Restore All Defaults: Reset original values for all general and security preferences.
Security Preferences
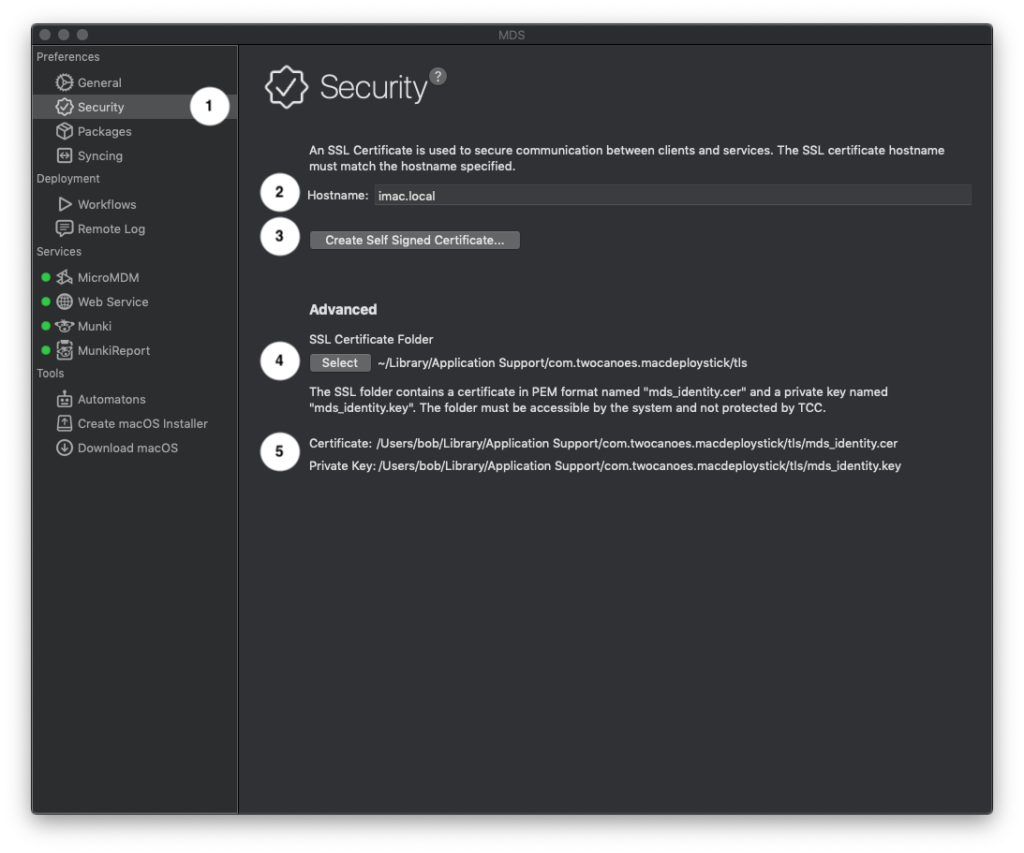
- The Security preferences tab manages certificates to secure communication for the services that MDS can run: MDM, Munki, and other items in Services > Web Service.
- Hostname: Set the host name that will be used for the certificate.
- Create New Self Signed Certificate: This button will create an X.509 certificate at a location selected. The DNS name on the certificate should match the DNS name that is used to initiate the connection.
- The “Create New” button described above will automatically populate the Certificate and Key values required, but if an existing certificate and key is to be used they can be selected here.
- The current file paths for the certificate and private key are shown.
Packages Preferences
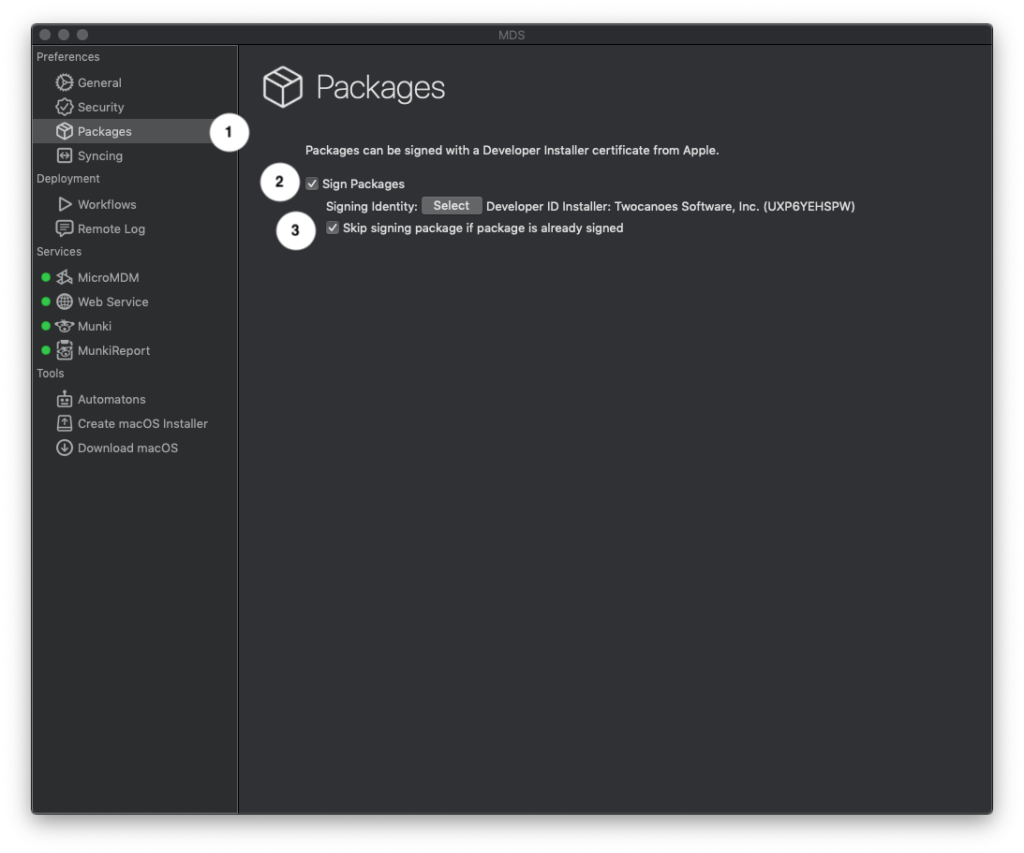
- Packages Preferences manages how MDS can sign packages with a signing identity.
- Sign Packages: Select an item from macOS keychain to be used to sign packages created.
- Skip signing: If some packages added to workflows will already be signed, click the second checkbox to leave signed packages as-is and only sign unsigned packages.
Syncing Preferences
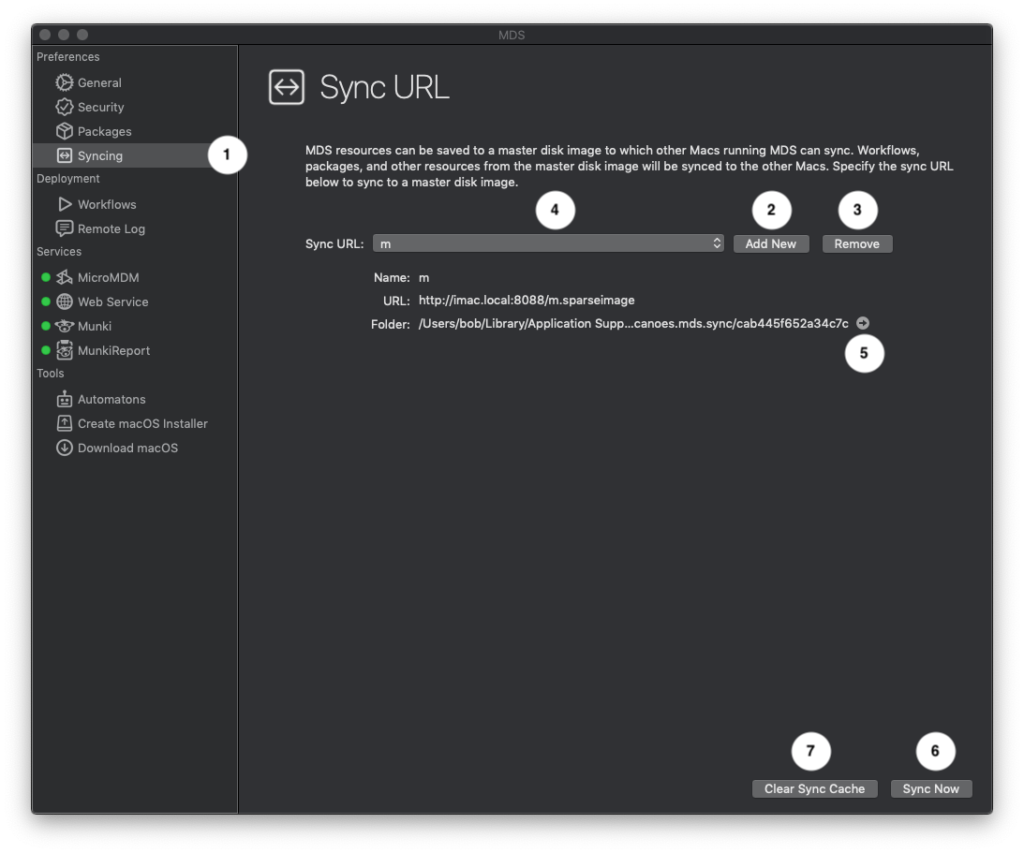
- Syncing Preferences: MDS can save workflow content and settings to a master disk image to which other Macs running MDS can sync.
- Set a URL to be used for syncing workflows to a remote master. This can be any valid file path that the computer can currently reach (local network, HTTP, or other remote address). The address should point to a sparseimage file previously created with MDS using the “Save Master for Syncing” option in the File menu.
- Remove a sync URL that is no longer needed.
- Select a sync URL: More than one sync URL can be added. Switch the current selection by selecting from the list.
- Open the folder used to store files for syncing.
- Sync Now: Update the Workflows panel with content from the current sync URL master disk image.
- Clear Sync Cache: Clear local files previously downloaded when syncing to a remote master.
Running the Workflow
On the Mac that is to be set up, boot into the recovery partition by holding Command-R when starting up the Mac. Once the Mac is booted to the recovery partition, open the Terminal by selecting Terminal from the Utilities menu. Once the Terminal is open, start Imagr from an external volume, a file server, or a web server:
External Volume
Plug in the external volume and enter the following command:
/Volumes/<Volume Name>/run
For instance, if the volume name is “MacDeployStick”, enter in:
/Volumes/MacDeployStick/run
Web Server
If the resources were saved to a Disk Image, copy the disk image to the web server and locate the URL to the disk image. To mount the disk image and open Imagr, enter command in this format:
hdiutil mount <URL to Disk Image>
/Volumes/MacDeployStickResources/run
For example:
hdiutil mount http://192.168.168.50/images/mds.dmg
/Volumes/MacDeployStickResources/run
File Server
If the disk image is hosted on a SMB file server, mount the file server and mount the image directly from the file server. The mount point must be created first, then the file server mounted, and the image then mounted in this format:
mkdir <mountpoint>
mount_smbfs smb://<username>@hostname/<sharedfolderpath> <mountpoint>
hdiutil mount <mountpoint> </path/to/disk/image.dmg>
/Volumes/<Disk Image Volume Name>/run
For example:
mkdir /tmp/mnt
mount_smbfs smb://guest@imac.local/Shared /tmp/mnt
hdiutil mount /tmp/mnt/mds/MDSDiskImage.dmg
/Volumes/MacDeployStickResources/run
Selecting Target Volume and Workflow
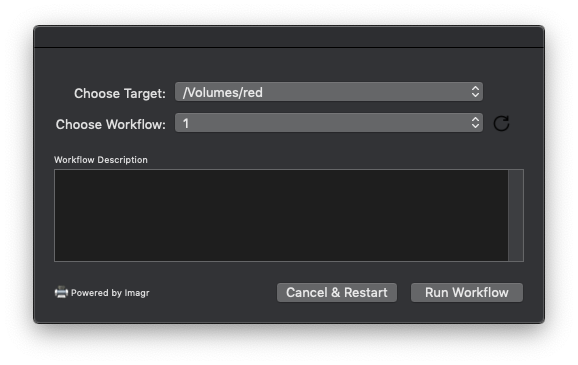
When Imagr starts, select the Target and Workflow and click Run Workflow.
Remote Log Viewer
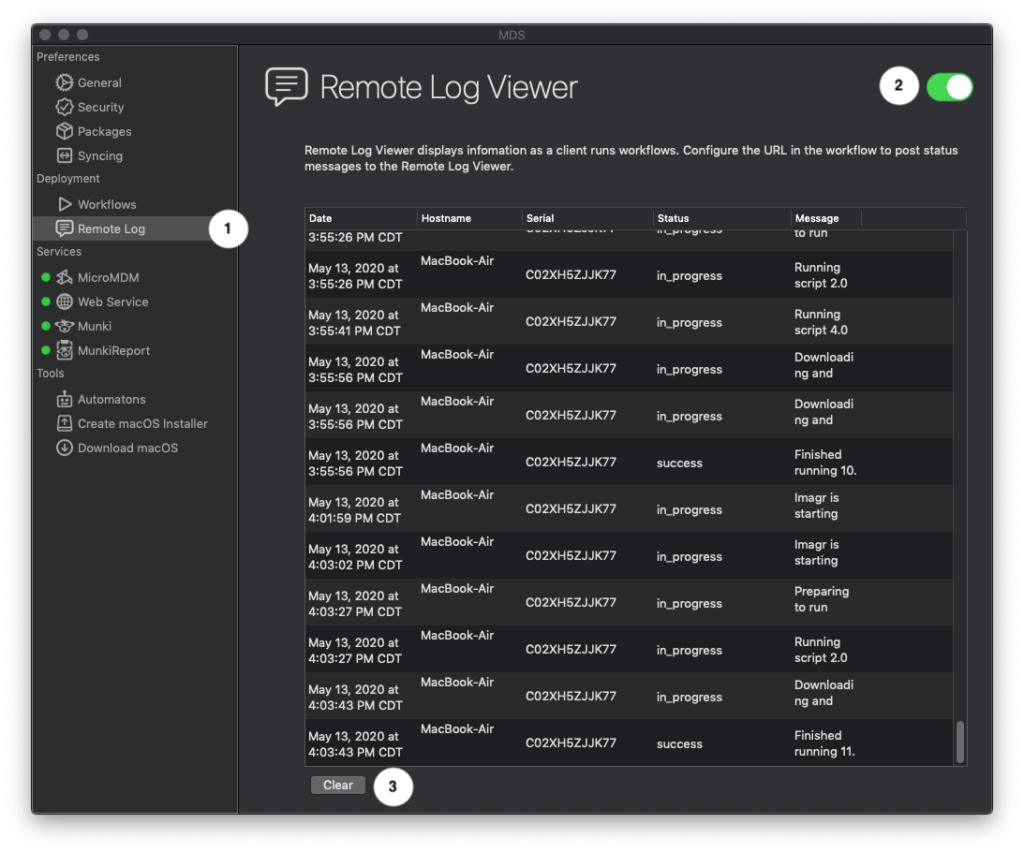
- When a workflow starts running in Imagr, it can send status logging information to the MDS Remote Log Viewer when configured to do so in the Workflows panel prior to saving the workflow to a volume or disk image.
- Before running a workflow, make sure to click the toggle button to turn on Remote Log Viewer so it can receive log info.
- Clear log info if needed.
Services
MicroMDM
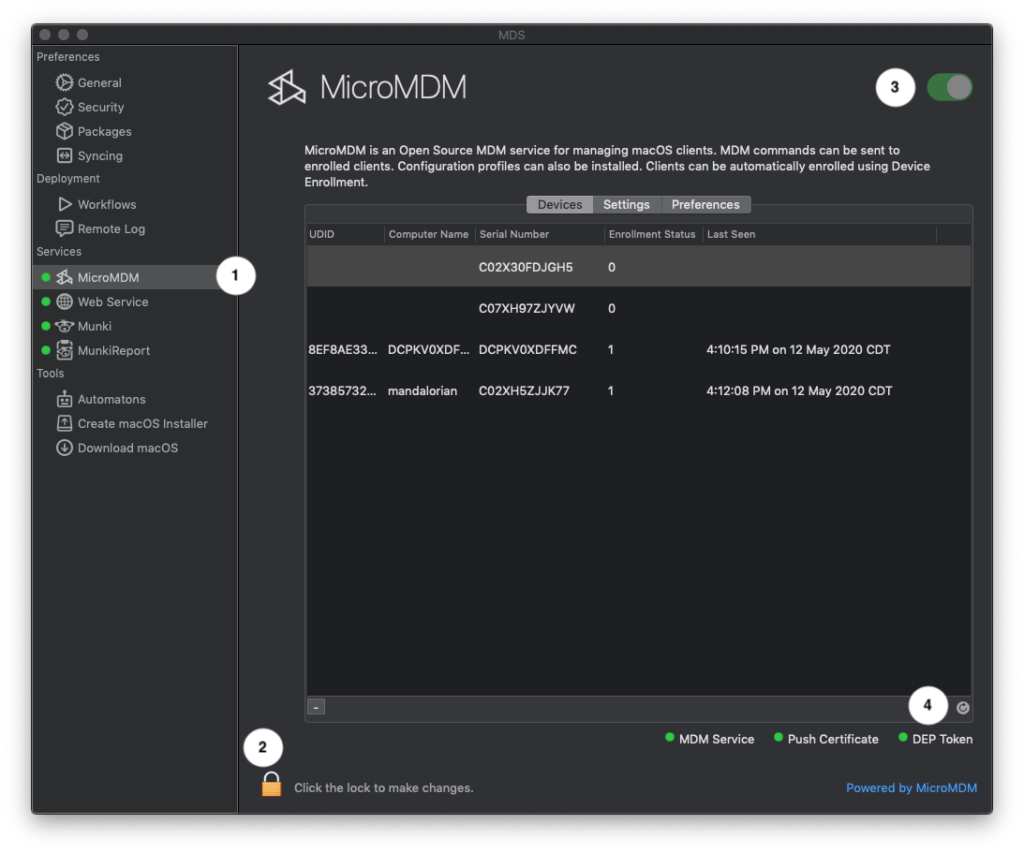
- MDS provides an interface to run MicroMDM.
- To set up MicroMDM you may need to first click the icon to unlock.
- Once unlocked, click the toggle switch to turn on the MicroMDM service.
- Once MicroMDM is set up and machines are enrolled, refresh the Devices list to view information on them.
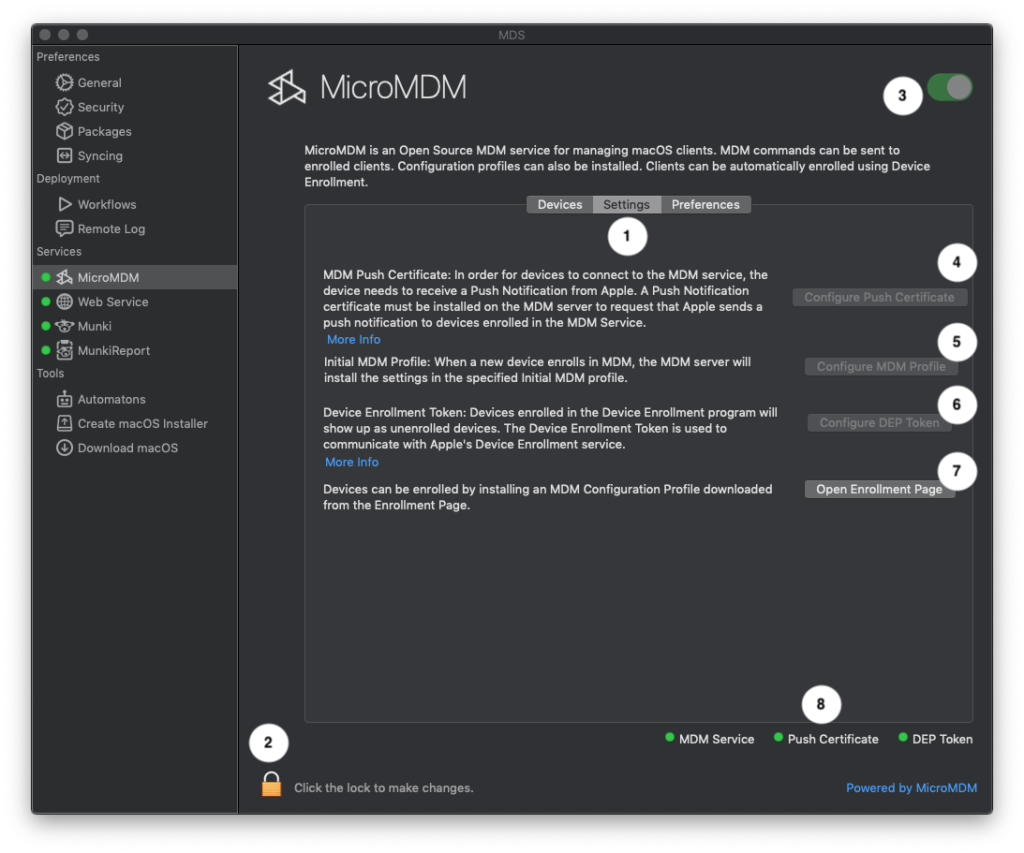
- MicroMDM Settings is the area to enter what is needed to set up the MDM service.
- Click the icon to unlock if needed before proceeding.
- After unlocking, click the toggle switch to start the service if it is not running.
- Configure Push Certificate: In order to send MDM commands it is required to have a signed Push Notification Request. This feature will save a file for this and provide instructions to get it signed by Twocanoes Profile. Note that this requires a support plan.
- Configure MDM Profile: This feature can be used to configure the components of a deployment enrollment profile including Resources, User Account creation, and other options similar to to those in an MDS workflow, as well as options to skip sections of macOS Setup Assistant.
- Configure DEP Token: In order to use the Initial MDM Profile mentioned above, this feature will export a public key to be used in Apple Business Manager or Apple School Manager, then import the DEP token issued by Apple.
- Once the MDM service is configured, click Open Enrollment Page to see the URL in a browser to use for enrolling devices.
- Status indicators will turn green to indicate when each component of MDM is activated or set up.
When MicroMDM is set up, visit the enrollment page on a target device to download the enrollment profile. Or include the enrollment profile in an MDS Workflow. Once a device is enrolled, select the device in the Devices list, then use the MDM menu in the menu bar to send MDM commands.
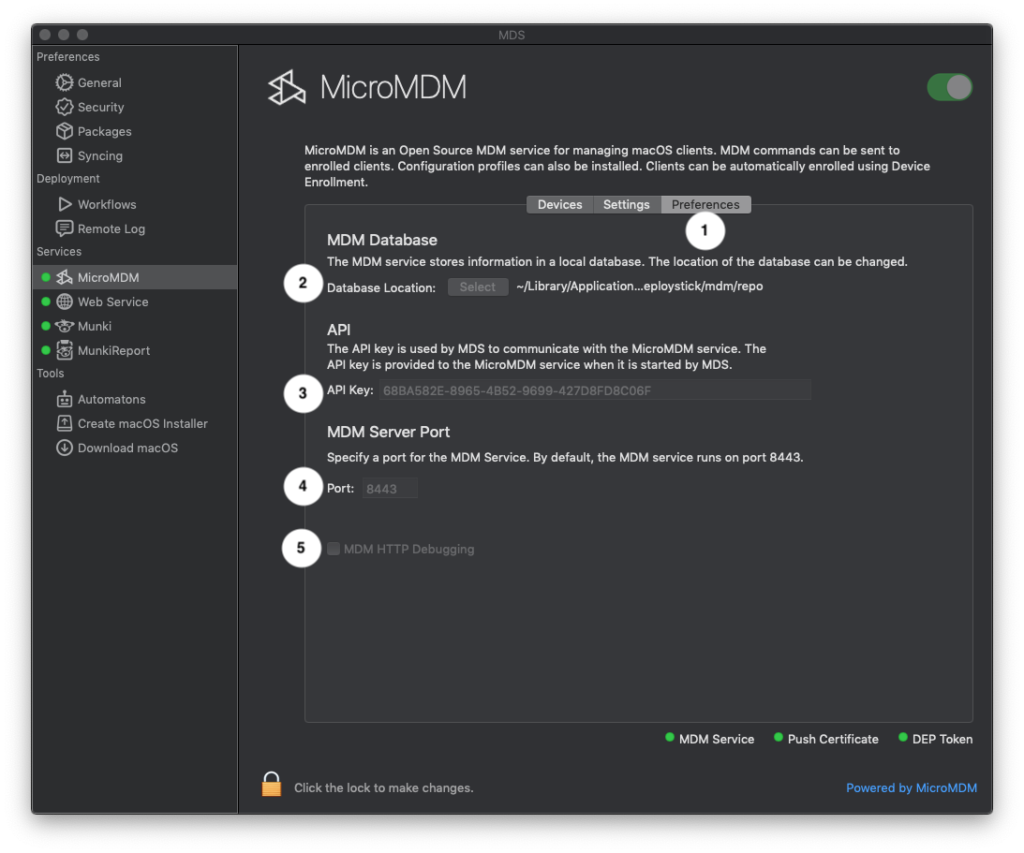
- MDM Preferences manages options for the MicroMDM service, but these options often may not need to be changed.
- Database Location: This shows the location of the database that MDS creates for the MDM service. Change this only when necessary.
- API key: MDS communicates with the MDM service using an API key that is auto-generated. Change this only when necessary.
- MDM Server Port: Set the port to be used for the MDM service.
- MDM HTTP Debugging: Turn on verbose information that can be displayed by going to menu bar > Window > Show Log. This will show information on communications with the MDM service.
Web Service
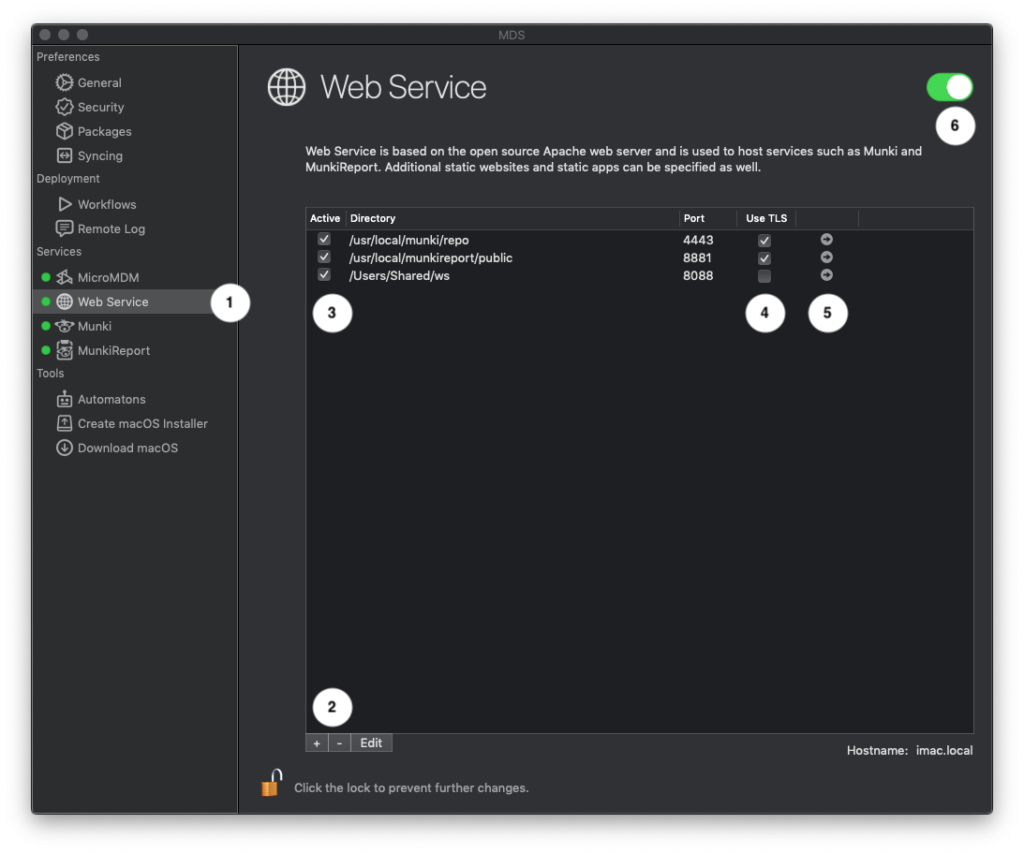
- MDS can run several web services such as Munki and MunkiReport, however it can also create additional services for making files available from a URL that can be useful when building workflows or running workflows from a disk image instead of saving them to a flash drive.
- Click the plus button to add a new web service.
- View the list of existing web services and click the checkbox to turn individual services on or off.
- After configuring Security Preferences in MDS, click “Use TLS” to make the web service secure.
- Click the arrow button for each service to load its URL in a browser.
- Click the toggle button to turn all current web services off or on.
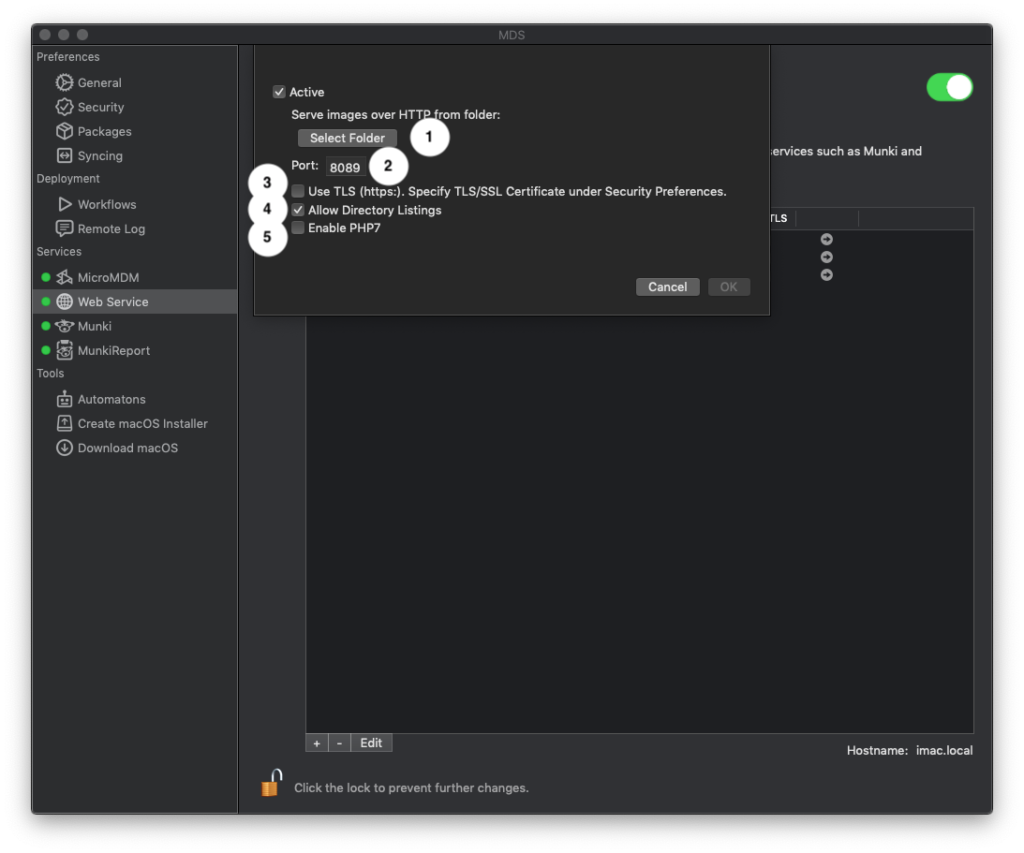
- When adding a new web service, select a folder, such as a location where one has saved workflows to disk image.
- Change the port for the web service, or leave the auto-selected value.
- Use TLS if needed to make the web service secure.
- Select if relevant to allow or disable a directory listing to show a list of all content in the selected folder.
- Enable PHP if the folder will contain PHP script to be run.
All web services will remain running even after quitting MDS or logging out the current user from macOS. Use the toggle switch to turn of web services when desired.
Munki
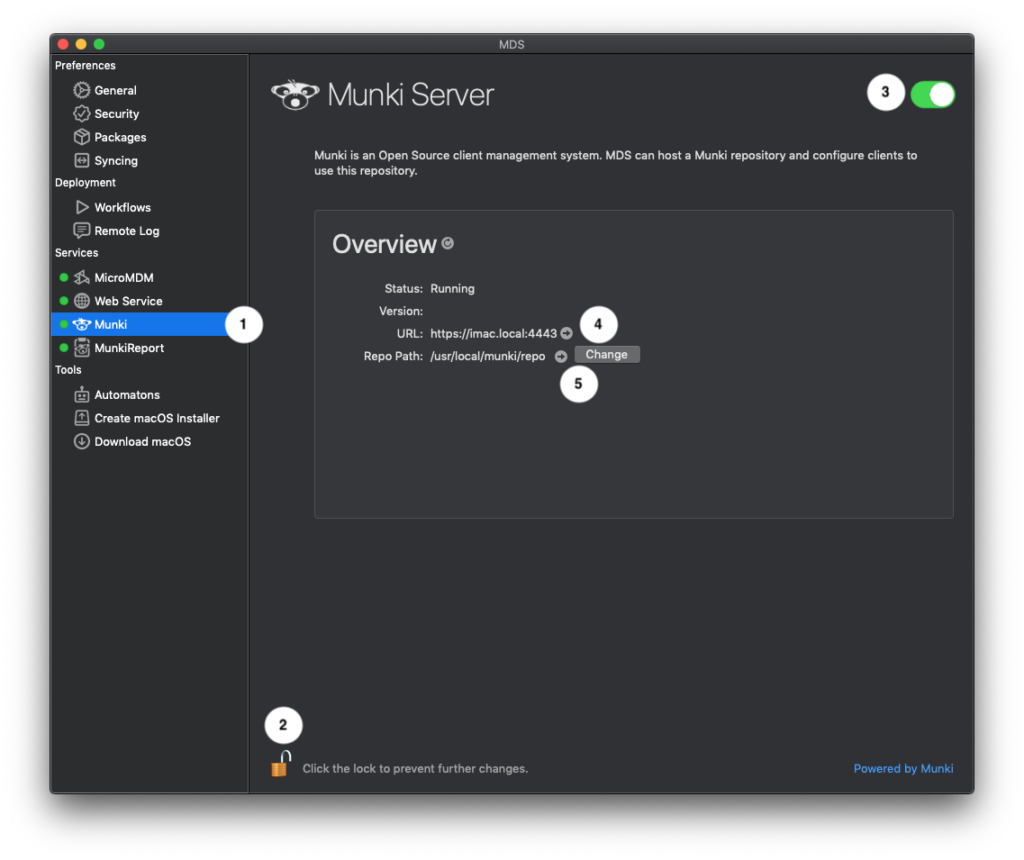
- Munki is a web service that requires additional setup.
- Click the icon to unlock if necessary.
- Click the toggle switch to start the Munki service. If Munki has not yet been installed, this will prompt with information to download and install Munki Tools, then a new Munki repository will be created when the service is started.
- Click the arrow to load the Munki service URL in a browser. This will use HTTPS if a certificate is created in MDS Security Preferences.
- If there is an existing Munki repository or if the location needs to be changed, click the Change button to select a new location. Or click the arrow button to go to the current repository location.
MunkiAdmin
To configure the content for the Munki repo, go to the MDS Tools menu and select “Open MunkiAdmin”. Instructions will be provided to download MunkiAdmin if needed.
MunkiReport

- MunkiReport is a web service that also has its own setup area.
- Click the icon to unlock if needed.
- Click the toggle switch to turn on the service once configured.
- Click the arrow button to load MunkiReport in a browser.
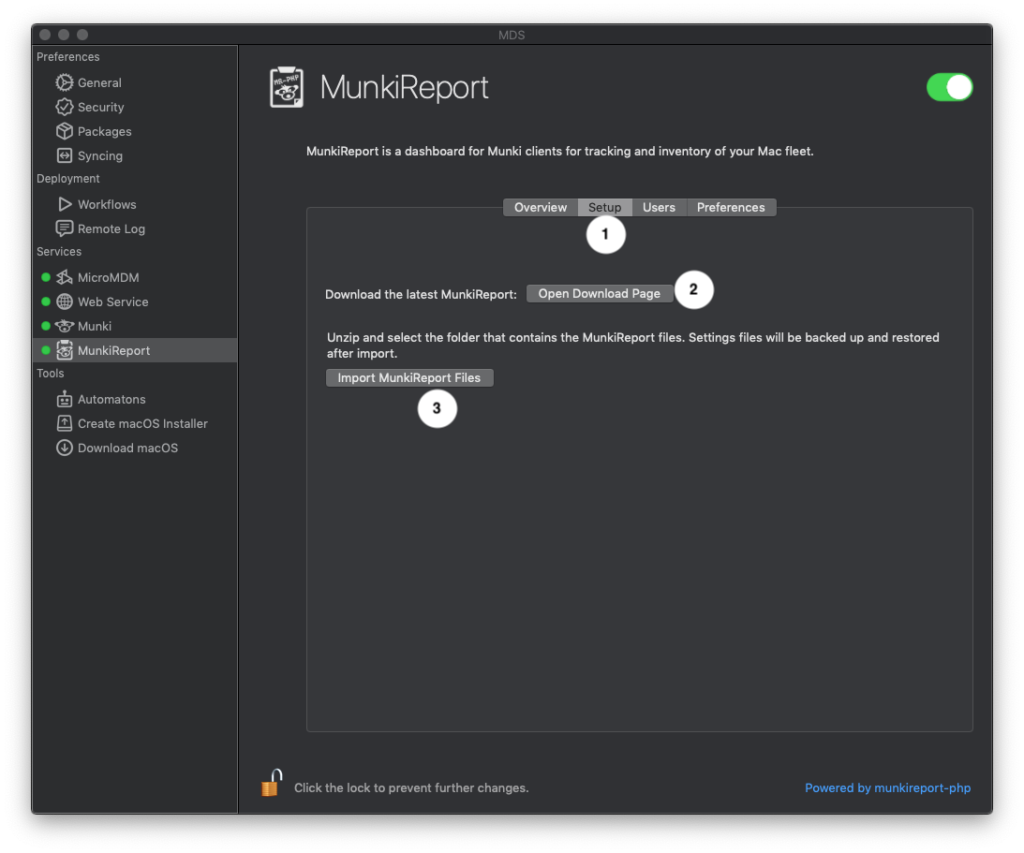
- Go to the Setup tab before starting MunkiReport.
- Get the needed setup files but clicking the button to open the download page.
- Once the setup files have been downloaded, click to import the setup files.
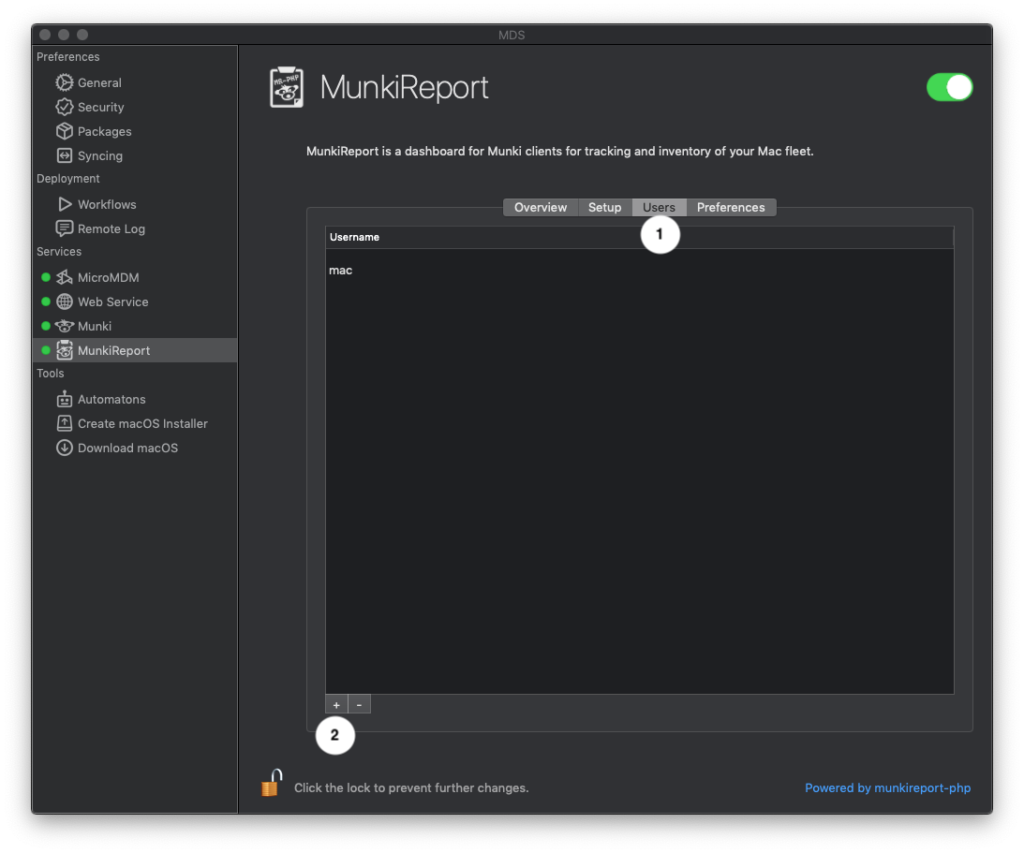
- Once set up, go to MunkiReport Users.
- Click the plus button to create a user account to be able to log into MunkiReport in the browser.
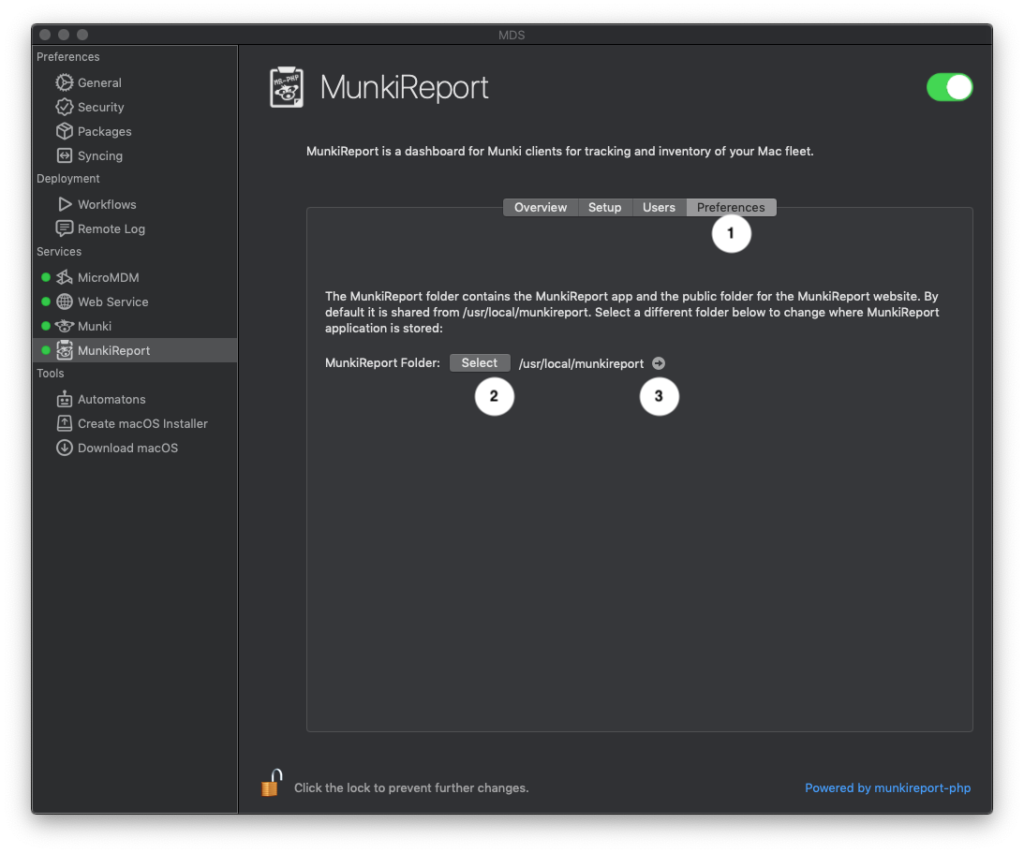
- Go to MunkiReport Preferences if needed after setting up the service to make changes.
- Select a new location for the MunkiReport folder.
- Click the arrow button to go to the current folder location.
Automatons
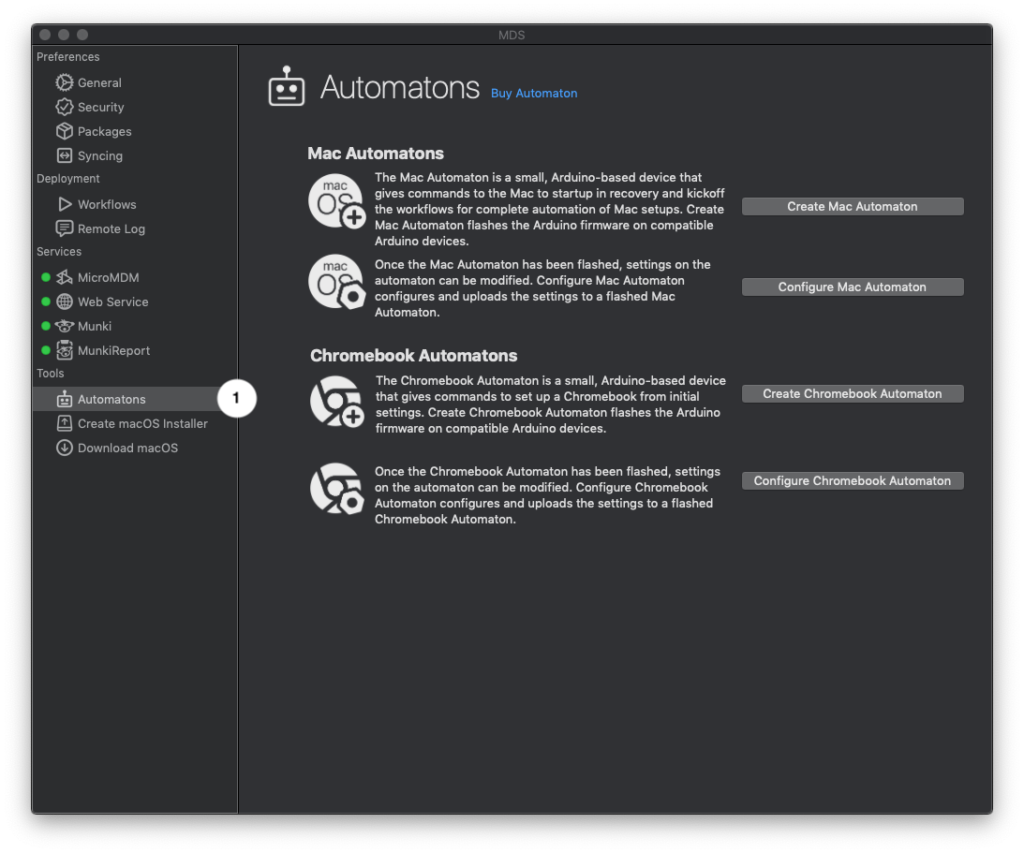
The Create Automaton function programs an Arduino ItsyBitsy to act as a keyboard when plugged into a USB port. The Automaton should be inserted at the boot selector screen. To enter the boot selector screen on a Mac, press the power button and immediately hold the option key down. The Mac will show bootable volumes. The Automaton should then be plugged into a USB port. The Automaton will issue a command-R keyboard command, which will boot the Mac into the recovery partition. The Automaton will then wait for an adjustable delay period and then issue commands to open the Terminal and launch the workflow selector (Imagr).
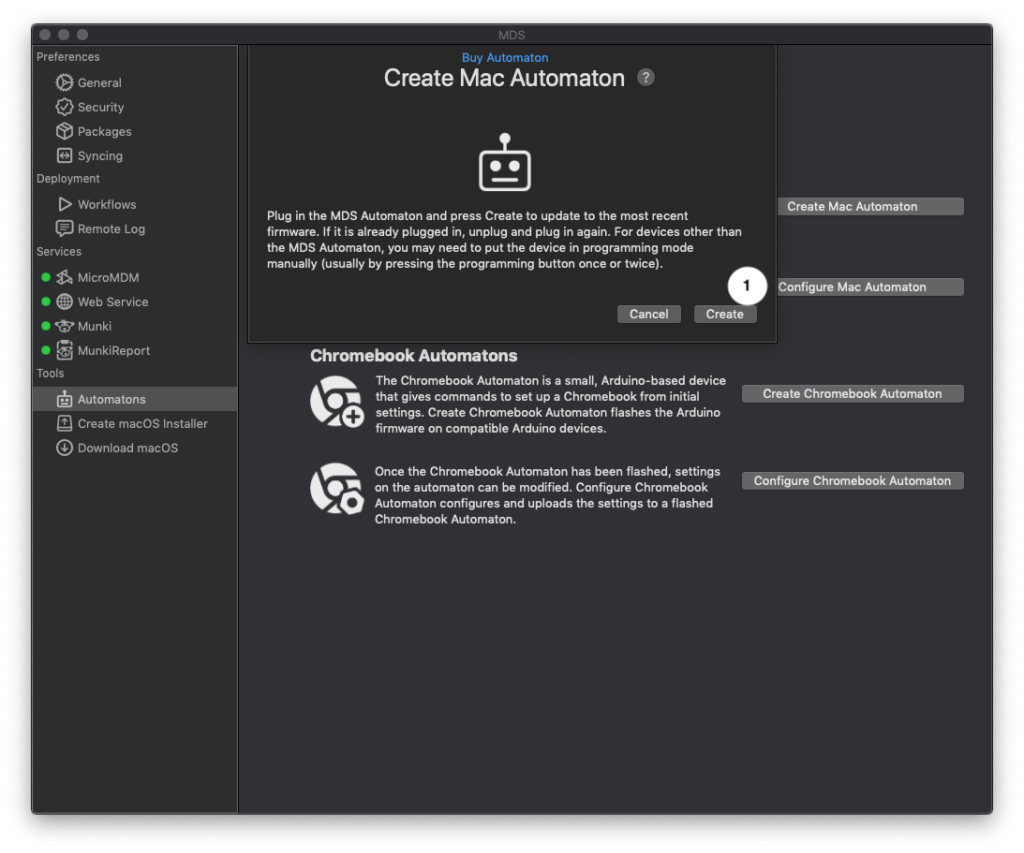
After connecting an Automaton device, click Create to program it or update its software version. Devices previously flashed with Automaton software do not require also pressing the device’s programming button.
Once the Arduino has been flashed, a success message will be displayed.
Once programming is complete, disconnect the Automaton. If left connected, it will begin pressing the keyboard strokes.
Configure Automaton
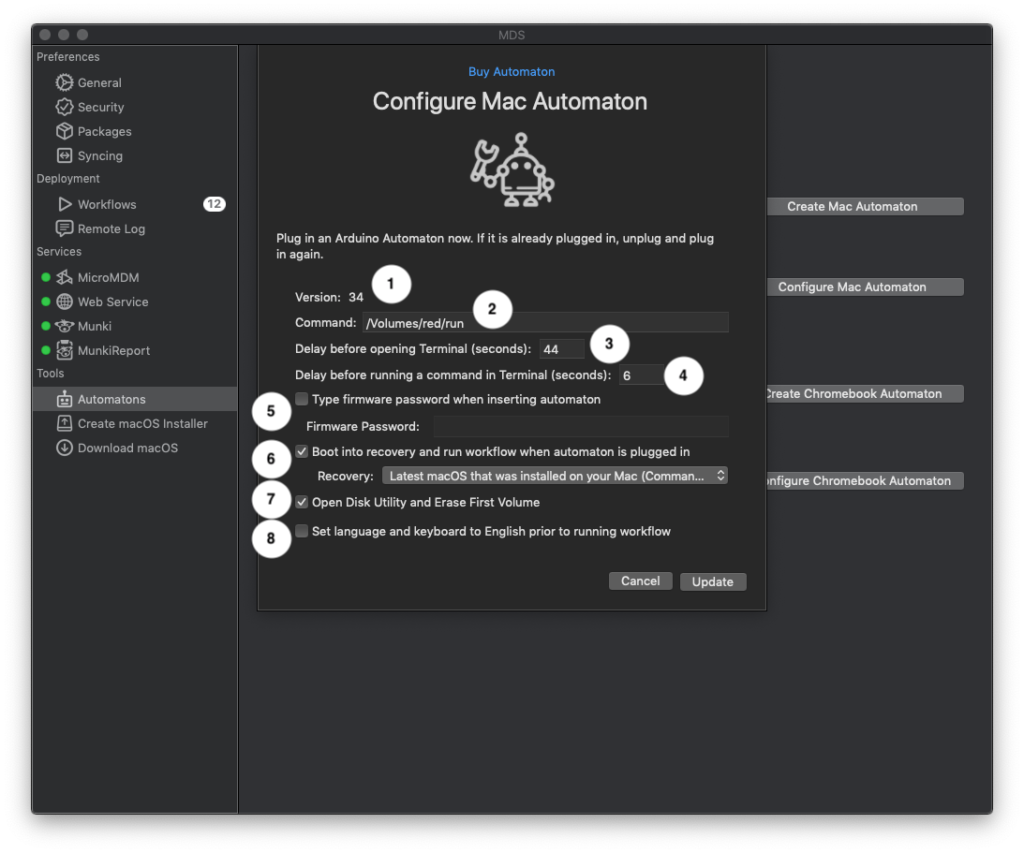
Click “Configure Mac Automaton” to change options.
The Automaton will press the command-R keyboard command a few seconds after it has been plugged in. It will then wait for a defined startup delay before issuing the commands for opening Terminal and running the specified command. These values can be adjusted using the Configure Mac Automaton sheet.
- View the current Automaton firmware version. MDS will prompt to update the Automaton if it has older firmware than what is provided in the current MDS version.
- Command: The command that will run in Terminal in the recovery partition. It should be adjusted to match the name of the external volume (replace “mds” with the current volume name). Depending on where the resources are located, the command will be different. See below for examples:
External Volume
/Volumes/mds/run
Web Server
hdiutil mount http://imac.local/mds/MDSDiskImage.dmg && /Volumes/MacDeployStickResources/run
SMB Server
mkdir /tmp/mnt && mount_smbfs smb://guest@imac.local/Shared /tmp/mnt && hdiutil mount /tmp/mnt/mds/MDSDiskImage.dmg && /Volumes/MacDeployStickResources/run
- Delay before opening Terminal: The amount of seconds between pressing command-R and issuing the commands to open Terminal to run the command.
- Delay before running command in Terminal: Additional time before the command is executed.
- Firmware password: Use only if the target Mac has been configured to use a firmware password. This setting will enter the required firmware password before booting to the recovery partition.
- Boot into recovery: Usually this should be left checked. Unchecking this option will disable the Automaton’s normal function of immediately issuing keyboard commands to boot to the recovery partition. Instead the Automaton will wait to receive commands later using its command line interface. This option can also be configured to boot to the different recovery partition options available (Note: some of these may not be available for older macOS versions):
- Latest macOS that was installed on your Mac (Command-R)
- Latest macOS that is compatible with your Mac (Option-Command-R)
- macOS that came with your Mac, or the closest version still available (Shift-Option-Command-R)
- Erase first volume: This is for use with volumes that have FileVault enabled. To avoid being prompted for a password when running the workflow, this option will instead have the Automaton open Disk Utility and delete the first volume in the recovery partition prior to running Imagr. A volume with the same name will be created so that Imagr can then proceed normally.
- Set language and keyboard to English prior to running workflow: This would only be needed in some situations for Macs with non-English settings that are found to have a conflict with how Automaton types commands.
Create Chromebook Automaton
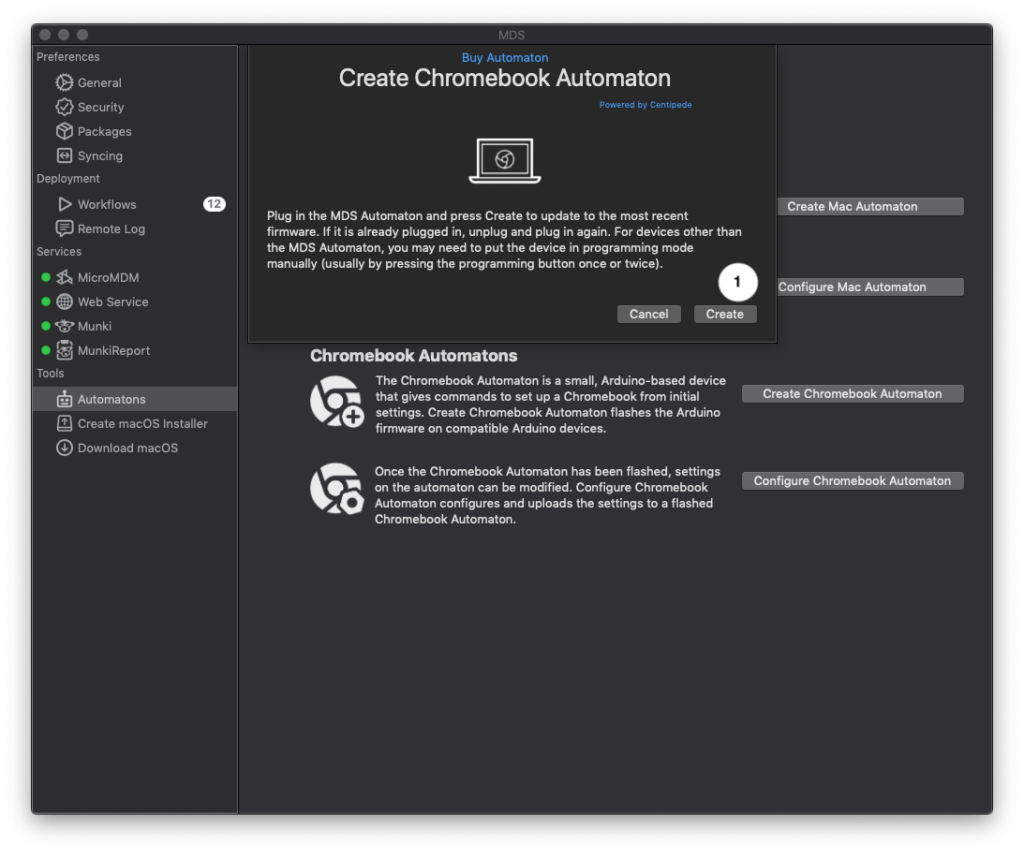
MDS can also create an Automaton for Chromebook setup. Click Create to flash a connected Arduino with this software.
Configure Chromebook Automaton
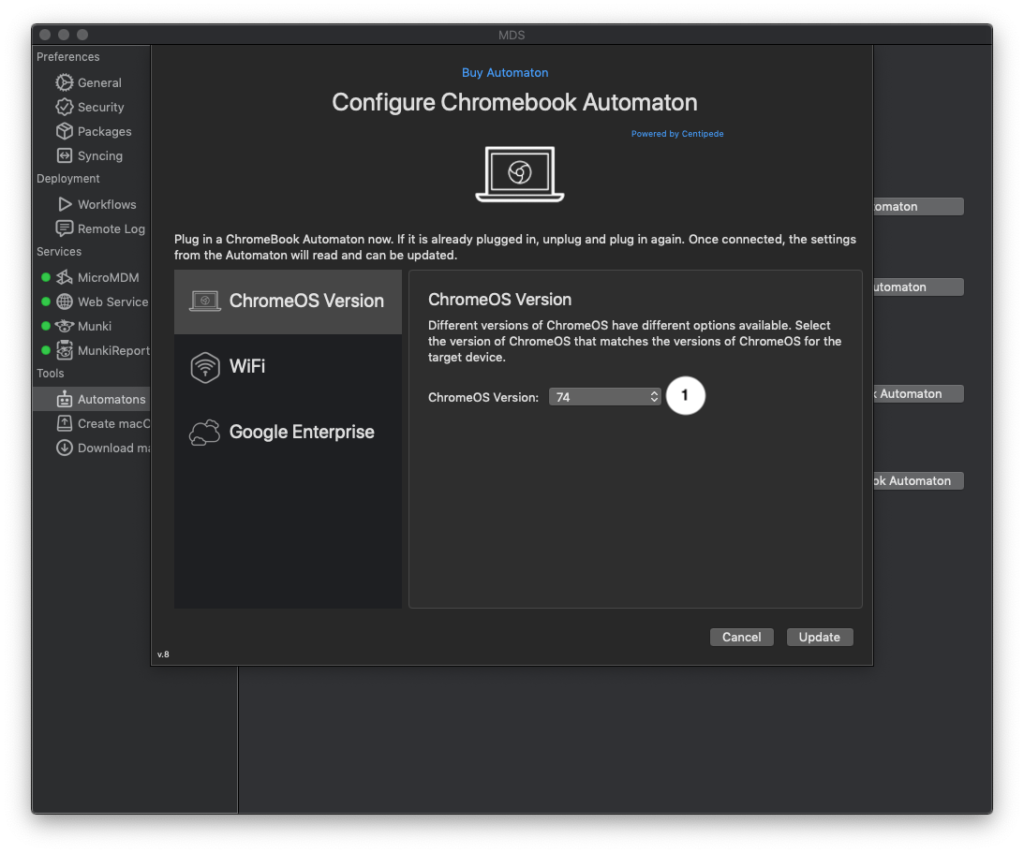
After using the Create Chromebook Automaton sheet, open the Configure Chromebook Automaton sheet to choose settings needed for the target machine(s).
Choose a ChromeOS version. This is needed to know the correct sequence of steps the Automaton will need to do. (Currently MDS only support ChromeOS Version 74).
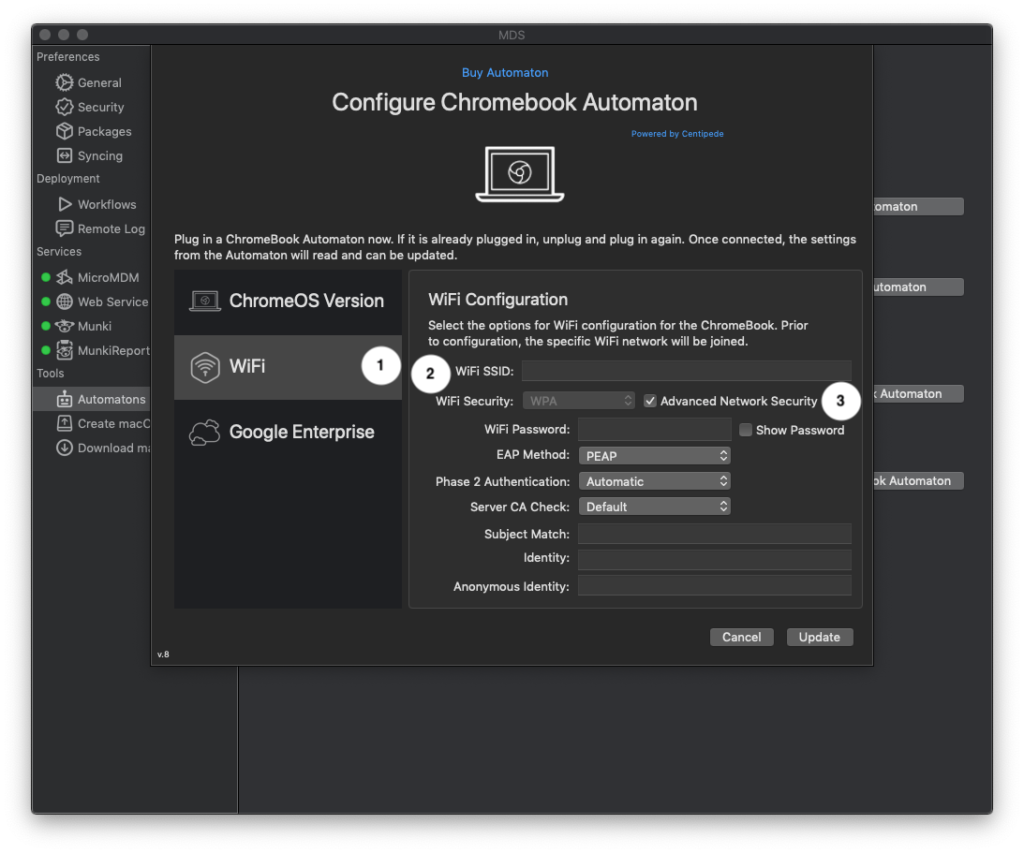
- Select the Chromebook Automaton WiFi tab.
- Enter standard WiFi settings. This will allow the target machine to be configured to join a WiFi network in order to proceed with further setup.
- If the desired WiFi network requires advanced configuration, select “Advanced Network Security” to show additional options. Enter any advanced WiFi options when necessary.
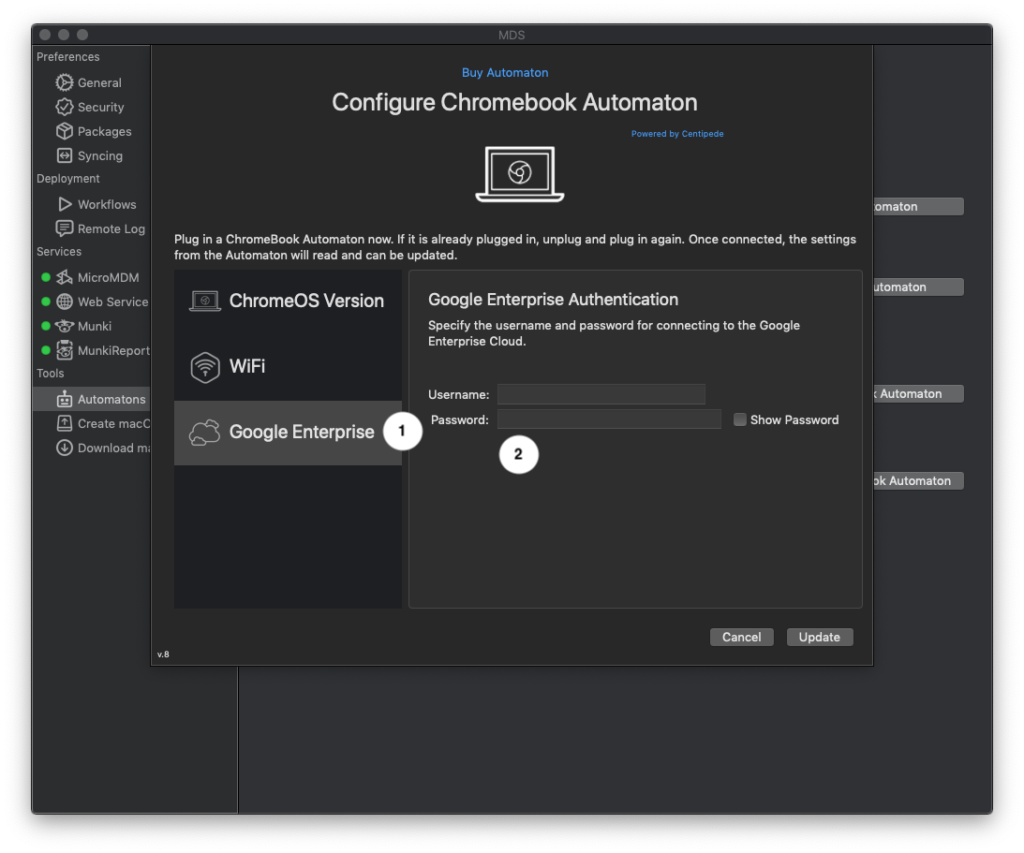
- Select the Chromebook automaton Google Enterprise tab to add credentials.
- Enter credentials: Add information for the Google account to be used to set up the target machine. Automaton does not currently support entering two-factor authentication, so this must be an account that does not have two-factor enabled.
Create Bootable Volume
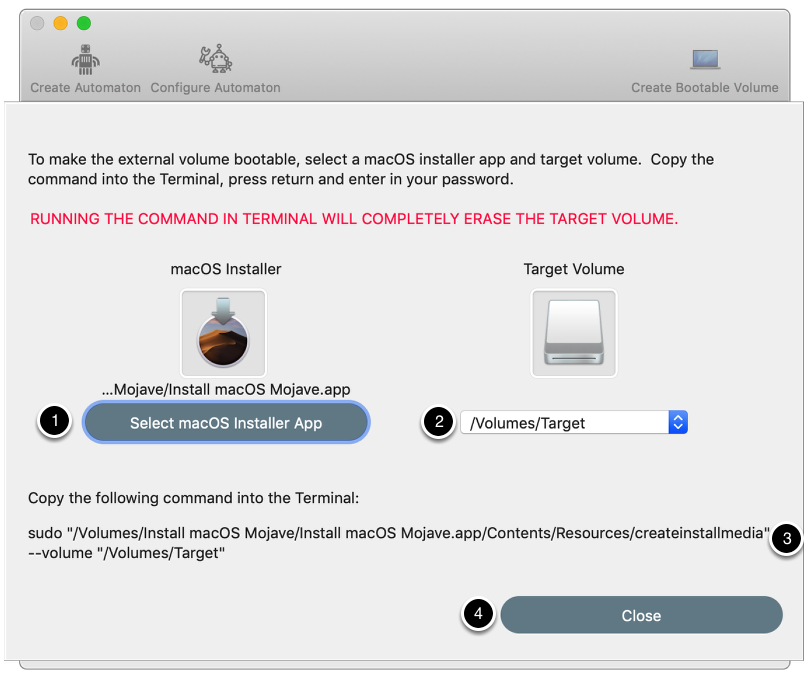
- The Create Bootable Volume sheet provides an easy way to create a bootable macOS installation on an external drive.
- Select macOS Installer App: Select this button to select a macOS Installer app downloaded from Apple. (MDS provides a feature to do this if needed.)
- Select the volume to install macOS. NOTE: THIS VOLUME WILL BE ERASED AND FORMATTED AS HFS+.
- Click the icon to unlock if needed.
- Click Create.
Note that this function is not required to restore macOS and packages. This is normally done by booting to the recovery partition. However, in some cases it is convenient to have a bootable external volume.
Running Workflows from External Volume
If you are saving an MDS workflow to a bootable external volume, be aware that the macOS installer presents the volume name as /Volumes/Image Volume rather than /Volumes/<name of volume>. This can cause issues with the workflows since the resources are accessed by the volume name. To resolve this, you can do one of two solutions:
- Create two HFS+ partitions on the external drive. Install the bootable macOS on one partition, and save the MDS resources to the other partition. You can then run the command using /Volume/<name of volume>/run/
- After installing macOS to the external volume, rename it to “Image Volume” then save the resources from MDS to the Image Installer volume. The workflow resources will then be referenced by the correct name and you can run the workflow by running /Volumes/”Image Volume”/run
Download macOS
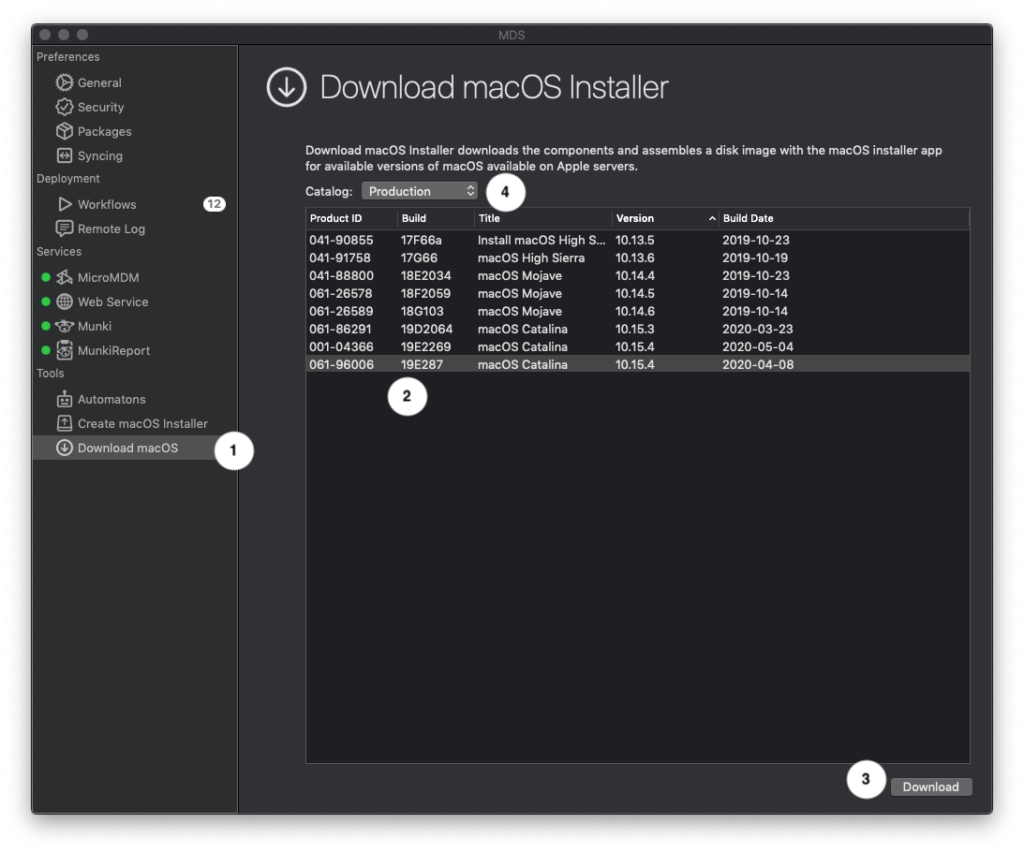
- Use “Download macOS” to get a macOS installer made available from Apple.
- Select a version of macOS from the list.
- Click Download. Depending on network connection this may take some time. A prompt will be shown when the download is complete.
- Select a different catalog of macOS installers provided by Apple, such as if a development version is needed.
While downloading, select “Show Log” from the Window menu to view status. Note that once complete, the download will be provided as a “sparseimage” file. There will also be a folder called “content” that is no longer needed once the download is complete and can be discarded.