Geohopper has two very useful features: it can easily set up and detect micro-location zones using bluetooth beacons, and it can call webhooks to connect with other services. In this post I will look at how these two features come together to connect with a home automation app called Indigo.
Indigo is an app that runs on macOS and can connect with a lot of home automation products and protocols including Insteon and X10. It can also open files or run scripts on macOS. Indigo allows you to have something that happens on one device trigger something to happen on another. Using Geohopper on a phone as the first step in this exchange, you can make the act of walking into a room turn the lights turn on. Or play music on your Mac. Or do any combination of things on a bunch of devices that can be set up to work with Indigo.
To get things going, first we need to get a bluetooth beacon and set up Geohopper.
Geohopper for iOS
https://twocanoes.com/products/ios/geohopper
Bluetooth beacons
https://store.proxidyne.com/collections/ibeacons
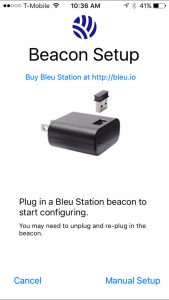 Geohopper makes it simple to set up and detect a micro-location using beacons. From the “Locations” section, tap “New”, and then “Beacon”. This will show a screen that will wait while you plug in your beacon.
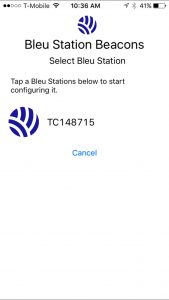
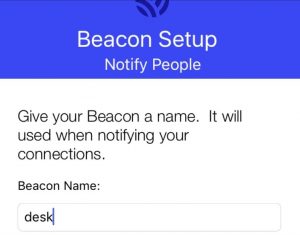
Using Proxidyne beacons, setup is automatic so you can just tap the beacon once it’s found. Then give it a name.
 Geohopper is often used to notify people when you arrive at a map location, such as a coffee shop, but this example will instead notify the Indigo app on your Mac when you move from one room to another.
So instead of entering someone’s email address to be notified, we can set up a webhook for Indigo. This means that when Geohopper detects that you move into a room, it will call some web address. When this web address is called, it will be a hook that makes Indigo do something.
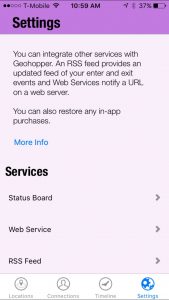
 Webhooks are set up by going to the Geohopper “Settings” section and tapping “Web Service”, then “Add Web Service…”, then typing a name/description.
To make this example simpler, the URL used will assume that both the Mac and the phone are both connected to the same wi-fi or local network. This can also work when the phone is on cell internet or some other network, but to do so you will need to set up your network to give you a web address where your Mac can be accessed from outside the local network. This is a separate challenge depending on your network setup so it will be omitted here.
 So I’ll get the local address for my Mac by going to System Preferences, then Network, and getting the address shown there. To set up this webhook we will also need to include a port number, which for this in Indigo will default to 6192. So the complete webhook URL to enter for triggering Indigo on my machine from the local network will be the local address from Network Preferences, followed by a colon and then the port number, 6192.
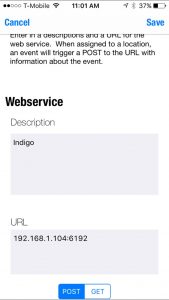 Finish adding the webhook by choosing the “POST” option near the bottom and choosing “Execute Locally”. Then tap “Save” at the top.
Now that the webhook is entered, we want to add it to the beacon we added earlier. So I can go back to the “Locations” section in Geohopper and tap on the beacon. Then scroll down and tap on “Web Services”, then tap on the name of the webhook I added, and finish by tapping “Back” and then “Save”.
Now that I’ve set up Geohopper with a beacon and a webhook, every time that my phone detects it’s moved within range of the beacon, it will call this webhook. Next I’ll set up Indigo to receive this webhook so it can do something with it.
If you don’t yet have Indigo, it’s available to buy or start a 30 day free trial from http://www.indigodomo.com. Install Indigo on your Mac. This machine will become your Indigo server so it will need to remain on to control the automation tasks.
![]() You’ll also need to get a free third party plugin available from https://github.com/flic/Beacon/
You’ll also need to get a free third party plugin available from https://github.com/flic/Beacon/
Click “Clone or download” as shown here and then “Download ZIP”.
To install the plugin, unzip the downloaded file, then double click the file inside called “Beacon.indigoPlugin”. The plugin adds a new device type in Indigo called “Beacon”.
Open Indigo and begin by going to the “Devices” section and clicking “New”. Choose “Beacon” as the Type and “Geofence Beacon” as the Model.
If “Beacon” is not shown as a choice for Type, review the steps above for downloading and installing the Beacon plugin.
Follow the instructions shown to configure the beacon info. Enter the email used for your Geohopper account and the name entered in Geohopper for the beacon. For example, if you had set up your beacon in Geohopper with the name “desk” and your email address used with Geohopper is bob@example.com, you would enter the following as your device address:
bob@example.com@@desk
Note that this is your full email address followed by two “@“ symbols followed by the Geohopper beacon name chosen earlier. Click Save to return to the main form, then enter a name for the device, and finish by closing the dialog box.
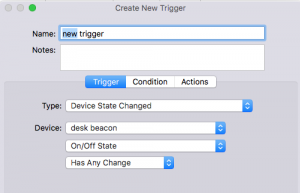 Next add a Trigger by going to the “Triggers” section and clicking “New”. Enter a name for the trigger. Keep “Type” set as “Device State Changed” and for “Device” select the beacon device you just created. Keep the next setting as “On/Off State”. To initially test this I will choose “Becomes On” for the trigger state. This will cause something to happen when Geohopper reports an “enter” event when I get near the beacon.
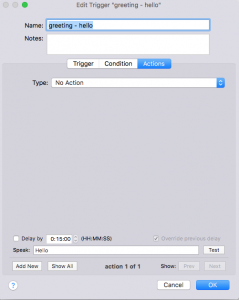
On the “Actions” tab for now I will leave this as “No Action” so I can test it. At the bottom I will enter text for the Mac to speak a message when I arrive. Next I’ll click “OK”, and then create a second new trigger to do something else when I leave. The “Trigger” tab settings will be the same as the first except that this one will use “Becomes Off” for the state. Then on the “Actions” tab I’ll enter a different message for the computer to speak when I leave, then click “OK”.
 When I move my phone out of range of the beacon, my Mac will speak the message for exit. When I return, it will speak the message for enter. I’ll test this by moving out of range and then return.
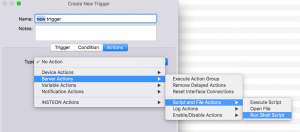
Indigo have a lot of options for what can be triggered. Once I’ve confirmed everything using the speak commands, I can create a new trigger to call a script when I either leave the beacon region or return. To do this I would set the Trigger tab device state choice to be “Has Any Change” and then give it a path to a script to be run.
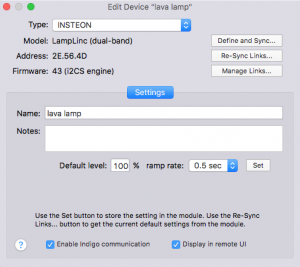
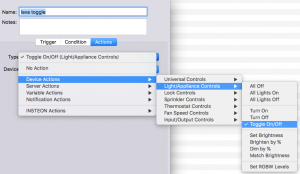
 More interesting can be to instead trigger another Indigo device. I tried plugging my lava lamp into an Insteon outlet switch and entering it as a new device. Then I can make a new trigger where I choose the beacon as the trigger device just like before, then on the “Actions” tab, choose the Type as Toggle On/Off, then choose the lamp as the Device.
Using these options I can have my presence near a beacon have my Mac either speak, run a script, or control other devices around me. Or I can continue to explore all the other options in Indigo to make complex combinations of things happen. And then if I want I can put beacons in each room that I want automated and have Geohopper and Indigo make everything happen.