SecureBoot
One of the areas that Apple has made big improvements with the release of the 2017 iMac Pro is the introduction of SecureBoot. SecureBoot is a process where the firmware validates the bootloader prior to loading. It is at the start of the chain of trust that ensures that code that gets run (drivers, kernel, applications) is known and validated. It all starts with the initial boot and with the release of the iMac Pro, Apple introduced SecureBoot to ensure that the initial bootloader is trusted.
We didn’t know a lot about SecureBoot prior to the release, but people have been seeing references to it in macOS by digging into pieces of prior software updates. Apple also announced that the iMac Pro will have a coprocessor, the T2, which is an ARM processor similar to the one in an iPad or iPhone:
Introducing the Apple T2 chip, our second-generation custom Mac silicon. By redesigning and integrating several controllers found in other Mac systems — like the system management controller, image signal processor, audio controller, and SSD controller — T2 delivers new capabilities to the Mac. For instance, the T2 image signal processor works with the FaceTime HD camera to enable enhanced tone mapping, improved exposure control, and face detection–based auto exposure and auto white balance. T2 also makes iMac Pro even more secure, thanks to a Secure Enclave coprocessor that provides the foundation for new encrypted storage and secure boot capabilities. The data on your SSD is encrypted using dedicated AES hardware with no effect on the SSD’s performance, while keeping the Intel Xeon processor free for your compute tasks. And secure boot ensures that the lowest levels of software aren’t tampered with and that only operating system software trusted by Apple loads at startup.
MacBook Pros with the TouchBar had the T1 processor and it contained a secure enclave for securely storing credentials and digital identities. When Apple announced that the iMac Pro would have the next generation T2 coprocessor, it was suspected that the iMac Pro would have secure boot as well as the features of the T1.
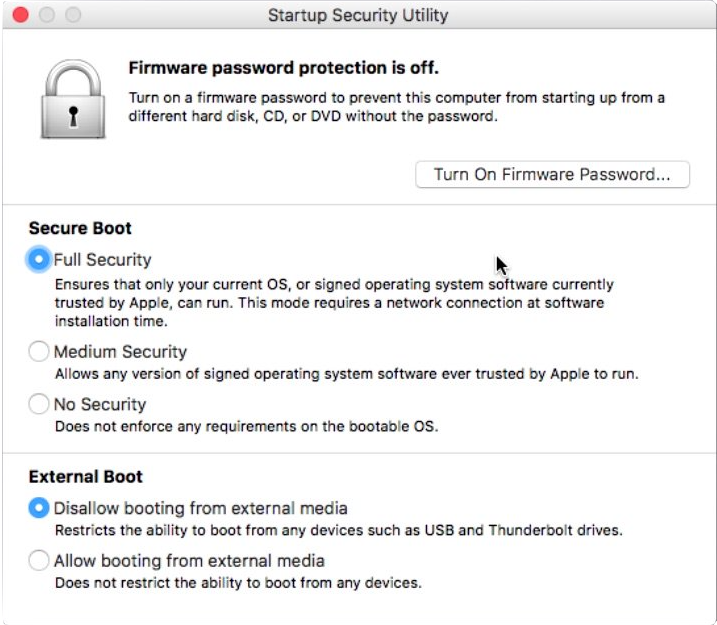
The first indication that the iMac Pro has SecureBoot is a new utility in the macOS Recovery called Startup Security Utility (located in the Utilities menu). Here is what it looks like:

SecureBoot has 3 modes:
- Full Security: Ensures that only your current OS, or signed operating system software currently trusted by Apple, can run. This mode requires a network connection at software installation time.
- Medium Security: Allows any version of signed operating system software ever trusted by Apple to run.
- No Security: Does not enforce any requirements on the bootable OS.


Since anyone with physical access to the Mac can boot into the macOS Recovery, this provides a safeguard against local attacks. It also could be that authentication is required because it causes the T2 to update what certificates are trusted by Apple and can render the Mac unbootable if it has an older OS (and force an upgrade).
By default, SecureBoot is set to Full Security. If you turn off Full Security by selecting one of the other two options and then select Full Security, you’ll be prompted to connect to the internet:

You can either connect ethernet or connect to a WiFi network by selecting the WiFi menu in the upper right corner. Once connected, you can click Try Again, and Startup Disk will open:

This part was a bit confusing until I understood what was going on. If you quit Startup Disk without clicking Restart, it will go back to Startup Security Utility with a failure. If you select the restart button in Startup Disk instead, Full Security mode will be enabled and the Mac will be rebooted into the selected OS. If you go back into the macOS Recovery and look in Startup Security Utility, it will show the Full Security has been enabled.
One of the interesting pieces to all this is how the iMac Pro validates the bootloader. Through some conversations on Twitter and some investigations, it appears that the bootloader is signed and the signature is verified when a startup disk is selected. I was unsure if this check happened at each reboot at the Full Security settings, so I did some network traces. What I discovered is that there doesn’t appear to be any checks during boot, but when you select the startup disk in the macOS Recovery, a bunch of things happen:
- Requests is sent to an Apple OCSP and CRL servers. It would be consistent to assume that it is checking to see if the current certificate used to signed the bootloader has been revoked.
- The boot.efi bootloader is copied from the selected macOS in /System/Library/CoreServices/boot.efi to the PreBoot APFS partition in <UUID>/usr/standalone/i386/boot.efi.
- The efi-boot-device variable in EFI is set to the path to the copied boot.efi.
Here is the output from nvram -p:
efi-boot-device-data %02%01%0c%00%d0A%03%0a%00%00%00%00%01%01%06%00%00%1c%01%01%06%00%00%00%03%16%10%00%01%00%00%00%00%00%00%00%00%00%00%00%04%01*%00%02%00%00%00%06,%01%00%00%00%00%00%07%0a’%0d%00%00%00%00%aesg%d2%09;%15J%a0″%9eJ%c8%93%c7%cb%02%02%04%03$%00%f7%fct%be|%0b%f3I%91G%01%f4%04.hB%06%08D%d1%93%1b%e7@%91%ed6%03%fb>%fe:%04%04%9a%00\%004%00B%003%005%008%009%005%00B%00-%005%008%00E%002%00-%004%00F%008%00E%00-%009%00B%005%00C%00-%001%00F%00E%00A%00A%002%00A%002%00B%00D%00F%004%00\%00S%00y%00s%00t%00e%00m%00\%00L%00i%00b%00r%00a%00r%00y%00\%00C%00o%00r%00e%00S%00e%00r%00v%00i%00c%00e%00s%00\%00b%00o%00o%00t%00.%00e%00f%00i%00%00%00%7f%ff%04%00
EFIBluetoothDelay %b8%0b
efi-backup-boot-device-data %02%01%0c%00%d0A%03%0a%00%00%00%00%01%01%06%00%00%1c%01%01%06%00%00%00%03%16%10%00%01%00%00%00%00%00%00%00%00%00%00%00%04%01*%00%02%00%00%00%06,%01%00%00%00%00%00%1e0%8e%0e%00%00%00%00%e2%05%853%b34AC%bf%91&%fc3%eb@%f0%02%02%04%03$%00%f7%fct%be|%0b%f3I%91G%01%f4%04.hB%b8%f5%d6\DrGF%a0%05$%cc%f9w%92%91%04%04%9a%00\%00E%00B%00A%006%00D%008%000%003%00-%006%007%006%00C%00-%004%003%003%00C%00-%00B%003%006%008%00-%000%00A%007%00E%00F%000%00E%007%00A%00A%005%002%00\%00S%00y%00s%00t%00e%00m%00\%00L%00i%00b%00r%00a%00r%00y%00\%00C%00o%00r%00e%00S%00e%00r%00v%00i%00c%00e%00s%00\%00b%00o%00o%00t%00.%00e%00f%00i%00%00%00%7f%ff%04%00
efi-backup-boot-device <array><dict><key>IOMatch</key><dict><key>IOProviderClass</key><string>IOMedia</string><key>IOPropertyMatch</key><dict><key>UUID</key><string>5CD6F5B8-7244-4647-A005-24CCF9779291</string></dict></dict><key>BLLastBSDName</key><string>disk2s2</string></dict><dict><key>IOEFIDevicePathType</key><string>MediaFilePath</string><key>Path</key><string>\EBA6D803-676C-433C-B368-0A7EF0E7AA52\System\Library\CoreServices\boot.efi</string></dict></array>%00
LocationServicesEnabled %01
csr-active-config %10%00%00%00
bluetoothInternalControllerInfo {%00%ac%05%00%00%00%00%8c%85%90%94M%d3
prev-lang:kbd en:0
previous-system-uuid 72D690BE-3798-35FF-912D-FC8C2A994D36%00
fmm-computer-name imp
efi-boot-device <array><dict><key>IOMatch</key><dict><key>IOProviderClass</key><string>IOMedia</string><key>IOPropertyMatch</key><dict><key>UUID</key><string>D1440806-1B93-40E7-91ED-3603FB3EFE3A</string></dict></dict><key>BLLastBSDName</key><string>disk1s2</string></dict><dict><key>IOEFIDevicePathType</key><string>MediaFilePath</string><key>Path</key><string>\4B35895B-58E2-4F8E-9B5C-1FEAA2A2BDF4\System\Library\CoreServices\boot.efi</string></dict></array>
bluetoothActiveControllerInfo {%00%ac%05%00%00%00%00%00%00%8c%85%90%94M%d3
backlight-level D%8b
display-config %00%00%25%01s%08%ff%ff%01%00
BridgeOSVersion 15.16.2064.0.0,0%00
Here is the top level of the PreBoot partition:
drwxr-xr-x@ 4 root wheel 128 Dec 31 22:57 .
drwxr-xr-x 7 root wheel 224 Dec 31 17:43 4B35895B-58E2-4F8E-9B5C-1FEAA2A2BDF4
Once the Mac is rebooted, the signature on the boot.efi specified in NVRAM on the PreBoot partition is verified. If this check fails, the iMac Pro should boot into the macOS Recovery (though in my testing, it continually rebooted until I held down the option key and manually booted to the macOS Recovery). I invalidated the signature on the bootloader by appending a single character to the end of the bootloader. I also verified that it booted fine if SecureBoot was completely turned off.
If the bootloader signature check succeeds, then control is passed to the boot.efi and the Mac boots normally.
Windows
One of the key areas of investigation is how Windows booting is handled by SecureBoot. Windows 10 was installed using the Boot Camp assistant, and installation proceeded as in prior installations on non-SecureBoot Macs. However, when booted into Windows 10, it didn’t show that SecureBoot was enabled. It turns out that SecureBoot on the iMac Pro is not uEFI compliant, so Windows does not show it as enabled (but rather shows that it is unsupported):
A signature of Windows bootloader is verified, and Apple SecureBoot will prevent booting one with invalid or missing signature.
Windows doesn’t show it as secure booted because Apple SecureBoot is not compatible with SecureBoot defined in UEFI specification.— Nikolaj Schlej (@NikolajSchlej) December 30, 2017
Only bootloaders from Microsoft are supported (I was curious if all bootloaders signed by Microsoft are supported):
There are two CA certificates used to generate signing keys to sign EFI images for UEFI SecureBoot: Microsoft Production CA 2011 (bootloaders from Microsoft) and UEFI CA (3rd-party bootloaders and OptionROMs). Apple only trusts the former right now, so the answer is no.
— Nikolaj Schlej (@NikolajSchlej) December 30, 2017
It is also interesting that you have to use Boot Camp assistant to enable trusting of Microsoft-signed bootloaders:
I should have added that by default Microsoft-signed bootloaders aren’t trusted, and to start trusting them you need to install Windows with BootCamp while Apple SecureBoot is enabled.
— Nikolaj Schlej (@NikolajSchlej) December 30, 2017
I did some testing on this with Winclone, and was able to create a Winclone image of the Boot Camp partition, delete the Boot Camp partition, create a MS-DOS partition using Disk Utility of a different size, and successfully restore then boot to Windows 10. SecureBoot was enabled the entire time. I am investigating further to determine how to turn on and off trusting of Microsoft-signed bootloaders without using Boot Camp assistant.
Target Disk Mode
I did some investigation of Target Disk Mode on the new iMac Pro, and while I had some issues with the correct USB-C cable (you can’t use the USB-C power supply cable from a MacBook Pro since it is USB 2), it turns out that SecureBoot settings don’t affect Target Disk Mode. Even at Full Security, I was able to put the iMac Pro into Target Disk Mode and mount it on my MacBook Pro with full access to all the attached drives and volumes.
NetBoot and NetInstall
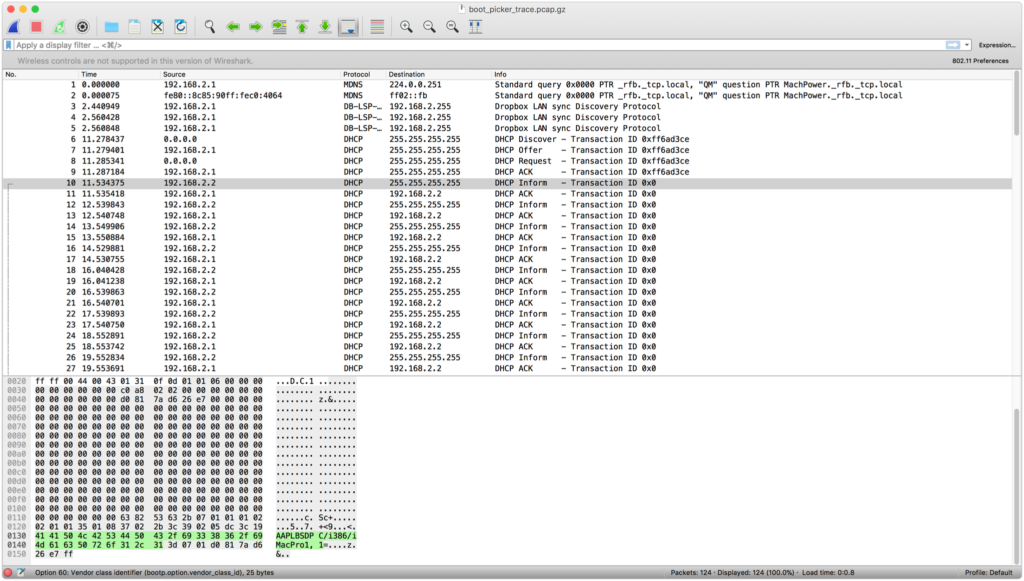
Since Macs have been able to boot from a network using NetBoot in prior models of the Mac, I tested to see how SecureBoot interacted with NetBoot/NetInstall. Even though the NetInstall icon did show up in Startup Disk (both on the macOS Recovery and when booted into High Sierra), the setting was ignored and the iMac Pro booted up into the locally installed version of macOS High Sierra. Holding down the option key during startup did not show any NetBoot / NetInstall volumes, and holding the “N” key did nothing during boot. I did see some DHCP requests for NetBoot servers, which my NetBoot server responded to:

However, nothing was displayed on the Startup Selector screen. I suspect that NetBoot in some form will be coming in a future update. Block-based imaging is pretty much dead as Apple has been encouraging administrators to use Mobile Device Management (MDM) and Device Enrollment Program (DEP) when setting up a large number of Macs, but NetBoot and NetInstall are good for running standard installers from the network and for troubleshooting.
Resetting NVRAM
Resetting the NVRAM (Command-Option P-R on boot) turns on System Integrity Protection (SIP) if it was disabled, but does not appear to have any affect on SecureBoot. The settings remain the same as before the reset.
Programmatically setting the Startup Disk
SIP was introduced in macOS 10.11. When it was enabled, you could no longer use the “bless” command line tool to select a different startup OS. You could, however, use the “systemsetup” command to select macOS versions that were 10.11 or later.
systemsetup no longer works on the iMac Pro and this feature looks like it has been removed in the build of 10.13 on the iMac Pro. When you run systemsetup with the setstartupdisk option, this error is returned:
Setting startup disk not allowed while System Integrity Protection is enabled.
You now have to disable SIP from the macOS Recovery in order to use the bless or systemsetup -setstartupdisk command.
Open Questions
- I am unclear exactly how the T2 interacts with the EFI firmware for validation of the bootloader.
- I suspect that the trusted certificate store is in the secure enclave, but I don’t have a way to verify that. I also am curious if the T2 is used to validate the signature of the bootloader or if the EFI firmware uses the T2 to decrypt the hash using the public key from the trusted certificate.
- I am also unsure where the settings are stored for enabling/disabling SecureBoot, as they do not appear in the nvram variables and survive a reset of NVRAM.
- I would also like to know how to manually validate the signature on the boot.efi bootloader.
- I would also like to know if a RSA identity is generated in the secure enclave on first setup, and what that identity is used for (this is a part of activation of an iPhone and I suspect it is also done on the new iMac Pro).
- The network traces showed some communication with activation servers (albert.apple.com) and it would be interesting to know what are in those packets and what type of validation information is sent to Apple.
Summary
SecureBoot is definitely a large change to how the Mac boots, and I expect it to appear in all Macs going forward. SecureBoot was implemented similar to how it was implemented on iOS rather than a standard of uEFI implementation of SecureBoot. I was pleased to see that Windows booting was still supported in the Full Security Setting. Most people will not even notice that SecureBoot is enabled by default since it doesn’t change setup and use for the average user. For corporate admins, the push to MDM and DEP continues with the iMac Pro, and their deployment systems will have to take into account SecureBoot and the lack of NetBoot.
There was speculation that Apple was going to force SecureBoot as the only option but as of today, you can boot into the macOS Recovery and disable SecureBoot if you want to boot other OS’s (like Linux or other OS’s that are supported on the hardware). This may happen in the future, but the ability to disable SIP has been around since 10.11 when it was introduced. I suspect that the ability to disable SecureBoot will remain for at least the medium term.
There are still some unanswered questions, but the big ones have been answered: The iMac Pro does indeed have SecureBoot, you can turn SecureBoot off, you can’t NetBoot the iMac Pro, and Boot Camp is still fully supported. The iMac Pro increases security of the Mac and I fully expect future Macs to incorporate SecureBoot.
Like this article? Follow Timothy Perfitt on Twitter (@tperfitt) and Twocanoes (@twocanoessoft) for future updates or for feedback/comments. Be sure to check out Winclone for cloning, migrating, and backing up your Boot Camp partition, as well as Boot Runner for managing the startup process on your dual boot macs.

