macOS 10.14.5 will require notarization for macOS apps to run on a Mac. I had to modify our build scripts in Xcode to add in notarization. The hard part was that the notarization had to happen in the middle of the build process. Our prior process did this:
Archive Build->Package->Add to DMG
We use Packages for easily creating distribution packages, and DropDMG for making great looking disk images. The notarization process involves uploading a copy of the app to the notarization service at Apple, then polling the service until it is complete, then downloading the ticket and “stapling” it to the app. So, our new process looks like this:
Archive Build->Upload->Poll Until Success->Staple->Package->Add to DMG
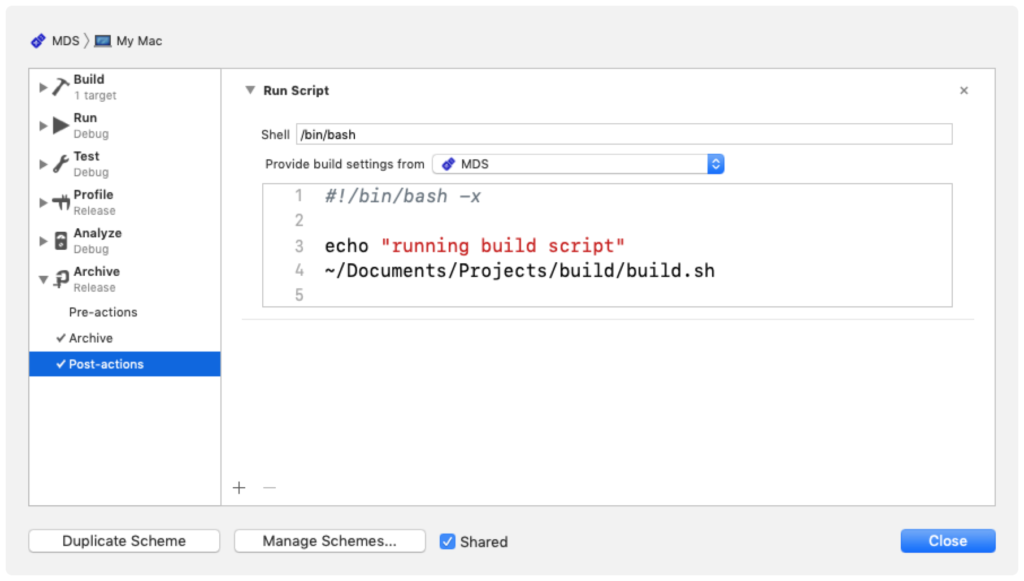
I also took the opportunity to standardize the build script across all of our apps. This meant having a flexible system for different needs on different apps. To accomplish this, every app calls the build script from a postaction in Xcode.

The build.sh doesn’t contain any passwords, but rather includes them using a source statement:
echo "starting..."
current_path=$(dirname "$0")
source "${current_path}/app_store_creds.sh"
The app_store_creds.sh is a simple script that defines all of the credentials. It is located next to the build script. This file is not added to source control.
#!/bin/sh

app_store_id="appstoreusername@mac.com"
app_store_password="app_specific_password"
The app is then zipped up. I had lots of problems with just using zip since the notarization service kept rejecting it. I ended up using ditto, which seemed to produce zips that the notarization service accepted. I also used all the Xcode environment variables and the Info.plist for naming.
local_apps_dir="${ARCHIVE_PRODUCTS_PATH}/${LOCAL_APPS_DIR}"
app_path="${local_apps_dir}/${FULL_PRODUCT_NAME}"
product_name=$(/usr/libexec/PlistBuddy -c "Print CFBundleName" "${app_path}/Contents/Info.plist")
zipped_app="${product_name}.zip" echo "Compressing ${FULL_PRODUCT_NAME} to ${zipped_app}" pushd "${local_apps_dir}"
ditto -c -k --rsrc --keepParent "${FULL_PRODUCT_NAME}" "${zipped_app}" 2>&1 > /dev/null popd
The app is then upload to the notarization service. I used a UUID for the primary-bundle-id since UUIDs are great for uniquely identifying things. Universally. The primary-bundle-id is just used for communicating back to me which upload it was. I don’t use it.
I pull out the RequestUUID from the response. This will be used later for the polling section.
uuid=$(uuidgen)
echo "Uploading to apple to notarize"
notarize_uuid=$(xcrun altool --notarize-app --primary-bundle-id "${uuid}" --username "${app_store_id}" --password "${app_store_password}" --file "${local_apps_dir}/${zipped_app}" 2>&1 |grep RequestUUID | awk '{print $3'})
The script then takes the RequestUUID and polls 20 times every 30 seconds until the notarization finishes. Exit codes didn’t seem to help much with the “xcrun altool –notarization-info” command, so I do a simple parse for “Invalid” or “success”. Note the use of “=~” and double “[[“/”]]” to determine if a string contains a string in bash. I thought that was a clean way to do it.
success=0
for i in 1 2 3 4 5 6 7 8 9 10 11 12 13 14 15 16 17 18 19 20; do
    echo "Checking progress..."
    progress=$(xcrun altool --notarization-info "${notarize_uuid}"  -u "${app_store_id}" -p "${app_store_password}" 2>&1 )
    Echo "${progress}"

    if [ $? -ne 0 ] || [[  "${progress}" =~ "Invalid" ]] ; then
        echo "Error with notarization. Exiting"
        break
    fi

    if [[  "${progress}" =~ "success" ]]; then
        success=1
        break
    else
        echo "Not completed yet. Sleeping for 30 seconds"
    fi
    sleep 30
done
If the process is successful, success is set to 1 and the app is stapled and the path of the notarized app is passed to a stage 2 script that packages it up and adds it to a dmg.
if [ $success -eq 1 ] ; then

    echo "Stapling and running packaging up"
    xcrun stapler staple "${local_apps_dir}/${FULL_PRODUCT_NAME}"
    "${current_path}"/build_post_notary.sh "${local_apps_dir}/${FULL_PRODUCT_NAME}"

fi
Here is the entire script. If you populate the app_store_creds.sh with your app specific password for the app store, and then add build.sh to your post-action in the xcode scheme, it should work for you too!
If you like this article and want to hear more, sign up for our newsletter or follow us on social media.
