Related Resources
- SSO Home: Single Sign-On Extension and Platform SSO for macOS and iOS
- Tutorial: Building a Single Sign-On Extension on iOS
- Article: Understanding the Single Sign-On Extension
- Code: Sample SSOE Github Project
Initial Setup
Project Setup
A Single Sign On Extension requires a container app and a extension. When the app is installed, the extension is register to be called as needed. This section will show how to create the project, the app and the single sign on extension. The container app does not need to have any functionality related to Single Sign-On, but is required by the extension.
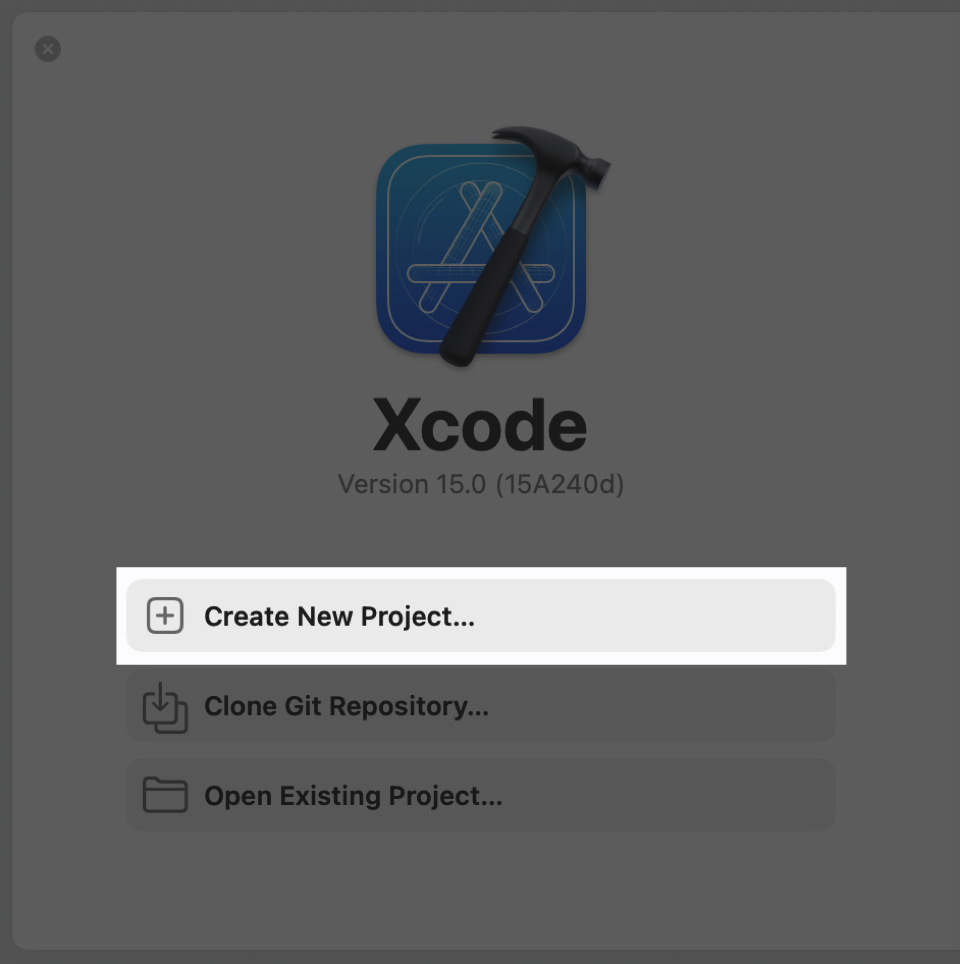
Step 1
Open Xcode and create a new project.
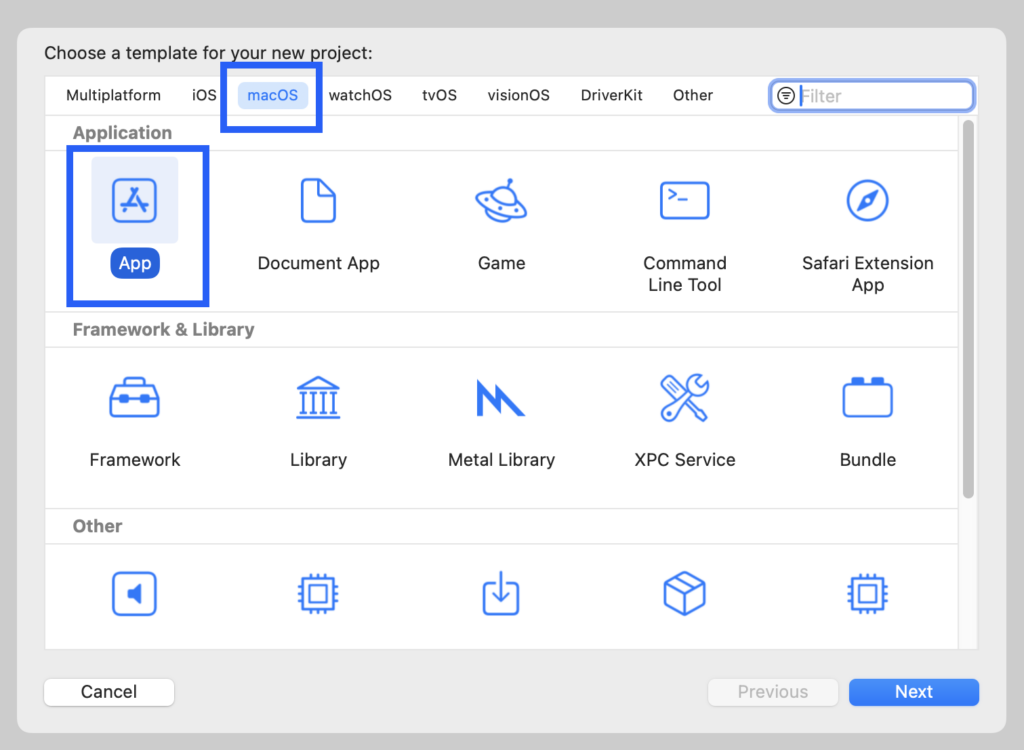
Step 2
Select the template type App for macOS.
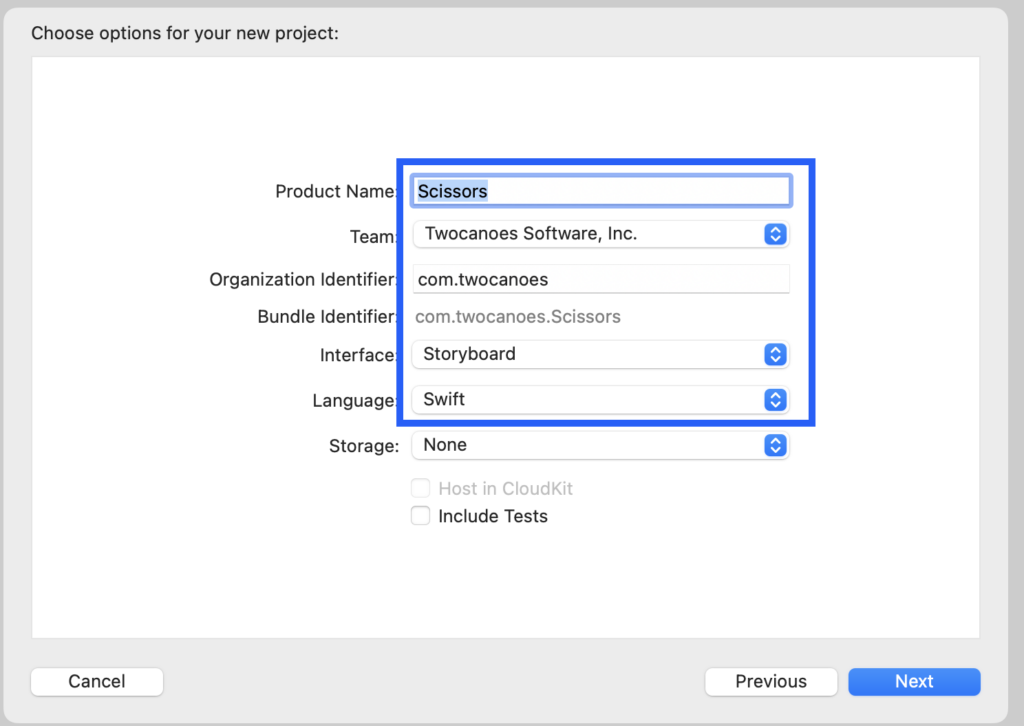
Step 3
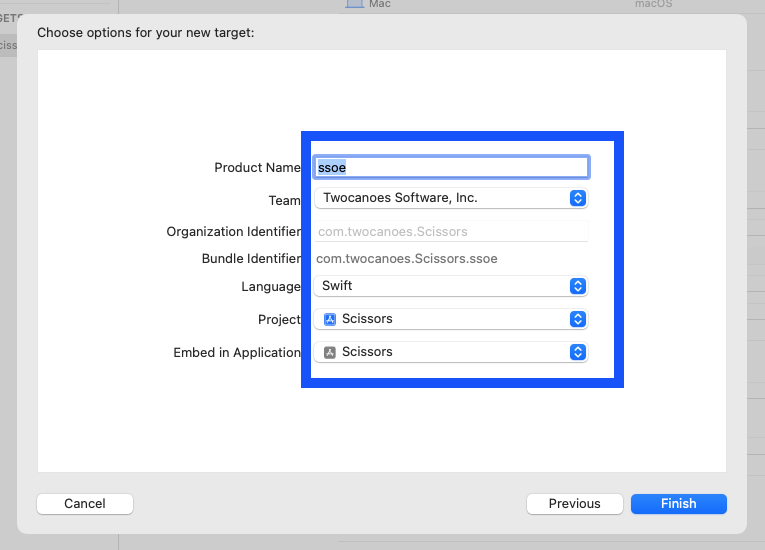
Name the app Scissors and set up the app to use Swift and Storyboards.
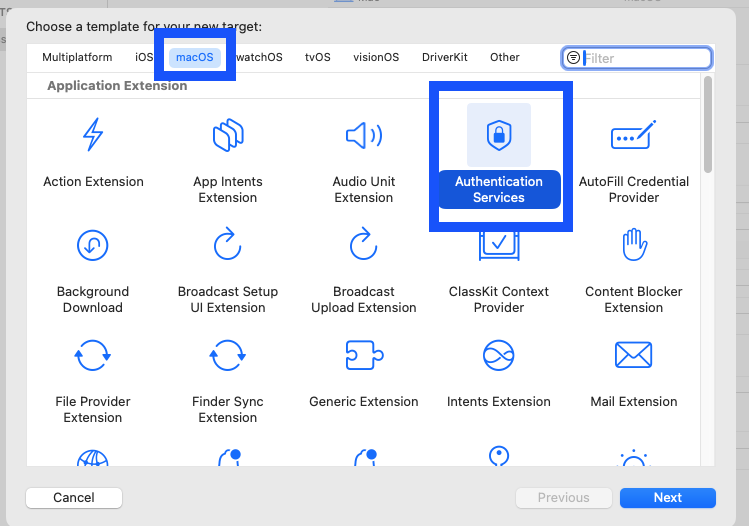
Step 4
After the project window opens, the single sign-on extension must be added. Selece File->New-> Target…. Select Authentication Services under Application Extensions and select Next.
Step 5
Name the extension ssoe and select Finish.
Step 6
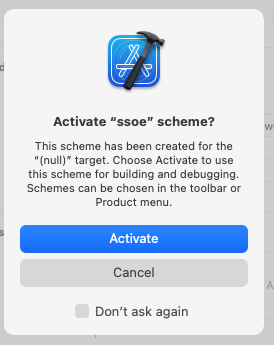
Xcode will detect that an extension and offer to add a scheme for building the extension. Select Activate.
Step 7
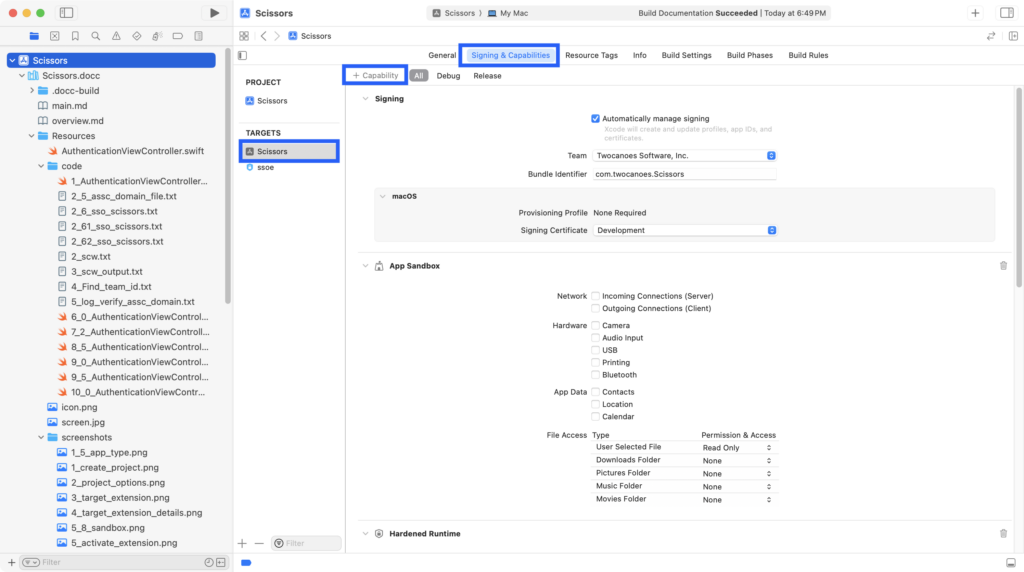
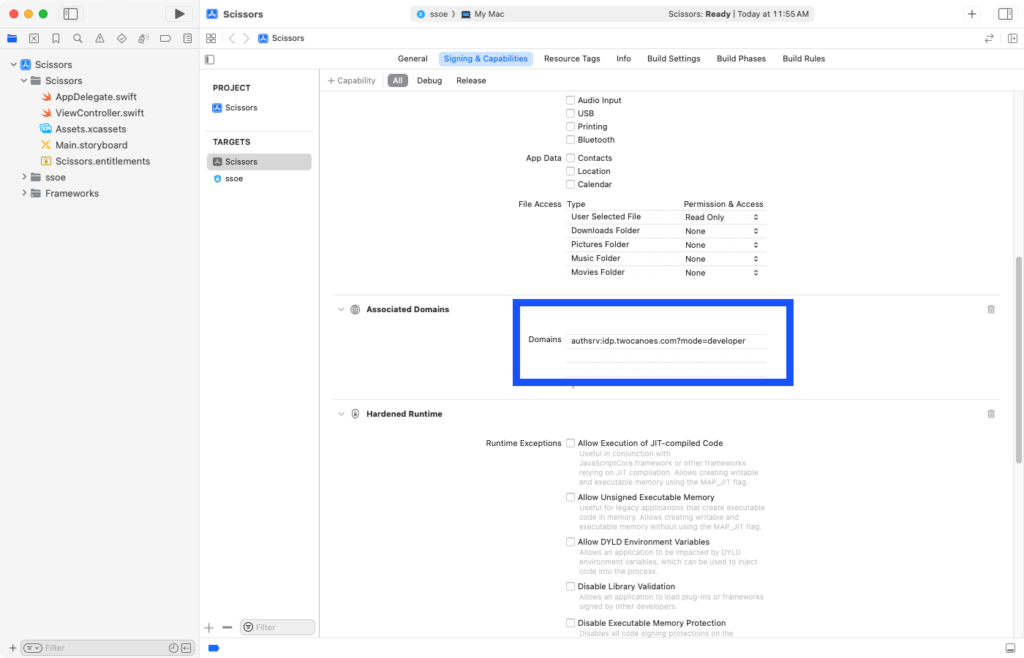
As mentioned in the prior chapter, the Single Sign-On extension must be associated with a domain. This requires an Associated Domain entitled. Make sure the Scissors target is selected and not the ssoe target and select Signing & Capabilites, then select + Capability.
Step 8
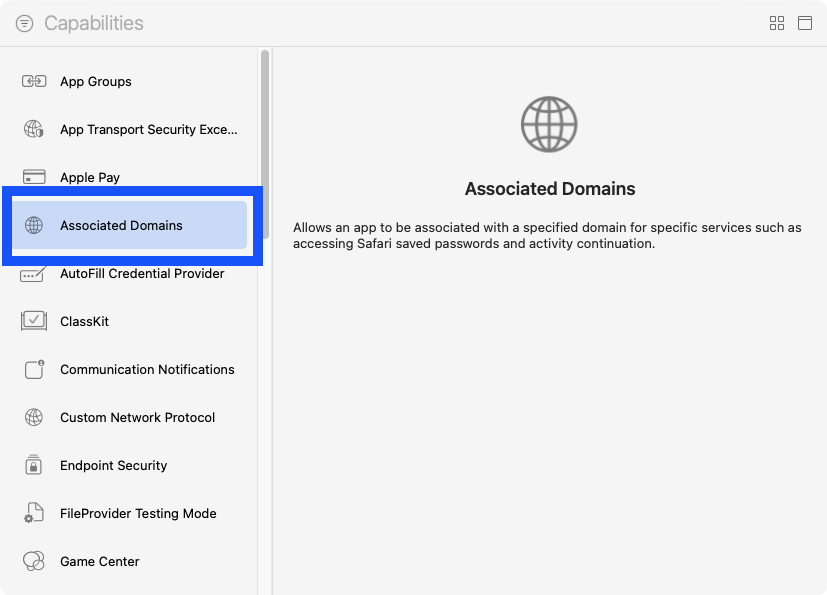
Select Associated Domains
Step 9
Under the new entry for Associated Domains, select + and enter “authsrv:idp.twocanoes.com?mode=developer”. As mentioned in the prior chapter, the extension does not check this hostname directly in production, but checks the Apple Content Distribution Network (CDN). During development, adding “?mode=developer” to the hostname will allow the extension to check the hostname directly.
Step 10
Developer mode must be activated for associated domains. Open Terminal and run sudo swcutil developer-mode -e true to turn on developer mode.
swcutil developer mode
sudo swcutil developer-mode -e true
Step 11
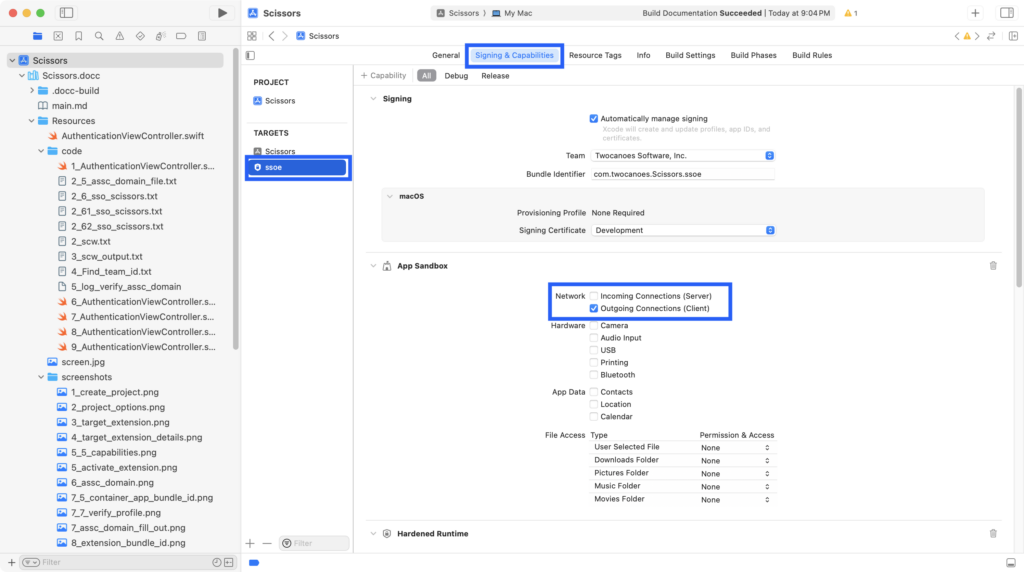
The extension will be contacting the network resources so it needs access to the network. Make sure the ssoe target is selected and select Network Outgoing Connections (Client) to allow access to the network.
Step 12
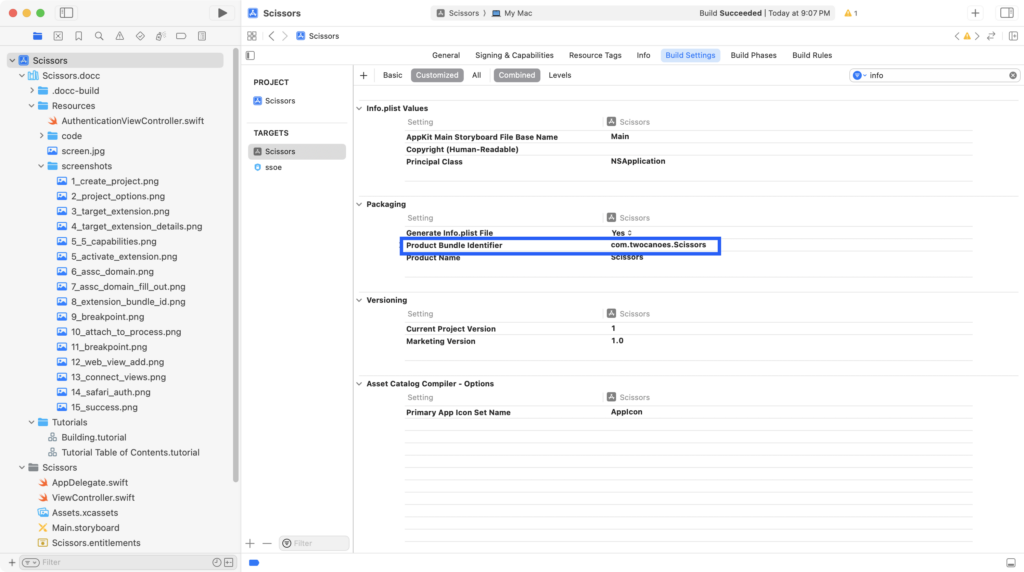
Determine the container app bundle identifier by selecting Build Settings in the container app target. In this tutorial, the bundle app ID is com.twocanoes.Scissors. The container bundle app ID is required in the next step.
Step 13
In order for the extension to be activated, a file must be present at a specific location on the web server located at the domain name specified above (in this tutorial, “idp.twocanoes.com”). The file must be available at https://hostname/.well-known/apple-app-site-association and must contain very specific information. The entry under “apps” must be in the following format: TEAM_ID.CONTAINER_APP_BUNDLE_ID The Team ID can be found the developer portal and on the developer signing certificate. The Container App bundle identifier was discoverd in the prior step. If you are unsure of your team identifier, it can be verified in an upcoming step. Update the file on the webserver to match these values. You will need to work with the administrator of the server to upload this file.
Associated JSON File
{
    authsrv =     {
        apps =         (
            "UXP6YEHSPW.com.twocanoes.Scissors",
        );
    };
}
Step 14
The file can be verified using the swcutil command as shown. The command swcutil requires administrator rights so the command must be run with the sudo command. Provide the “dl” option and the hostname of the identity provider. This must be the same as the hostname provided in step 8. If the Associated Domain file has been uploaded to the correct location on the webserver, the JSON file contents will be shown.
swcutil output
mdscentral-2:~ tperfitt$ sudo swcutil  dl -d idp.twocanoes.com
Password:
{
    authsrv =     {
        apps =         (
            "UXP6YEHSPW.com.twocanoes.Scissors",
        );
    };
}
Step 15
A configuration profile must to deployed with an MDM service for the extension to be activated. Note the configuration profile cannot be manually installed.
Line 11 must be updated to match the bundle identifier of the extension. Line 28 must be updated to match the URL that will used caught and send to the extension. The hostname of URL must match the hostname in Step 8.
MDM Profile
<?xml version="1.0" encoding="UTF-8"?>
<!DOCTYPE plist PUBLIC "-//Apple//DTD PLIST 1.0//EN" "http://www.apple.com/DTDs/PropertyList-1.0.dtd">
<plist version="1.0">
<dict>
<key>PayloadContent</key>
<array>
<dict>
<key>AuthenticationMethod</key>
<string>Password</string>
<key>ExtensionIdentifier</key>
<string>com.twocanoes.Scissors.ssoe</string>
<key>PayloadDisplayName</key>
<string>Single Sign-On Extensions #1</string>
<key>PayloadIdentifier</key>
<string>com.apple.extensiblessoD5AC0626-265B-406F-9497-567D8CD58B0A</string>
<key>PayloadType</key>
<string>com.apple.extensiblesso</string>
<key>PayloadUUID</key>
<string>CDC67F3E-0687-4796-95B0-A61EF6F3F9A7</string>
<key>PayloadVersion</key>
<integer>1</integer>
<key>TeamIdentifier</key>
<string>UXP6YEHSPW</string>
<key>Type</key>
<string>Redirect</string>
<key>URLs</key>
<array>
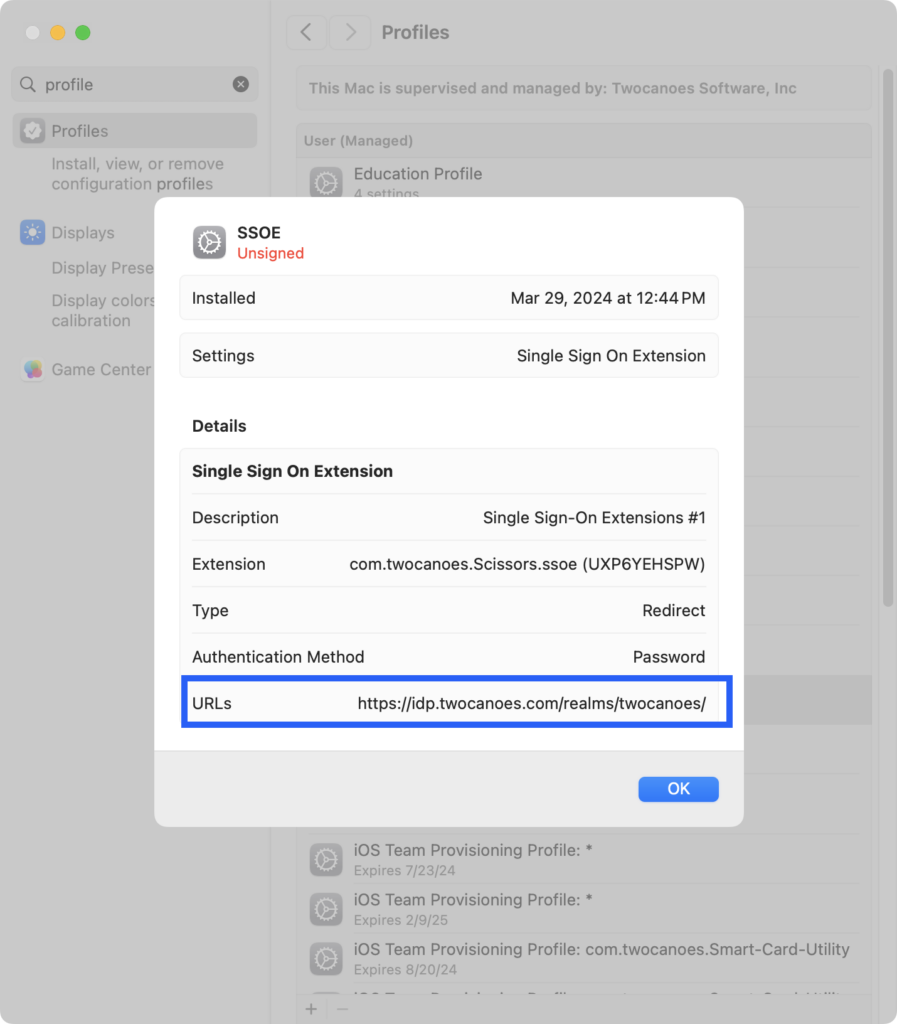
<string>https://idp.twocanoes.com/realms/twocanoes/</string>
</array>
</dict>
</array>
<key>PayloadDisplayName</key>
<string>SSOE</string>
<key>PayloadIdentifier</key>
<string>mdscentral.CDC67F3E-0687-4796-95B0-A61EF6F3F9A7</string>
<key>PayloadScope</key>
<string>System</string>
<key>PayloadType</key>
<string>Configuration</string>
<key>PayloadUUID</key>
<string>0DC6670F-F853-49CB-91B3-1C5ECB5D3F46</string>
<key>PayloadVersion</key>
<integer>1</integer>
</dict>
</plist>
Step 16
Upload the configuration profile to your MDM service and have MDM service send the configuration profile to your develop mac. Verify the profile shows up in System Settings with the correct settings.
Verifying Settings
Now that the project is set up with the container app, the single sign-on extension, the app domain association file and the profile, it important to verify all settings are correct otherwise the extension will not get called. This section verifies the settings and tests the the extension will get called.
Step 1
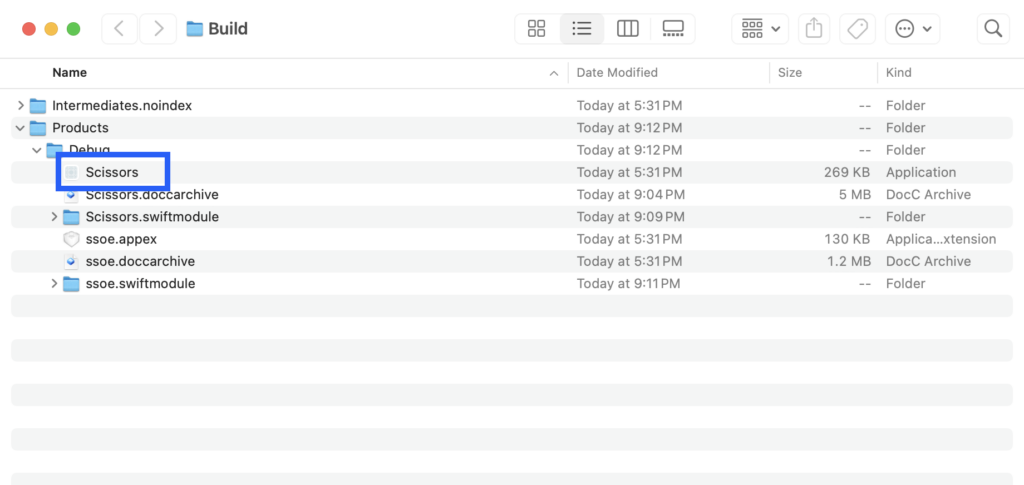
Select the Scissors Scheme, and build the App by selecting Product->Run or clicking the Run button. The container app should show an empty window and not have any build errors. Quit the app.
Step 2
Find the path to the container app by selecting Build->Show Build Folder in Finder. This path will be used in the next step.
Step 3
Run the command codesign -dv <Path To App>. Verify the team id same as the team id added to the apple app site association file. If it is different, update the team id in the apple app site association file on the web server to match. Remember to re-recheck the file with scwutil after updating the file.
Team ID
mdscentral-2:~ tperfitt$ codesign -dv /Users/tperfitt/Library/Developer/Xcode/DerivedData/Scissors-desvvwvwenmhnlflkmlezenmexpe/Build/Products/Debug/Scissors.app
Executable=/Users/tperfitt/Library/Developer/Xcode/DerivedData/Scissors-desvvwvwenmhnlflkmlezenmexpe/Build/Products/Debug/Scissors.app/Contents/MacOS/Scissors
Identifier=com.twocanoes.Scissors
Format=app bundle with Mach-O thin (arm64)
CodeDirectory v=20500 size=898 flags=0x10000(runtime) hashes=17+7 location=embedded
Signature size=4796
Signed Time=Mar 29, 2024 at 12:27:00 PM
Info.plist entries=21
TeamIdentifier=UXP6YEHSPW
Runtime Version=14.4.0
Sealed Resources version=2 rules=13 files=6
Internal requirements count=1 size=188
Step 4
The SOExtensionManager must recognize the associated domain is mapped to the correct extension. Run sudo swcutil show to show that this mapping is correct and approved.
scwutil output
--------------------------------------------------------------------------------
Service:              authsrv
App ID:               UXP6YEHSPW.com.twocanoes.Scissors
Domain:               idp.twocanoes.com?mode=developer
User Approval:        unspecified
Site/Fmwk Approval:   approved
Flags:                developer
Last Checked:         2024-03-29 17:27:01 +0000
Next Check:           2024-04-03 17:11:24 +0000
--------------------------------------------------------------------------------
Step 5
As a final check, start logging using the command log stream --predicate 'category contains "SOExtension, clean and run the project. Verify the log shows that your extension’s bundle ID shows the correct domain in the associatedDomains array.
Log Output
log stream --predicate 'category contains "SOExtensionManager"'


    "<SOExtension:0x600003f399f0, bundleID=com.twocanoes.Scissors.ssoe, path=/Users/tperfitt/Library/Developer/Xcode/DerivedData/Scissors-desvvwvwenmh on <decode: missing data>
2024-03-29 12:54:13.076520-0500 0x41fcfe   Default     0x253e377            23546  0    AppSSOAgent: (AppSSO) [com.apple.AppSSO:SOExtensionManager] -[SOExtensionManager loadedExtensionWithBundleIdentifer:] com.twocanoes.Scissors.ssoe => <SOExtension:0x600003f399f0, bundleID=com.twocanoes.Scissors.ssoe, path=/Users/tperfitt/Library/Developer/Xcode/DerivedData/Scissors-desvvwvwenmhnlflkmlezenmexpe/Build/Products/Debug/Scissors.app/Contents/PlugIns/ssoe.appex, associatedDomains=(
    "idp.twocanoes.com"
)> in (
    "<SOExtension:0x600003f38690, bundleID=com.twocanoes.ssoeexample.ssoe, path=/Users/tperfitt/Library/Developer/Xcode/DerivedData/ssoexample-fftqnmlaqrfzfzanzalglvmttuvi/Build/Products/Debug/Twocanoes Single Sign-On.app/Contents/PlugIns/ssoe.appex, associatedDomains=(null)>",
    "<SOExtension:0x600003f38cd0, bundleID=com.apple.AuthKitUI.AKAppSSOExtension, path=/System/Library/PrivateFrameworks/AuthKitUI.framework/PlugIns/AKAppSSOExtension_macOS.appex, associatedDomains=(null)>",
    "<SOExtension:0x600003f399f0, bundleID=com.twocanoes.Scissors.ssoe, path=/Users/tperfitt/Library/Developer/Xcode/DerivedData/Scissors-desvvwvwenmh on <decode: missing data>
Step 6
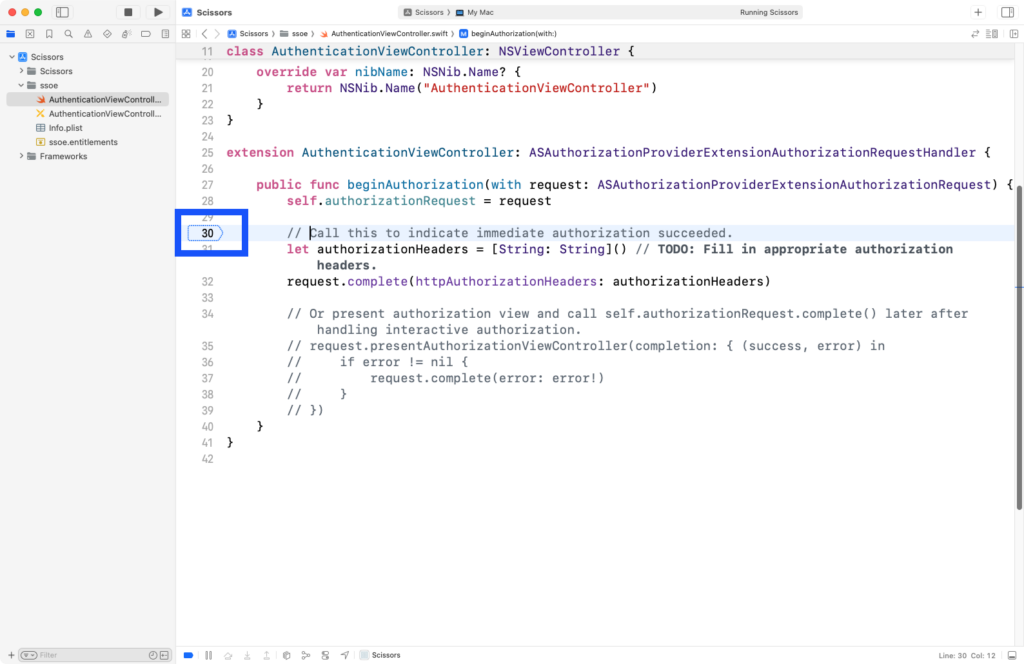
Set a breakpoint at the start of the beginAuthorization(request:) function.
Step 7
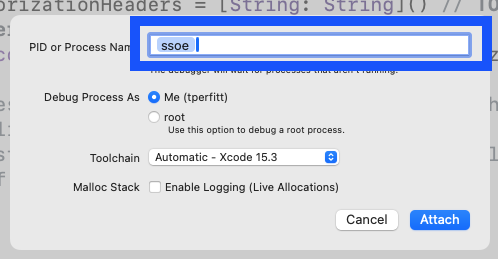
In order for this breakpoint to be stopped on, Xcode must be attached to the extension process when it dynamically launched by the system. To attach with Xcode, select the Debug menu, then Attach to Process by PID or Name. Enter in the name of the single sign-on extension. The name will be the same name as the target of the extension unless changed.
Step 8
Build and run the application. Open the Safari browser and go the URL defined in MDM configuration profile. In this example, the URL is https://idp.twocanoes.com/realms/twocanoes/. If everything is set up correctly, Xcode should stop at the breakpoint you set. If Xcode does not stop at the breakpoint, recheck your steps. Also, make sure that the ssoe process did not exit. If ssoe exits, you must attach to it again in Xcode.
Coding The Single Sign-On Extension
Handling the Request
The extension is now getting called when the specified redirect URL navigated to. Let’s add in some code to show a simple interface and handle the request.
Step 1
Select the AuthenticationViewController.swift in the extension.
AuthenticationViewController.swift
//
// AuthenticationViewController.swift
// ssoe
//
// Created by Timothy Perfitt on 3/29/24.
//
import Cocoa
import AuthenticationServices
class AuthenticationViewController: NSViewController {
var authorizationRequest: ASAuthorizationProviderExtensionAuthorizationRequest?
// @IBOutlet weak var webView: WKWebView!
@IBAction func cancelButtonPressed(_ sender: Any) {
self.authorizationRequest?.doNotHandle()
}
override func loadView() {
super.loadView()
// Do any additional setup after loading the view.
}
override var nibName: NSNib.Name? {
return NSNib.Name("AuthenticationViewController")
}
}
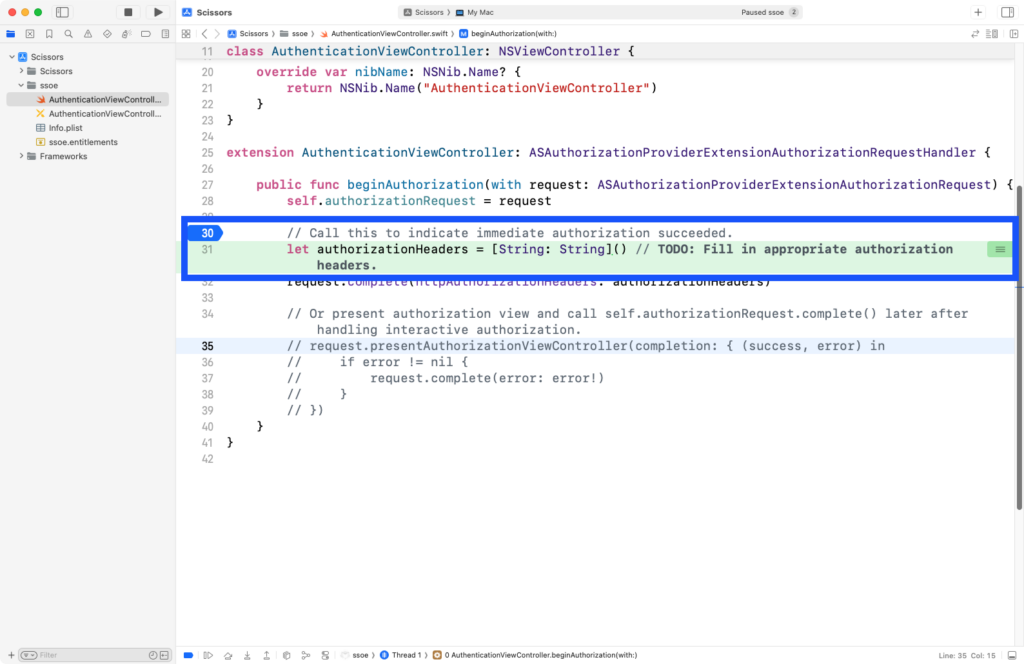
extension AuthenticationViewController: ASAuthorizationProviderExtensionAuthorizationRequestHandler {
public func beginAuthorization(with request: ASAuthorizationProviderExtensionAuthorizationRequest) {
self.authorizationRequest = request
// Call this to indicate immediate authorization succeeded.
let authorizationHeaders = [String: String]() // TODO: Fill in appropriate authorization headers.
request.complete(httpAuthorizationHeaders: authorizationHeaders)
// Or present authorization view and call self.authorizationRequest.complete() later after handling interactive authorization.
// request.presentAuthorizationViewController(completion: { (success, error) in
// if error != nil {
// request.complete(error: error!)
// }
// })
}
}
Step 2
Import WebKit since we will be adding in a webview. Set the kService for the service name in the keychain when cookies are saved. Set the kCallbackURLString to detect the webview gets redirected to the this URL, ending the session. We also need to define an instance variable for URL to capture the passed in URL.
AuthenticationViewController.swift
//
//  AuthenticationViewController.swift
//  ssoe
//
//  Created by Timothy Perfitt on 3/29/24.
//


import Cocoa
import AuthenticationServices
import WebKit


private let kService = "Cookie Cache"
private let kCallbackURLString = "https://idp.twocanoes.com:9443/auth/callback"


class AuthenticationViewController: NSViewController {


    var url:URL?
    var authorizationRequest: ASAuthorizationProviderExtensionAuthorizationRequest?


    @IBOutlet weak var webView: WKWebView!
    @IBAction func cancelButtonPressed(_ sender: Any) {
        self.authorizationRequest?.doNotHandle()
    }
    override func loadView() {
        super.loadView()
        // Do any additional setup after loading the view.
    }
    override var nibName: NSNib.Name? {
        return NSNib.Name("AuthenticationViewController")
    }
}
extension AuthenticationViewController: ASAuthorizationProviderExtensionAuthorizationRequestHandler {


    public func beginAuthorization(with request: ASAuthorizationProviderExtensionAuthorizationRequest) {
        self.authorizationRequest = request


        // Call this to indicate immediate authorization succeeded.
        let authorizationHeaders = [String: String]() // TODO: Fill in appropriate authorization headers.
        request.complete(httpAuthorizationHeaders: authorizationHeaders)


        // Or present authorization view and call self.authorizationRequest.complete() later after handling interactive authorization.
        // request.presentAuthorizationViewController(completion: { (success, error) in
        //     if error != nil {
        //         request.complete(error: error!)
        //     }
        // })
    }
}
Step 3
When the view appears, we need to do some setup. Replace the loadView() delegate callback with the viewDidAppear delegate callback. The window is resized so the view must be added to the window in order to the resize to work. The viewDidAppear() retrieves any saved cookies from the keychain, puts them in the webview, sets a delegate to get called when a redirect happens and then tells the webview to load. The cookies restore the session and is a simple way to not require the user to have to reenter their password between requests from other apps or other web page sessions.
AuthenticationViewController.swift
//
//  AuthenticationViewController.swift
//  ssoe
//
//  Created by Timothy Perfitt on 3/29/24.
//


import Cocoa
import AuthenticationServices
import WebKit


private let kService = "Cookie Cache"
private let kCallbackURLString = "https://idp.twocanoes.com:9443/auth/callback"


class AuthenticationViewController: NSViewController, WKNavigationDelegate {


    var url:URL?
    var authorizationRequest: ASAuthorizationProviderExtensionAuthorizationRequest?


    @IBOutlet weak var webView: WKWebView!
    @IBAction func cancelButtonPressed(_ sender: Any) {
        self.authorizationRequest?.doNotHandle()
    }
    override func viewDidAppear() {
        if let url = url {
            webView.navigationDelegate=self
            var request = URLRequest(url: url)
            let cookies = getCookies()


            if let cookies = cookies {
                request.setValue(self.combineCookies(cookies: cookies), forHTTPHeaderField: "Cookie")


            }
            request.httpShouldHandleCookies=true
            webView.load(request)
        }
        view.window?.setContentSize(NSMakeSize(600, 600))


    }
    override var nibName: NSNib.Name? {
        return NSNib.Name("AuthenticationViewController")
    }
}
extension AuthenticationViewController: ASAuthorizationProviderExtensionAuthorizationRequestHandler {


    public func beginAuthorization(with request: ASAuthorizationProviderExtensionAuthorizationRequest) {
        self.authorizationRequest = request


        // Call this to indicate immediate authorization succeeded.
        let authorizationHeaders = [String: String]() // TODO: Fill in appropriate authorization headers.
        request.complete(httpAuthorizationHeaders: authorizationHeaders)


        // Or present authorization view and call self.authorizationRequest.complete() later after handling interactive authorization.
        // request.presentAuthorizationViewController(completion: { (success, error) in
        //     if error != nil {
        //         request.complete(error: error!)
        //     }
        // })
    }
}
Step 4
Save the passed in URL from the request. Present the view controller using request.presentAuthorizationViewController(completion:) callback. The NSExtensionPrincipalClass in the extension’s property list was set to AuthenticationViewController so the ASAuthorizationProviderExtensionAuthorizationRequest knows what interface to show.
AuthenticationViewController.swift
        self.authorizationRequest = request


        url=request.url
        request.presentAuthorizationViewController(completion: { (success, error) in
            if error != nil {
                request.complete(error: error!)
            }
        })
    }
}
Step 5
When the authentication is complete in webview, there is a redirect sent to a known URL. If the redirect is to kCallbackURLString, the transaction is complete. The cookies are saved to the keychain and the authorization is complete.
AuthenticationViewController.swift
//
//  AuthenticationViewController.swift
//  ssoe
//
//  Created by Timothy Perfitt on 3/29/24.
//


import Cocoa
import AuthenticationServices
import WebKit


private let kService = "Cookie Cache"
private let kCallbackURLString = "https://idp.twocanoes.com:9443/auth/callback"


class AuthenticationViewController: NSViewController, WKNavigationDelegate {


    var url:URL?
    var authorizationRequest: ASAuthorizationProviderExtensionAuthorizationRequest?


    @IBOutlet weak var webView: WKWebView!
    @IBAction func cancelButtonPressed(_ sender: Any) {
        self.authorizationRequest?.doNotHandle()
    }
    override func viewDidAppear() {
        if let url = url {
            webView.navigationDelegate=self
            var request = URLRequest(url: url)
            let cookies = getCookies()


            if let cookies = cookies {
                request.setValue(self.combineCookies(cookies: cookies), forHTTPHeaderField: "Cookie")


            }
            request.httpShouldHandleCookies=true
            webView.load(request)
        }
        view.window?.setContentSize(NSMakeSize(600, 600))


    }
    override var nibName: NSNib.Name? {
        return NSNib.Name("AuthenticationViewController")
    }
}
extension AuthenticationViewController: ASAuthorizationProviderExtensionAuthorizationRequestHandler {


    public func beginAuthorization(with request: ASAuthorizationProviderExtensionAuthorizationRequest) {
        self.authorizationRequest = request


        url=request.url
        request.presentAuthorizationViewController(completion: { (success, error) in
            if error != nil {
                request.complete(error: error!)
            }
        })
    }
    public func webView(_ webView: WKWebView, didReceiveServerRedirectForProvisionalNavigation navigation: WKNavigation!) {
        guard let url = url, let webViewURL = webView.url else {


            return
        }
        if (webViewURL.absoluteString.starts(with: (kCallbackURLString))) {
            webView.configuration.websiteDataStore.httpCookieStore.getAllCookies({ cookies in
                let headers: [String:String] = [
                    "Location": webViewURL.absoluteString,
                    "Set-Cookie": self.combineCookies(cookies: cookies)
                ]
                self.storeCookies(cookies)
                if let response = HTTPURLResponse.init(url: url, statusCode: 302, httpVersion: nil, headerFields: headers) {
                    self.authorizationRequest?.complete(httpResponse: response, httpBody: nil)
                }
            })
        }


    }
}
Step 6
Add in the functions to handle loading and saving the cookies. This is what the final AuthenticationViewController.swift should look like.
AuthenticationViewController.swift
    }
    fileprivate func combineCookies(cookies: [HTTPCookie]) -> String {
        let dateFormatter = ISO8601DateFormatter.init()
        var cookiesStrings = [String]()
        for cookie in cookies {
            var cookieString = [String]()
            cookieString.append("\(cookie.name)=\(cookie.value)")
            cookieString.append("domain=\(cookie.domain)")
            cookieString.append("path=\(cookie.path)")
            if let expires = cookie.expiresDate {
                cookieString.append("expires=\(dateFormatter.string(from: expires))")
            }
            if cookie.isSecure {
                cookieString.append("secure")
            }
            if cookie.isHTTPOnly {
                cookieString.append("httponly")
            }
            if let sameSite = cookie.sameSitePolicy {
                cookieString.append("SameSite=\(sameSite.rawValue)")
            }
            cookiesStrings.append(cookieString.joined(separator: "; "))
        }
        return cookiesStrings.joined(separator: ", ")
    }


    func storeCookies(_ cookies: [HTTPCookie] ) {
        if let data = try? NSKeyedArchiver.archivedData(withRootObject: cookies, requiringSecureCoding: false) {


            let attributes = [kSecClass: kSecClassGenericPassword,
                        kSecAttrService: kService,
          kSecUseDataProtectionKeychain: false,
                          kSecValueData: data] as [String: Any]
            _ = SecItemDelete(attributes as CFDictionary)
            let _ = SecItemAdd(attributes as CFDictionary, nil)
        }
    }


    @discardableResult func getCookies() -> [HTTPCookie]? {
        let attributes = [kSecClass: kSecClassGenericPassword,
                    kSecAttrService: kService,
               kSecReturnAttributes: true,
      kSecUseDataProtectionKeychain: false,
                     kSecReturnData: true] as [String: Any]
        var item: CFTypeRef?
        if  SecItemCopyMatching(attributes as CFDictionary, &item) == 0 {
            if let result = item as? [String:AnyObject],
               let cookiesRaw = result["v_Data"] as? Data,
               let cookies = try? NSKeyedUnarchiver.unarchiveTopLevelObjectWithData(cookiesRaw) as? [HTTPCookie] {
                if cookies.count == 0 {
                    return nil
                } else {
                    return cookies
                }
            }
        }
        return nil
    }
}
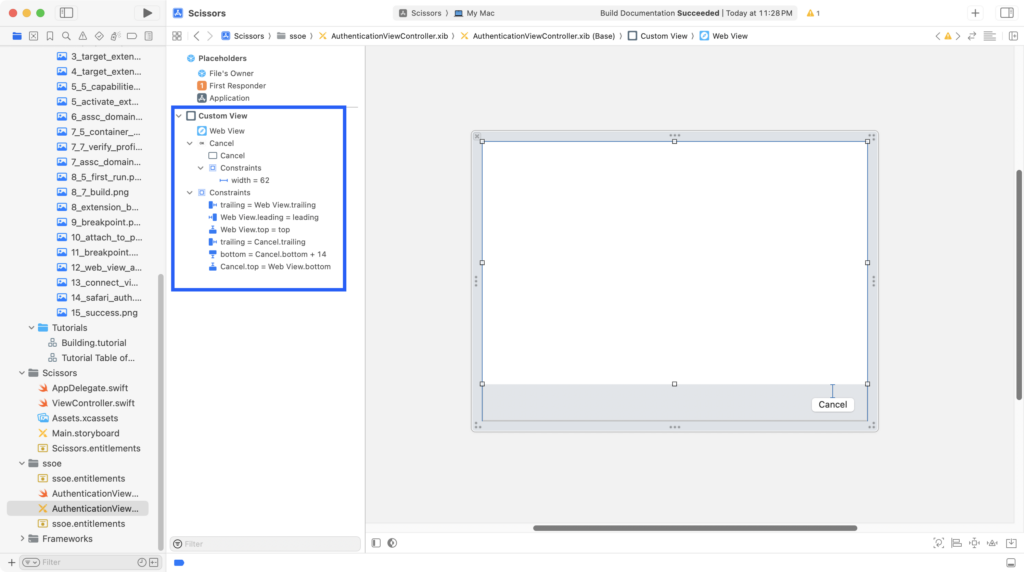
Adding the WebView
The webview is shown when a URL is caught to allow the user to authenticate.
Step 1
Open the AuthenticationViewController.xib and add a WebView.
Step 2
Add in a button and layout the view as shown.
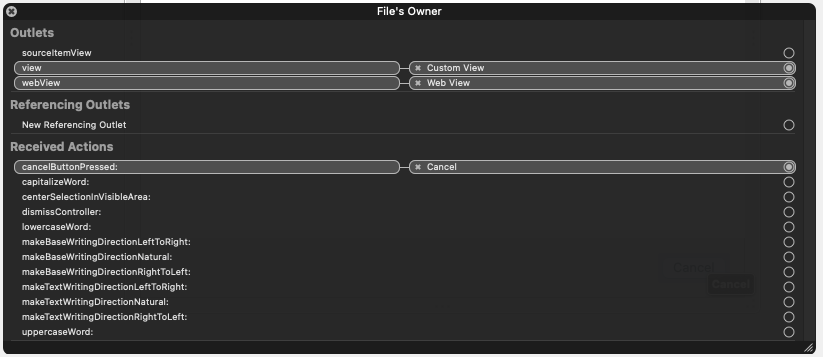
Step 3
Connect the button and the web view as shown.

Step 4
Connect the button and the web view as shown.
Testing The Single Sign-On Extension
Testing
The extension is now complete. The extension can be tested by navigating to a URL that was defined in the MDM configuration payload.
Step 1
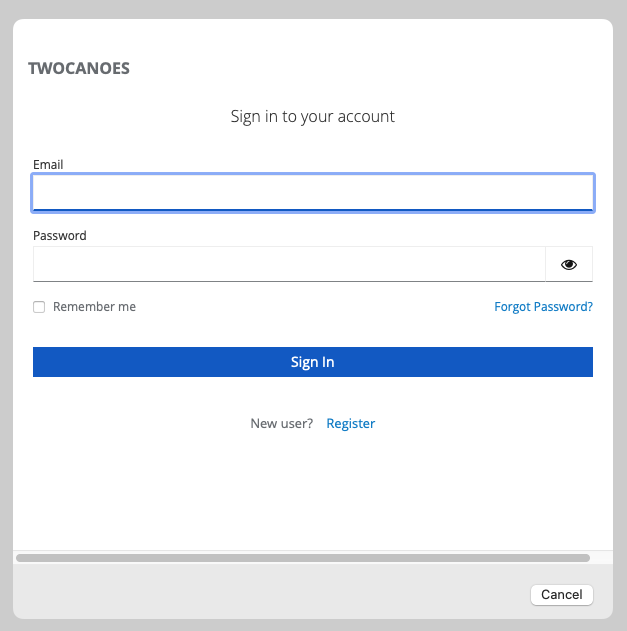
Build and run the application. Open the Safari browser and go a URL that redirects to the Identity Provider to trigger a redirect to the URL defined in the MDM configuration profile. In this example, the URL is https://idp.twocanoes.com:9443. Safari will redirect to the identity provider and the web view will be shown. Log in to the web service using the username “jappleseed” and the password “twocanoes”.
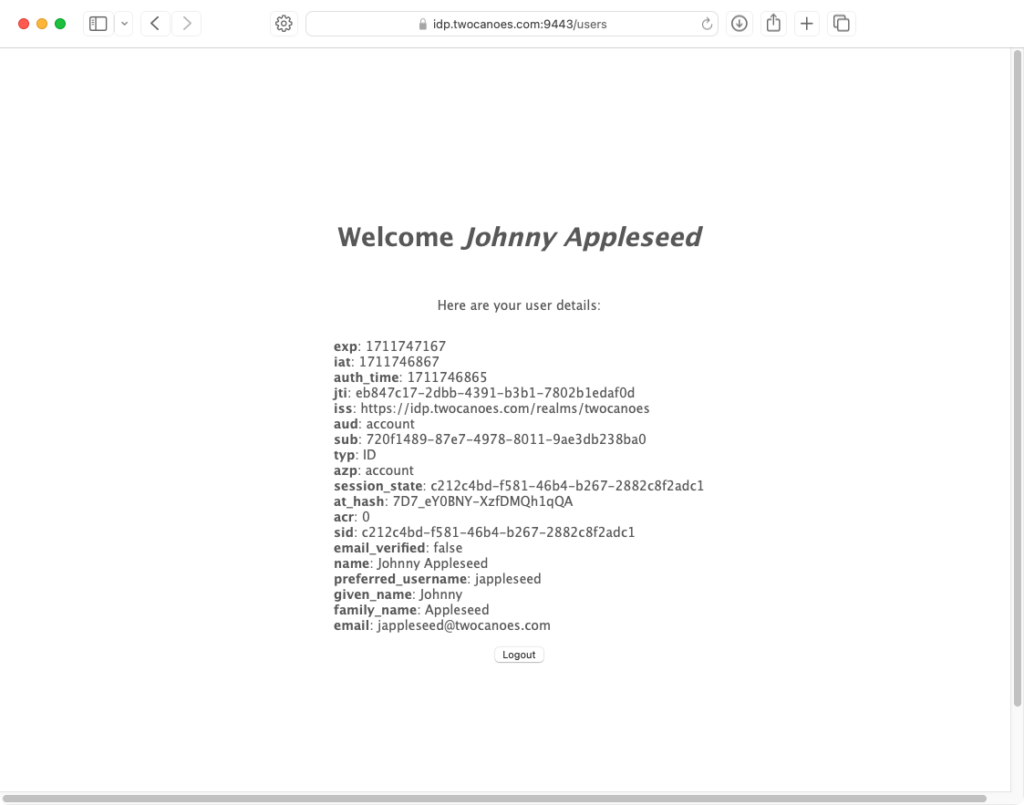
Step 2
The extension will save the session cookies to the keychain and do a final redirect. The authentication should be successful. Any further attempts to access that same resources (with another web session or an app) will not require authentication.
Developing a Single Sign-In extension or Platform Single Sign-In extension for your organization and need some assistance? Get in touch!