Boot Runner 3 Admin Guide
Overview
Boot Runner 3 supports physical startup volumes as well as virtual machines, making it easy to offer selections of any combination of macOS, Windows, Linux, and other systems installed natively or in a virtual machine. Boot Runner 3 also includes customization options to make the startup selection screen easier for end users to both find and start the OS environment they need.
Startup control with Boot Runner can be fully integrated with existing client management consoles using Configuration Profiles. The easiest way create a configuration profile is to use the Boot Runner 3 Profile Web Service. This Admin Guide details all available settings that can be controlled through profiles.
Installing Boot Runner Software and License
Find your download links for Boot Runner in the email you received from us to download your software and license:
- When you purchase Boot Runner, your download links will be in an email from orders@twocanoes.com. If those links have expired or you can’t find that email, please redownload your software.
- If you requested a trial version, you will find your download links in an email from info@twocanoes.com. If your links or your trial license has expired, please contact us if you need an extension.
Installation
Install Software
Double-click BootRunner3.dmg to mount the disk image. Double-click Boot Runner.pkg and follow the installation instructions.
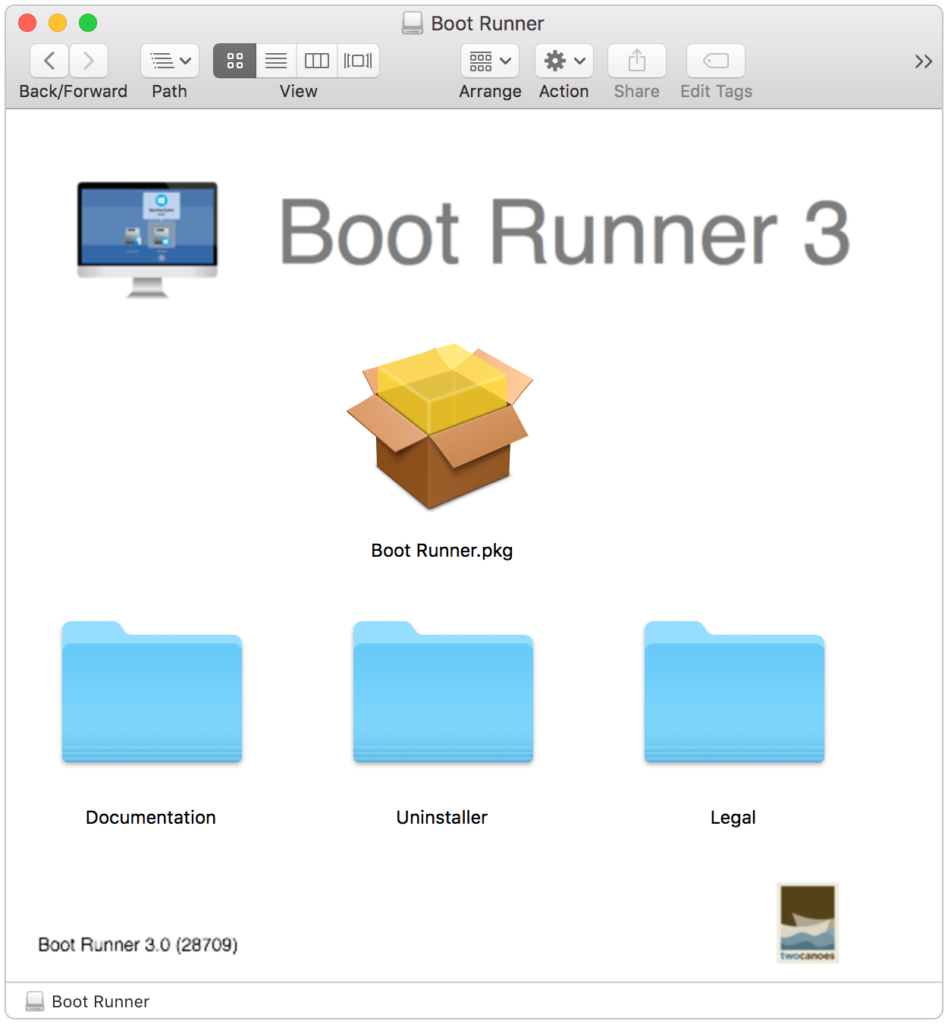
The installer places files in three locations:
- /Library/PrivilegedHelperTools/Boot Runner.app: This is the main Boot Runner app that runs over the Login Window.
- /Library/LaunchAgents/com.twocanoes.bootrunner.plist: This LaunchAgent starts Boot Runner over the Login Window.
- /Library/LaunchAgents/com.twocanoes.bootlauncher.plist: This LaunchAgent starts a process to log out the current user whenever a file is created at /Users/Shared/.com.twocanoes.bootrunnerlogout. It is used for automatically logging out when a VM is closed.
Install License
Click the Boot Runner license file.
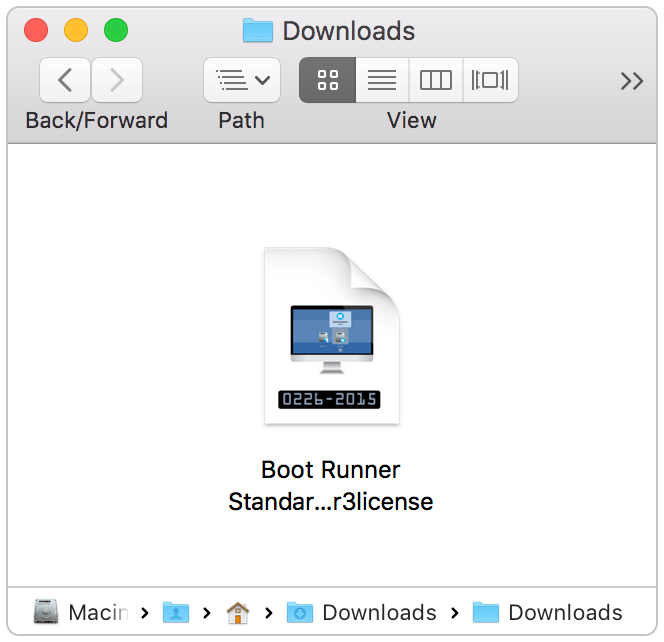
Type your admin password to allow the license installation.

License Location
The location of the Boot Runner 3 license is:
/Library/Application Support/Twocanoes/Licenses/
The license file can be copied to this location; Boot Runner will discover and use the license key. If there are multiple license keys for Boot Runner in this location, Boot Runner will use the first valid license key based on alphabetical order.
Customizations

The Boot Runner selection screen appears at startup or following logout from macOS. Bootable volumes are presented as selectable disk icons. The user interface can be customized to reflect your brand and how your organization uses Boot Runner. The Boot Runner interface elements are:
- Countdown Timer – When a volume is selected automatically via settings, the Countdown Timer is shown to alert the user that a restart is pending. The amount of time is customizable.
- Popover – The popover appears above each volume and gives more information about the operating system or applications on the volume. The text and when the popover appears is customizable
- Disk Icon – The Disk Icon represents the disk. Its image is customizable.
- OS Badge – The OS Badge identifies the operating system for the volume. It appears in the bottom left corner of the Disk Icon.
- Disk Label – The Disk Label identifies the name of the volume with a line of text. By default, it is the name of the volume filesystem but is also customizable via settings.
- Marquee Text – The Marquee text provides up-to-date information to the user. It is customizable and may be animated in settings. The font family name, size, and color are also customizable.
- Shutdown and Restart Buttons – The Shutdown and Restart buttons allow for users and administrators to shutdown and restart the computer. Both buttons can be shown or hidden independently via settings.
- Status Box – The Status Box shows the version and build of Boot Runner, the version of macOS, and the current time. It can be shown or hidden based on settings.
- Background Image – The Background Image is a full screen image appearing under all the Boot Runner controls. It can be specified via settings.
Initial Setup
The Boot Runner Selection Screen runs on top of the macOS login screen. In order for Boot Runner to display the Selection Screen containing the available start up disks, Automatic Login must be disabled on the client system. Go to System Preferences ⮕ Users and Groups ⮕ Login Options and Set “Automatic Login” to Off.
When using virtual machine volumes, the Login window must be set to “Name and password.” Go to System Preferences ⮕ Users and Groups ⮕ Login Option and set “Display Login window” to “Name and password.”
SIP and Secure Boot
System Integrity Protection (SIP) is a feature of macOS that prevents modifications of system related files. It also protects the area where the startup disk is changed (NVRAM). In order for Boot Runner to change the startup disk and boot into a different OS, SIP must be configured to allow for Boot Runner to set the startup disk:
-
- Boot into the recovery partition by holding ⌘R while restarting the Mac
- From the Utilities Menu, select Terminal. On the Terminal command line, enter:
csrutil enable --without nvram
Restart back into the Mac volume.
See this article for more information.
Secure Boot is currently only available on the 2017 iMac Pro and prevents unknown operating systems from being selected. Boot Runner is able to select macOS and Windows 10 with Secure Boot enabled and does not require any special configuration. For operating systems that Secure Boot does not recognize, it can be disabled from the Recovery Partition.
Customizing Boot Runner Settings
Boot Runner settings are customized via configuration profiles created by an online service provided by Twocanoes. As a user of Boot Runner, you can create a free account; within this online service, multiple configuration profiles can be created, modified, and exported. To get started, visit our profile webpage:
Basic Settings
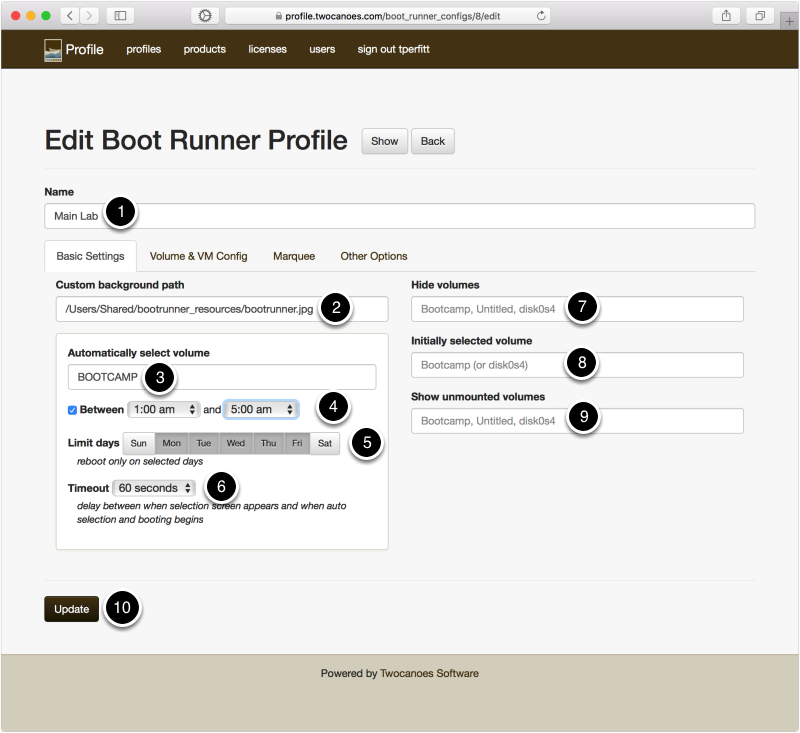
When first creating a configuration, give the profile a name and fill out the Basic Settings:
- Name – The name of the configuration profile. This will be the filename of the configuration profile when exporting.
- Custom background path – Desktop pictures or any standard format image may be used (formats include .jpg, .tif, .png, and .pdf). Enter the path to the desktop image. The image must be a local path and be available on each Mac. The image will be scaled to the full screen but should be as close as possible to the screen resolution of the Macs.
- Automatically select volume – Use the device name or identifier to select a default boot volume.
- Between [Times] – You can specify the time period when this default will be in effect; Boot Runner will automatically reboot and boot into the specified volume.
- Limit days – You can specify which days restarting will take place.
- Timeout – The amount of time that the user is given before the Mac is restarted.
- Hide volumes – Enter the name or device of any bootable volumes that you do not want displayed in the Boot Runner Selection Screen.
- Initially selected volume – When Boot Runner is shown, the default behavior is to select the startup Mac volume. You can specify the name of another volume for it to be selected at start.
- Show unmounted volumes – Enter the name or device of any bootable volumes that you do not want displayed in the Boot Runner Selection Screen. By default, Boot Runner will show all volumes that are mounted at startup. If you wish to enter more than one volume in these fields, separate the values with a comma.
- Click “Update” to save the configuration.
Volume Configuration
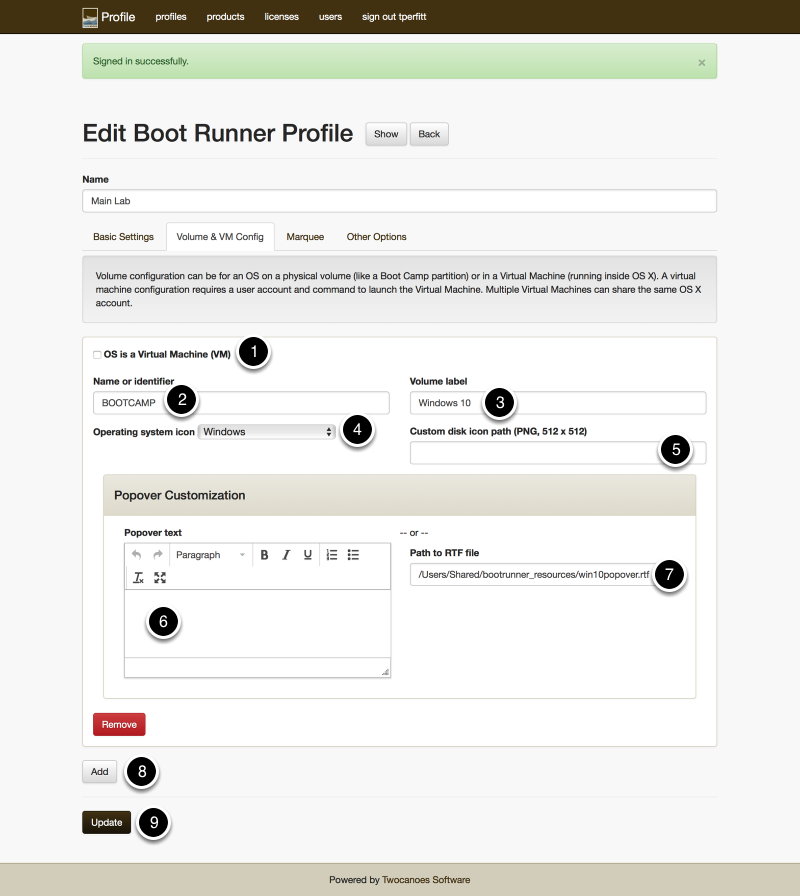
The “Volume & VM Config” section is where each volume and associated descriptions are located. Add a volume to the volume descriptions list in order to customize information for the Selection Screen.
- OS is a Virtual Machine (VM) – If the Boot Runner volume is an virtual machine (VMware Fusion, Parallels, or VirtualBox), select this checkbox. When this option is selected, the Name or Identifier text field will be disabled and you can only specify a Volume Label.
- Name or identifier – The volume name or device ID used when mounted in macOS. The volume name is the name shown on the mounted volume in Finder and mounted on the desktop.
- Volume label – Enter a name that users will see below the volume on the Boot Runner Selection Screen.
- Operating system icon – Click to select the appropriate operating system or choose “Auto Detect.” Note: Auto Detect will not work with unmounted volumes. The selection of operating system will determine the icon that appears next to each disk and the icon in the popover description.
- Custom disk icon path – A local path to a 512×512 PNG for the Disk Image. The image must be available locally on each Mac.
- Popover text – Enter text to describe the volume. This text will be displayed in a popover above the volume on the main selection screen. The text may be formatted as needed.
- Path to RTF file – Enter the path location to an RTF format text document containing descriptive information about the volume. The document must be in Rich Text Format (RTF [TextEdit can create RTF formatted documents]) which allows basic text formatting without images. The RTF file must be available locally on each Mac.
- Click “Add” to add a new volume.
- Click “Update” to save the configuration.
Virtual Machine (VM) Configuration
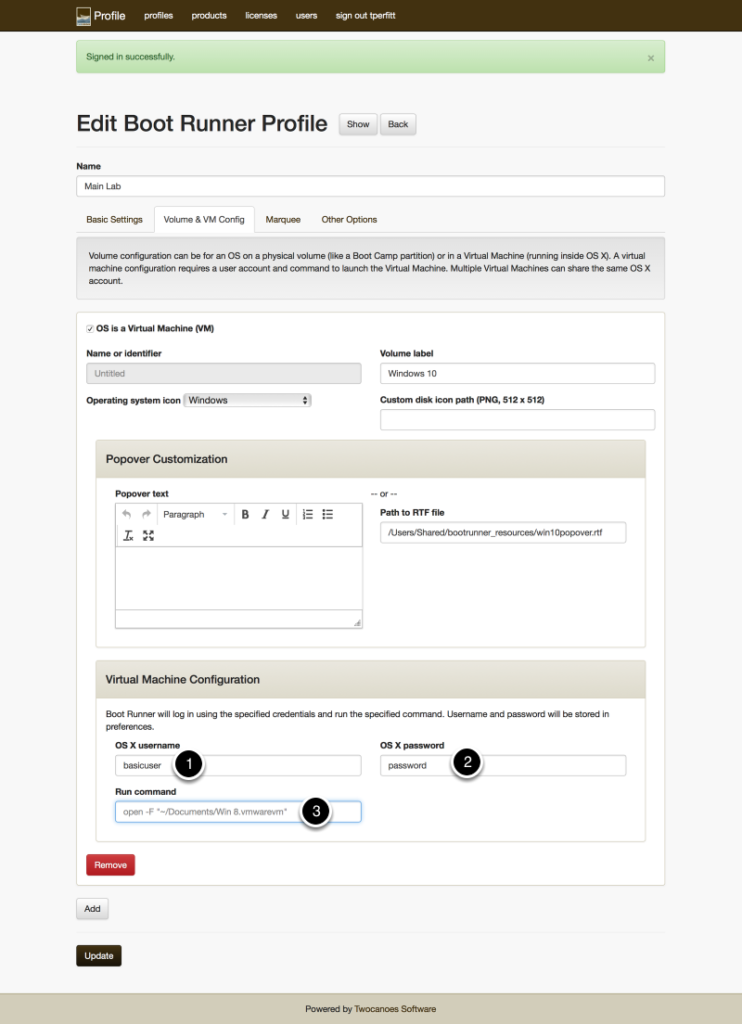
Virtual machines have some additional configuration options in Boot Runner Volume Configuration. In Boot Runner, virtual machines are automatically launched by logging in to a standard macOS account and launching the virtual machine. In order to do this, Boot Runner must know the username and password of a macOS user account and the VM to launch. Specify the options as shown below:
- OS X username – The username (shortname) of the macOS account to log in to.
- OS X password – The password in macOS for the user account.
- Run Command – After the user selects the virtual machine, Boot Runner will log in to the user account and launch the command specified here. Typically, the command “open -F” will automatically launch the specified virtual machine document. The virtual machine must be installed in the user account and set to enter full screen.
Boot Runner also has a feature where the current user session will log out when a file at /Users/Shared/.com.twocanoes.bootrunnerlogout is created. Share this folder to, and create a script in, the virtual machine to automatically create this file when the user logs out from the host OS. This will force the VM to save the session, then log out from the macOS session and return to the Boot Runner selection screen.
Marquee Options
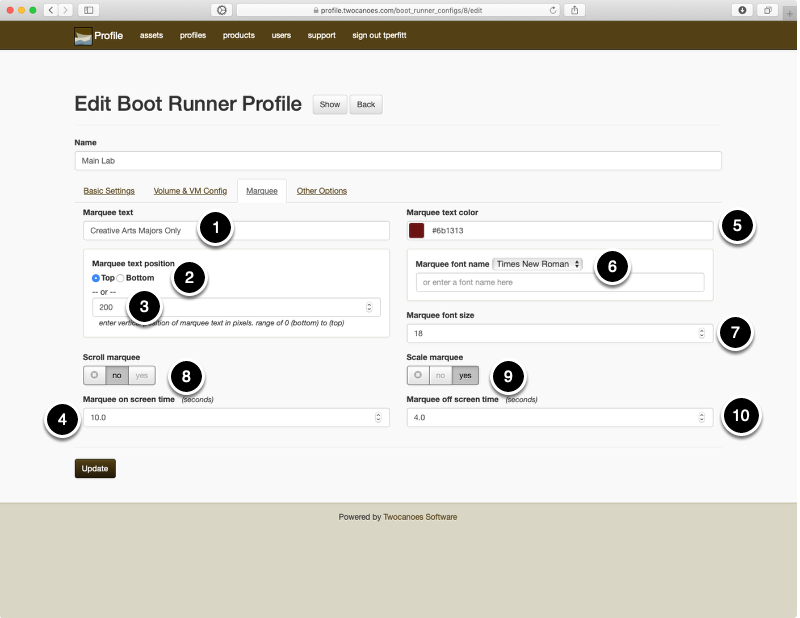
The Marquee displays stationary or animated text on the Boot Runner Selection Screen.
- Marquee text – Enter text that will scroll across the Boot Runner Selection Screen
- Marquee text position – Choose the position (top or bottom of the screen) for text
- Marquee text position vertical – Vertical position of marquee text in pixels from 0 (bottom of screen) to the top (dependent on resolution)
- Marquee on screen Time – The amount of time, in seconds, that the marquee pauses on screen during an animation
- Marquee text color – The color of the text can be customized here
- Marquee font name – The font family name for the Marquee
- Marquee font size – The size of the Marquee font
- Scroll marquee – Marquee text slides into the middle, pauses, then slides out
- Scale marquee – Marquee text zooms in, pauses, then disappears
- Marque off screen time – When the marquee text is animated, it can stay off screen for the amount of time specified here
Additional Options
The last tab of the Boot Runner Configuration window contains settings for the Boot Runner Selection Screen, the Boot Runner Menu Item, and display options for restart and shutdown buttons.
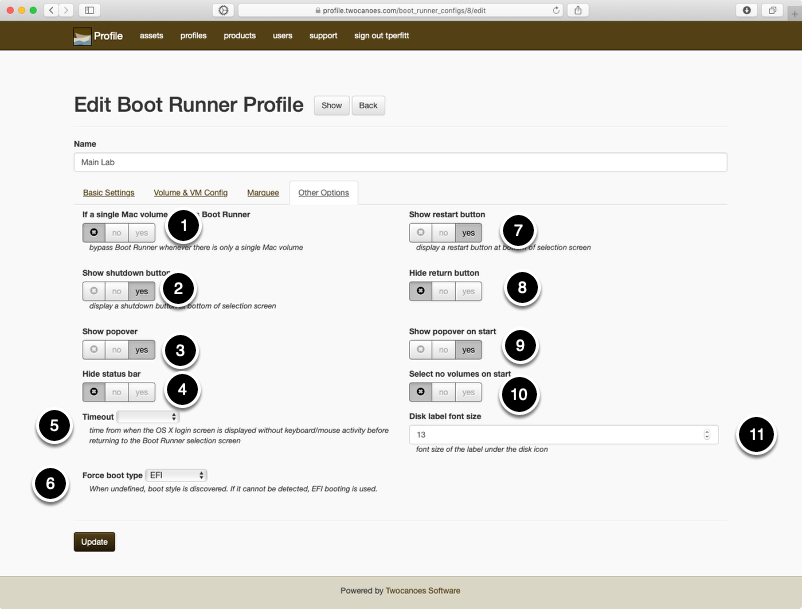
- If a single Mac volume, bypass Boot Runner – Check this box to bypass running Boot Runner on single-volume macOS Macs. For mass deployments where some Macs only host one bootable volume, the Boot Runner Selection Screen will not appear unless additional boot volumes are added
- Show shutdown button – Display a shutdown button on selection screen
- Show popover – Show or hide popovers above volumes
- Hide status bar – Allows you to hide or show the status bar at the bottom of the screen
- Timeout – When a user selects the macOS volume but does not log in, the Boot Runner selection screen will be shown after the specified timeout
- Force boot type – Normally, Boot Runner 3 will detect the style of booting for selected volumes. However, if you want to override these settings, specify a boot type
- Show restart button – Display a “Restart” button on selection screen
- Hide return button – After a user selects the startup volume, a “Return to Boot Runner” button will be shown: use this setting to hide this button
- Show popover on start – By default, when the selection screen is first shown, the popover information is shown automatically: use this setting to hide the initial popover
- Select no volumes on start – By default, the Mac startup disk is selected: use this option to turn off initial selection
- Disk label font size – Size of the disk label text shown under the Volume icon
Privacy Controls
macOS 10.14 Mojave introduced new privacy controls for protecting user data. Once of these controls must be configured for full functionality of Boot Runner.
When the Boot Runner Selection Screen is activate, it appears over the macOS Login Window but does not have focus; anything typed on the keyboard is not sent to Boot Runner. Users can still select volumes with the pointer; however, in order to select volumes with the keyboard, Boot Runner must have the ability to control the mouse. To enable this feature:
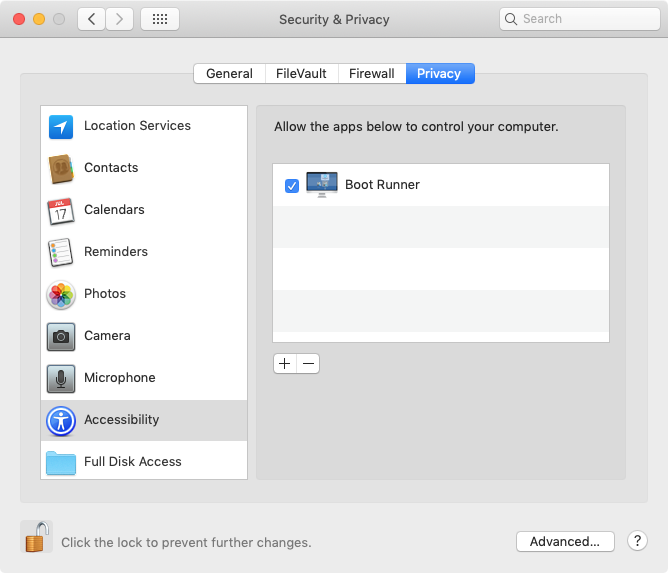
- In macOS, open System Preferences and select Security & Privacy
- Select the Privacy tab
- Unlock System Preferences by clicking the lock in the bottom left corner
- Select Accessibility and under Allow the apps below to control your computer, click +
- Select Boot Runner.app in /Library/PrivilegedHelperTools
- Quit System Preferences
If your Macs are managed by an MDM server, you can set the Accessibility configuration key. See Configuration Profile Reference for more information.
Installing Configuration Profiles
After creating a configuration profile via the web service, export the configuration profile and apply it to all the Macs that will have Boot Runner installed. To install a configuration profile for Boot Runner manually, double-click on the configuration profile or use the profiles command in Terminal to install it. More information on the profiles command can be found in the manual by typing man profiles in Terminal.
For example:

sudo profiles -I -F ~/Desktop/com.twocanoes.bootrunner.mobileconfig
The configuration profiles can be deployed using MDM.
Configuration Profile Keys
CustomBackgroundPath – (string) location of local image file for selection screen background (TIFF, PNG, JPG, or PDF)
HiddenVolumeNames – (string) name or identifier of existing volume that are hidden in selection screen, separate multiple volume names with commas
AutomaticallySelectVolume – (string) name or identifier of existing volume to be selected and booted automatically
AutoSelectTimeout – (integer) delay in seconds between when selection screen appears and when auto selection and booting begins
LimitTimeFrom – (integer) start of period when specified volume should automatically be selected and booted, range from 0-23
LimitTimeTo – (integer) end of period when specified volume should automatically be selected and booted, range from 0-23
LimitTimes – (boolean) yes/no to activate LimitTimeFrom and LimitTimeTo
ShowUnmountedVolumes – (string) name or identifier of volume (usually external drive) that may not always be mounted but will appear in the selection screen
ForceBootType – (integer) determines how the selected volume boots. 1: EFI, 2: Legacy, 3: Volume EFI. If this key is not specified, the boot type will be autodetected based on OS installed and Mac hardware
VolumeDescriptions – (array) key-value clusters for each volume, not editable. Volume property sets assigned by Item number dictionaries (Item 0, Item 1, Item 2, etc.)
- VolumeName – (string) name or identifier, disabled for virtual machine volumes
- VolumeLabel – (string) displayed under the volume graphic
- VolumeType – (integer) operating system icon.
0-auto-detect, 1-OS X, 2-Windows XP, 3-Windows 7, 4-Windows 8, 5-Windows 10, 6-Linux, 7-Other, 8-Custom - VolumeDescriptionRTF – (string) encoded raw text entered into the popover text window. VolumeDescriptionRTF takes precedence over Volume Descriptions if both keys are present
- VolumeDescriptions – (string) path to a rich-text format, base64-encoded file containing the popover text (not to be confused with the array of the same name)
- VMPath – (string) path including open command to launch the virtual machine
- VMUsername – (string) macOS login name to auto-login and launch virtual machine
- VMPassword – (string) macOS password to auto-login and launch virtual machine
- UseVM – (boolean) yes/no
- LogoutFile – (string) name of touched file, defaults to /Users/Shared/.com.twocanoes.bootrunnerlogout
- VMPostrunScript – (string) path to script file for actions post-vm logout/shutdown. Defaults to /Library/Application Support/Twocanoes/Boot Runner/logoutscript
- CustomVolumeGraphic – (string) path to customized image used as icon overlay on volume and in popover. 256×256 works best
- CustomDiskGraphic – (string) path to customized image used instead of default disk icon. 512×512 works best
TypingDelay –(integer) in nanoseconds to delay between keystrokes when auto-login VMUsername and VMPassword are enabled. It should be a number value between 0 and 100,000,000 (100 Million is 1 second). Default is 0
MarqueeText – (string) contents of marquee text that appears on selection screen
MarqueeTextPosition – (integer) defines where to place the marquee text. Zero (0) appears at top of screen, one (1) appears at the bottom of the screen
MarqueeTextColor – (string) Hex Colors (e.g., #0A0A0A)
MarqueeFontName – (string) A name for the font family for the Marquee
MarqueeFontSize – (string) The size of the marquee text in points
MarqueeYPosition – (integer) vertical position of marquee text in pixels. Default is 0. Positioning is dependent on display resolution. For example, a 1920×1200 display has MarqueeYPosition range of 0 (bottom) to 1200 (top)
ScrollMarquee – (boolean) value for scrolling of marquee text across the screen
SelectSingleMacVolume – (boolean) for behavior to bypass Boot Runner whenever there is only a single Mac volume on the system
ShowRestartButton – (boolean) option to display a restart button at bottom of selection screen
ShowShutdownButton – (boolean) option to display a shutdown button at bottom of selection screen
Timeout – (integer) Time in seconds from when the macOS login screen is displayed without keyboard/mouse activity before returning to the Boot Runner selection screen
WindowLevel – (integer) Boot Runner default is screen saver window level (9). Can specify 0 – 9. See window level constants: http://apple.co/1aRwMh1
Logging Options
Boot Runner logs messages via the Apple System Logger. To view the logs, open Terminal and enter the following command:
log show --style syslog --predicate 'process contains[cd] "Boot Runner"' --info --last 2d
You can adjust the “2d” for a longer or shorter time period. You can specify a number, then m (minutes), h (hours), or d (days). For example:
--last 2m
or
--last 3h
To send the output to a file, redirect the output:
log show --style syslog --predicate 'process contains[cd] "Boot Runner"' --info --last 2d > ~/Desktop/bootrunner.log
This will save the last 2 days of Boot Runner output to a file on the current user’s desktop called “bootrunner.log”.
Additional Options
- If there is a file at the top of a volume named “.bootrunner.rtf” (note the period at the start of the name) and a volume description is defined via a policy, configuration profile, or preference, text contained in the RTF file will be shown as the description text in the Boot Runner Selection Screen.
- To set Windows to reboot on logout, create a script that contains the command shutdown “-r -f -t 0”. In gpedit.msc, go to User Configuration ⮕ Windows Settings ⮕ Scripts and add the script to the Logoff item.
- macOS will unmount any volumes contained on removable drives when the user logs out; it will also unmount them if the removable drives are plugged when the login window appears. In order to see external drives at the login window, run the following defaults command:
sudo defaults write /Library/Preferences/SystemConfiguration/autodiskmount AutomountDisksWithoutUserLogin -bool true
Keep In Touch
Connect With Us
Sign Up for Boot Runner Security and Product Updates
Enter your information below to receive email updates when there is new information specifically regarding this product and how to use it. Alternatively, to receive email updates for general information from Twocanoes Software, please see the Subscribe page.