Configure MDS Automaton
This is an older version of the Configuration document. For the latest version, please visit https://twocanoes.com/mds-setup.
The MDS Automaton automates the keyboard presses needed to fully automate a Mac setup using the resources for the MDS macOS app. Specifically, when the MDS Automaton is plugged in to a USB keyboard, it will send the keyboard command to boot to recovery (command-R) then wait for a default 30 seconds. The keyboard commands for opening Terminal will then be sent, followed by the command to run the workflow selector.
If you purchased the MDS Automaton bundle, your Automaton has been already programmed for you. It can be re-programmed and configured easily right in the MDS app.
Hardware
The MDS Automaton is an Arduino-compatible Adafruit ItsyBitsy inside a custom enclosure. It also includes a short micro USB to USB-A cable. The micro USB end of the cable plugs into the USB connector on the Automaton, and the USB-A end of the cable plugs into the Mac that is being is being set up.
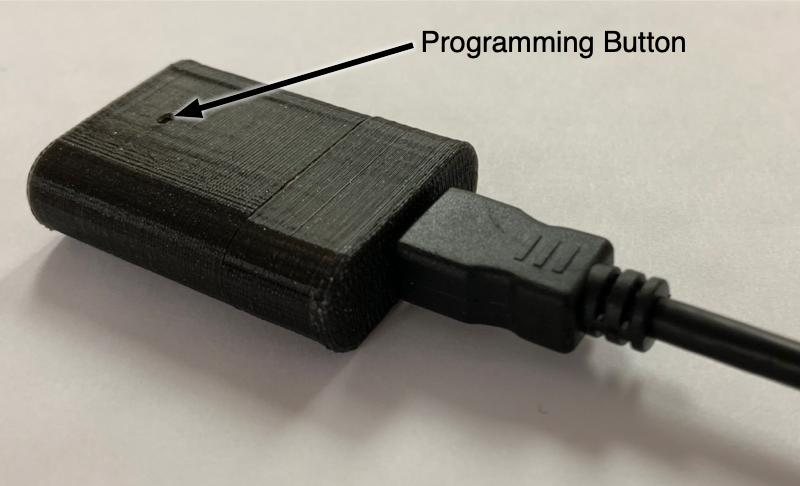
To put MDS Automaton into programming mode, insert a paperclip into the Programming Button hole and press the button inside the enclosure twice quickly.
Downloading the macOS Software
The MDS Automaton Bundle includes the macOS application, MDS. To access the software, go to Twocanoes Profile and enter in the email you used to purchase the MDS bundle and activate your account. Once you verify your email address, you will be able to download and install the MDS Software. Your activation key is also available on Profile.
Programming an Arduino (skip if you purchased the MDS Bundle from Twocanoes Software)
If you purchased a compatible Arduino, it must be programmed with the firmware bundled within the macOS MDS app. Programming is simple:
- Click Create Automaton in the MDS macOS App.
- Plug in the Arduino and put it in programming mode. This is usually done by pressing the programming button once or twice, or briefly shorting the reset pin to ground. Consult your manual for details.
- Once the flashing is completed, a success dialog will appear and you can unplug the Automaton.
Note: If the flashing does not start, verify the cable is not a “power only” cable. In order to flash the arduino, it must show up in macOS under /dev with a name that contains “cu.usbmodem”.
Configuring the Automaton
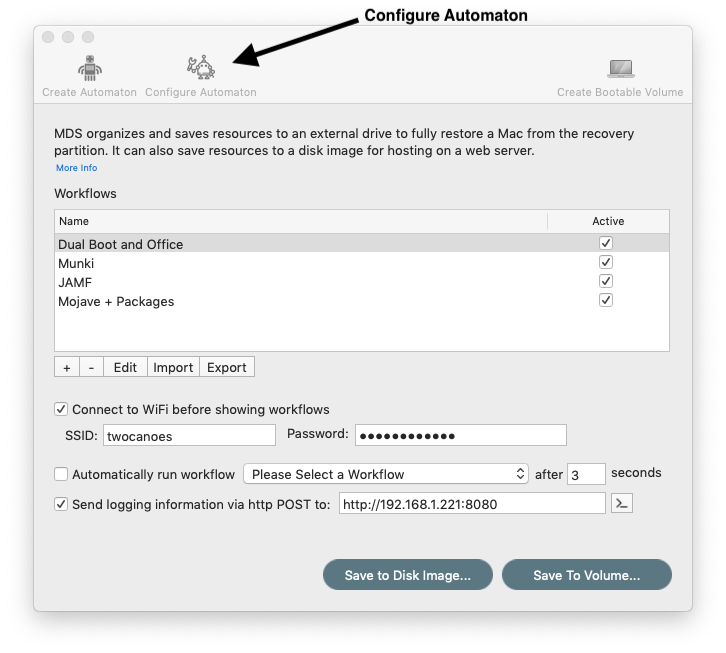
To configure the MDS Automaton, launch the MDS macOS App, and click Configure Automaton. Once the automaton sheet is displayed, plug in the Automaton using the provided USB cable. Note: the MDS Automaton must be connected when the configuration sheet is shown since it only listens for a connection for a few seconds on initial power.
Settings
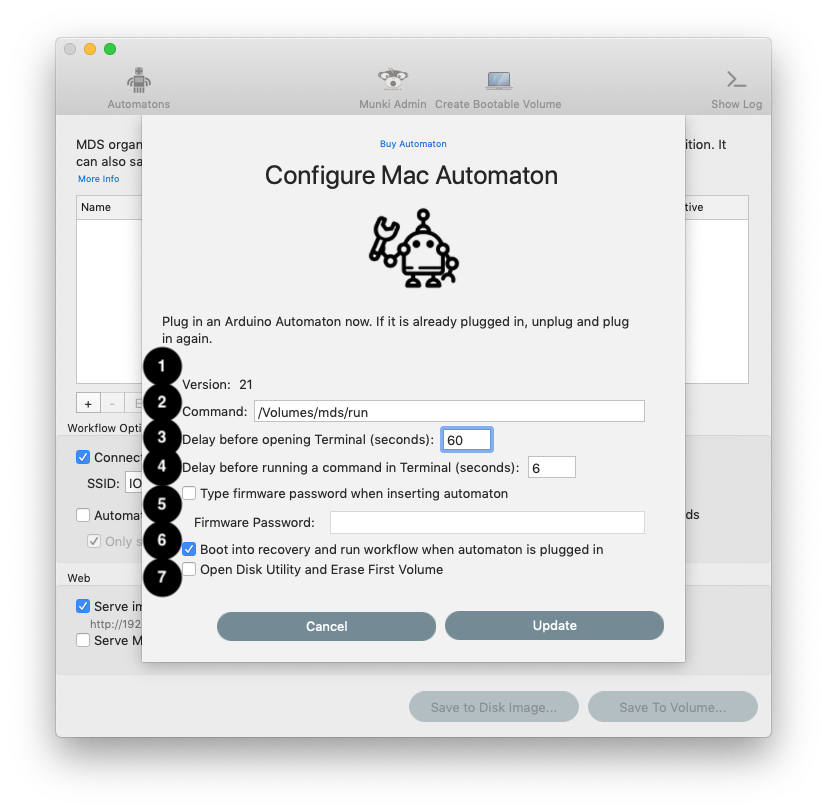
The settings on the Automaton are read by the MDS app and show in the configuration sheet:
- Version: The current version of the firmware on the device. If there is a new version available, you will be prompted when this sheet is opened.
- Command (default: /Volumes/mds/run) : The command that is run once Terminal is opened to launch Imagr, the workflow selection app.
- Startup Delay (default: 180): The number of seconds after the Automaton is plugged in and when it will press open the Terminal. This is about the time the Mac takes to boot into Recovery mode, which is usually about 59 seconds.
- Pre-Command Delay (default: 6): The number of seconds after launching Terminal to when the command is typed in. Adjust this if the start of the command is missing.
- Type firmware password when inserting automaton (default: off): If the Macs being set up are protected by a known firmware password, the automaton can enter it prior to giving the keyboard command to boot to recovery partition.
- Firmware Password: Enter the firmware password to be entered automatically on insertion of the Automaton.
- Erase First Volume: This is only to be used when FileVault is enabled. When activated this option will open Disk Utility and delete the first volume, then create a new one with the same name.
Using the Automaton
To once the automaton is programmed and configured, you can now start using it. After preparing the MDS resource volume or disk image:
- Boot the target mac by pressing the power button and holding the option key.
- When the boot selector screen appears, insert the Automaton into the USB port. Within 5 seconds, the Mac should start booting to the recovery partition.
- The Automaton will enter the keystrokes to open Terminal and run the command to launch the workflow selector.
MDS Automaton Timing
The MDS Automaton performs keyboard strokes to boot in to the recovery partition and other operations. The timing is very specific for each operations:
- 0 secs: MDS Automaton is powered on. LED turns on.
- 2 secs: serial port turned on and listening for any keystroke over serial to enter admin mode
- 7 secs: Enter startup mode. Serial port closed. LED turns off. Wait 1 second for serial to close and keyboard mode engaged.
- 8 secs: Command-r is pressed for 30 seconds. LED flashes about every 1/2 second.
- 38 secs: startup delay specified in settings starts (default 180 seconds). Flashes LED two times every 1/2 second.
- 3 minutes, 38 secs: Press space to clear mouse configuration for Mac Mini. Wait 10 seconds for language selector to come up.
- 3 minutes, 48 sec: Press return to dismiss language dialog. Wait 30 seconds for recovery window to show.
- 4 minutes, 18 secs: Press control-f2 to turn on keyboard navigation. Press right arrow key 4 times and down arrow key 4 times.
- 4 minutes, 20 secs: Wait for pre-command delay (default 6 seconds) for terminal to come up.
- 4 minutes, 26 secs: type specified terminal command
- 4 minutes, 30 secs: turn off keyboard, wait 2 seconds
- 4 minutes, 32 secs: turn on serial port and wait for input.
Resources
https://twocanoes.com/knowledge-base/mac-deploy-stick-admin-guide/
https://twocanoes.com/knowledge-base/mds-automaton-command-line-interface/