Customizing Mapped Fields with XCreds
XCreds provides some options for how to use the authentication fields returned from identity providers. This is primarily used when XCreds uses one of these fields to set the user name when creating a new macOS account. Depending on your choice of IdP and your current IdP configuration, these field names may be different. XCreds establishes some defaults for these and then allows them to be customized when needed.
Confirm Fields Sent to XCreds
To customize how XCreds uses IdP fields it is important to first confirm what fields are currently being sent from the IdP to XCreds. XCreds can only use an IdP field if it is included in the authentication data it receives. The current IdP field data received can be found in the XCreds log located at /tmp/xcreds/xcreds.log.
Note that IdP field data is only shown in the log after enabling verbose logging. If verbose logging is not enabled, the log will show this command to enable it: sudo defaults write /Library/Preferences/com.twocanoes.xcreds showDebug -bool true. Once enabled, the log will show a different command to disable verbose logging.
With XCreds verbose logging enabled the IdP data may show, for example, a field named last_name or family_name. Confirm the correct field name shown in the XCreds log before using it to customize XCreds mapping preferences.
Add Optional Claims
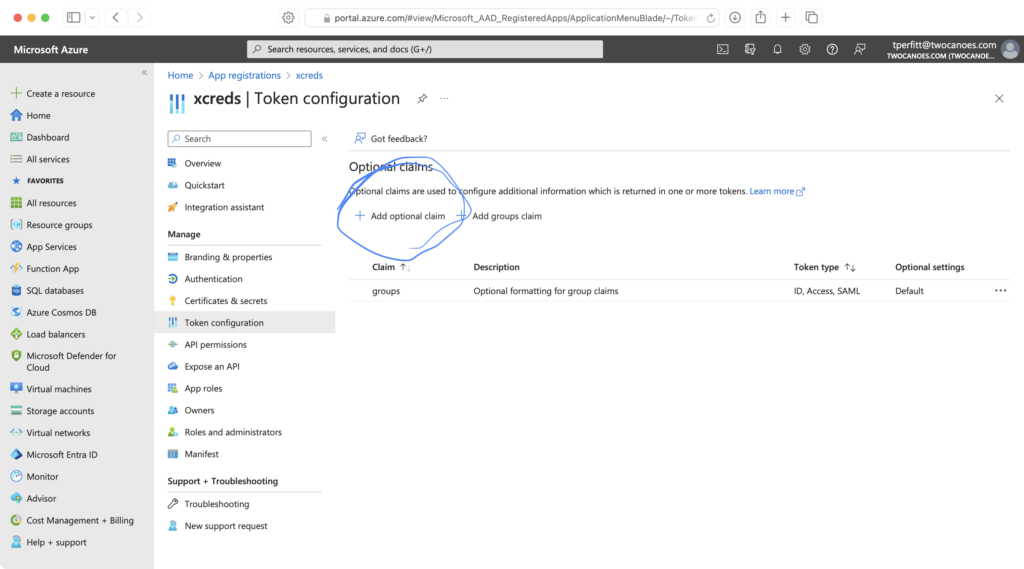
If there is a field used in your IdP but is not shown in the XCreds log data, it can be added by going to the IdP console. For Azure this can be done at portal.azure.com, then finding your XCreds item in App registrations, then going to Token configuration on the left navigation. There will then be buttons for Add optional claim and Add group claim. Select one of these and then choose from what is provided to add claim information.
Add Custom Claims
If the field to be added is not available as describe above in Optional Claims, it may be possible to add it as a custom claim. Before adding custom claims it will be necessary to edit the Azure App Registration Manifest. From the Azure portal go App Registrations and find your XCreds app, then on the left side click Manage and then click Manifest.
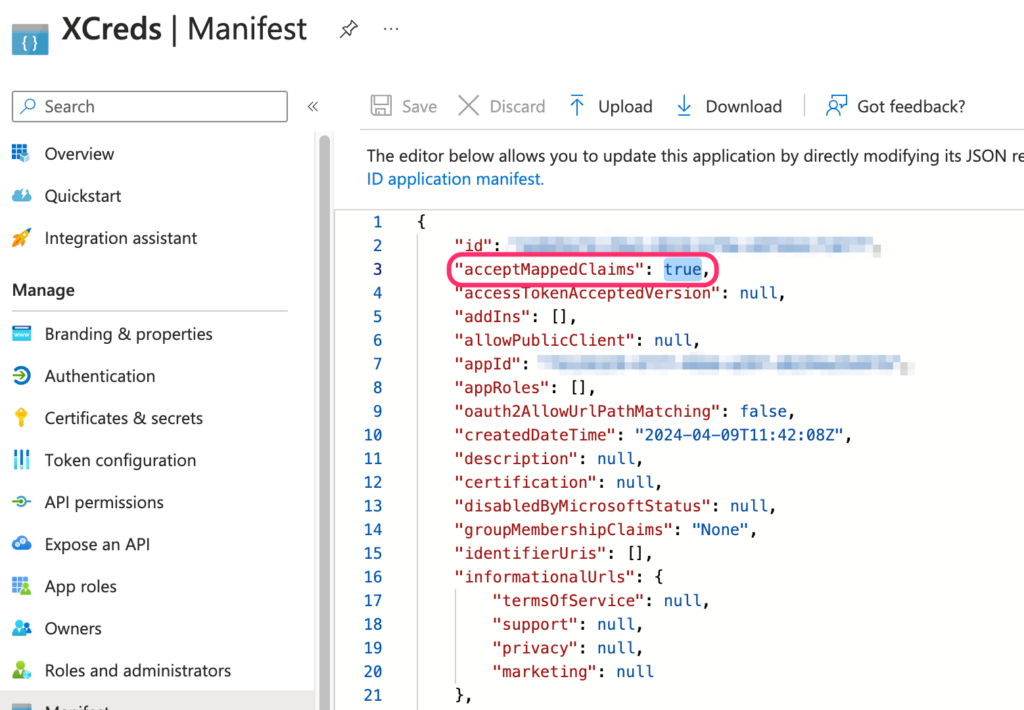
Find the Manifest line for acceptMappedClaims and change its value from null to true, then click Save.
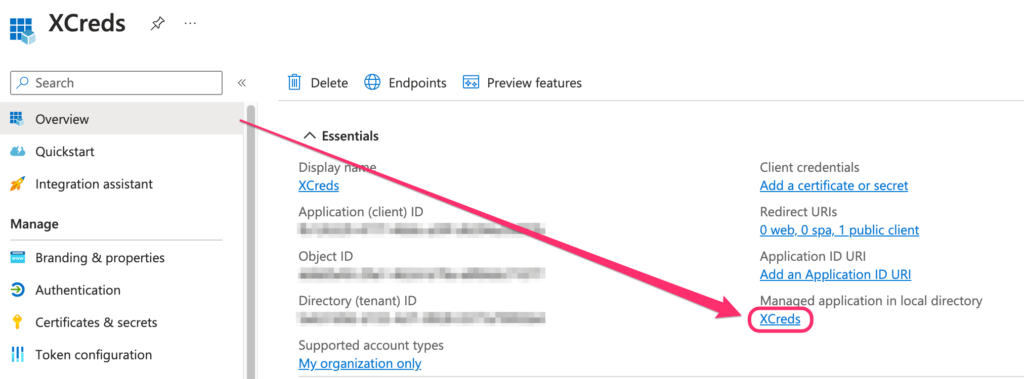
Then go back to the left side navigation and click on Overview and then click your app name under Managed application in local directory.
Go to the left side navigation and click on Manage and then Single sign-on. Then in the section for Attributes& Claims click the Edit button, then Add new claim.

Enter a name for the attribute and choose a source attribute, then click Save. As an example one could name the custom attribute user-department and choose from the dropdown list for source attribute the value user.department. The name entered here will be the attribute name later made available to XCreds.
Note that if custom claims are set up and then the Manifest is changed back to set acceptMappedClaims to be null, it will be necessary to remove the custom claims to avoid possible issues with authentication.
Confirm in XCreds Log
After updating your IdP configuration, confirm the intended claim field data is being received for XCreds to use. This can be done by signing in to macOS again using XCreds and checking the XCreds log. Once the log shows data received from your IdP, it can be used to map to macOS user fields.
Customize XCreds Field Mapping with Preferences
Use the confirmed IdP field names shown in the XCreds log to set XCreds preferences with Profile Creator. In Profile Creator find any of the following preference keys and set their value to the name of the corresponding IdP field name. It may also be necessary to configure the preference for scopes. See XCreds Preferences guide for more information on setting each preference key.
map_firstnamemap_lastnamemap_fullnamemap_usernamemap_fullusernamemap_uidmap_password_expiryusername
Field Mapping Defaults and Normalization
When XCreds field mapping preferences are not customized, the app will do the following default sequence to map user name:
- If the claim
emailis defined, that is selected. - Otherwise if the claim
unique_nameis defined, that is selected. - If neither of those are true, then the value in
subis selected.
After selecting the user name, it is normalized by taking the part before the “@” and replacing spaces with “_”.
There is also a separate preference username that can be used to force the local username for any cloud login. When the username preference is set, XCreds will bypass the mapping described above and force the local username to be the specified value.
Full User Name
XCreds also has a preference key for map_fullusername for use with XCreds Credential Provider. This is a separate preference from map_username. If map_fullusername is not customized:
- If the claim
unique_nameis found, that is selected. - Otherwise if the claim
emailis found, that is selected and the value is lower-cased. - If neither of those are true, then the value in
upnis selected.
Compare Similar Preferences
Note the different use of the following preferences with similar names:
map_username- Example:
jappleseed - Usage: The value that will be set for the macOS user account field
User name. This is the default value to use on the XCreds username and password login screen.
- Example:
map_fullname- Example:
Johnny Appleseed - Usage: The value that will be set for the macOS user account field
Full name. This is often first and last name.
- Example:
map_fullusername- Example:
jappleseed@twocanoes.com - Usage: The value that will be set for XCreds Credential Provider to enter when signing in on a web page in Safari.
- Example:
username- Example:
appleseed_the_great - Usage: Bypass other options for setting the macOS account field
User nameand set a specific value for any cloud user regardless of claims received.
- Example:
Map Kerberos Name
Optionally if using Active Directory together with Azure as the cloud IdP, one of the new claim fields can be used to allow a user to sign in to macOS with their Azure cloud IdP credentials and then get a Kerberos ticket. This would be done by using Profile Creator to set the preference key for mapKerberosPrincipalName. Set the value for this preference to be the name of the custom claim created. Then if this custom claim value as shown in the XCreds log matches the AD user ID, launch XCreds to run in the menubar and it can use the claim value to get a Kerberos ticket for the user even if the cloud IdP user name is different than the AD user name.

Special Thanks
Thanks to Neil Delamere for contributing information for this on custom claims configuration.