New Features in MDS 1.3
MDS 1.3 introduces an enhanced version of Imagr to support folder paths, setting computer name when first running a workflow, and a new Automaton feature to reflash the firmware without pressing the programming button. You are also able to change the name of the disk image volume in preferences.
MDS 1.3 will officially be released as beta soon and a full release about a week after that. If you want to try it now, head over to downloads and give it a try today.
Change Disk Image Volume Name

When saving to a disk image, the disk image volume name is now “mdsresources” by default. It can be changed in the MDS preferences.
Prompt and Set Computer Name
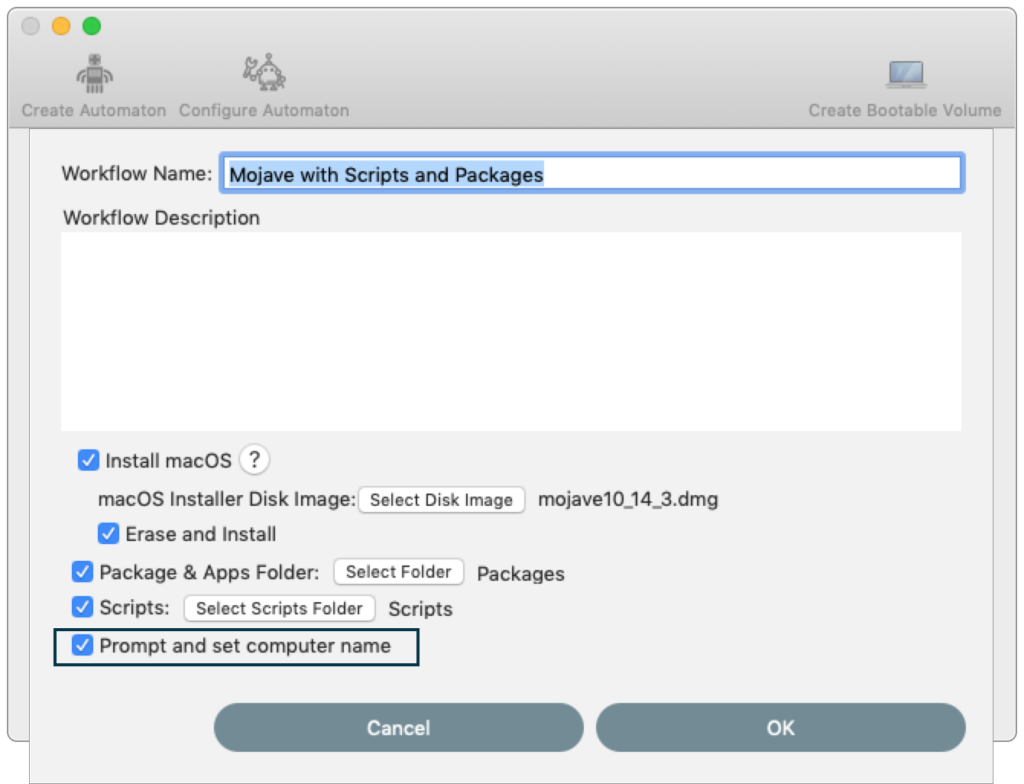
The new “prompt and set computer name” option activates the administrator specifying the computer name when a workflow is run. When the workflow is run from the recovery partition, the admin enters in a computer name. This computer name is saved as an extended attribute (“ComputerName”) on the target volume. A script is added to the workflow (“set_computer_name_from_xattr.sh”) that applies that extended attribute after the OS is installed:
#!/bin/bash

NAME=$(/usr/bin/xattr -p ComputerName /)

echo setting computer name to $NAME
if [ -n "${NAME}" ]; then
 	/usr/sbin/scutil --set ComputerName "$NAME"
 	/usr/sbin/scutil --set HostName "$NAME"
 	/usr/sbin/scutil --set LocalHostName "$NAME"
fi

exit 0
MDS Automaton Bootloader Command
A new command has been added to the MDS Automaton. The new command, “bootloader”, is sent to the MDS Automaton via a shell command (either via Terminal, SSH, ARD, or other mechanism), the MDS Automaton will enter bootloader mode for 8 seconds. If this command is followed by the avrdude command to flash the MDS Automaton, the new firmware will then be loaded onto the device. Once the new firmware is loaded, the MDS Automaton will restart and start running the new firmware.
An example setup is available for download. The firmwareupdater.zip contains a folder with a sample script (“update_automaton.sh”) that can be run to update the MDS Automaton. The firmware in that folder, arduino_firmware.hex, will be applied when the script is run. Simply extract the arduino_firmware.hex from the MDS application and replace the arduino_firmware.hex in that folder, then run the script. For example:
cp /Applications/MDS.app/Contents/Resources/arduino_firmware.hex ~/Desktop/firmwareupdater/update_automaton.sh
plug in arduino
putting into bootloader mode

...
 avrdude: reading on-chip flash data:
...
 avrdude done.  Thank you.
Specify Package Folder
Imagr has been updated to 1.5 to support specifying a path to a folder that has packages in it. This will allow future versions of MDS to use this feature. Once implemented, you will be able to add and remove packages from the external volumes and the workflow will automatically detect the change and only install packages that are currently in that folder. A full writeup is available here.
Customized Imagr serverurl
When MDS saves out the resources, it creates a configuration file for Imagr in the Applications folder in the Deploy folder. This configuration file, “com.grahamgilbert.Imagr.plist”, tells Imagr where to the find the workflow configuration. The configuration file has a key called “serverurl” that usually points to the workflow configuration file on Deploy/Config/config.plist. You can now override the value of serverurl by running the follow defaults command:
defaults write ~/Library/Preferences/com.twocanoes.MacDeployStick.plist serverurl '<URL to workflow configuration>'
The “URL to workflow configuration” can be on a web server (like http://example.com/config.plist) or on a local disk (like file:///Users/Shared/config.plist).
If you override the serverurl, the config.plist will still be written to the Deploy/Config/config.plist in the resources, though it will not be used by Imagr. It is still written to allow administrators to have access to the workflow information to add to their own customized config.plist.
FileVault Support
In prior version of MDS, if a target volume was encrypted with FileVault, it was not available in the workflow selector until the volume was manually erase or mounted with a password in Disk Utility. In this release, MDS will show Filevault volumes by their device identifier (like /dev/disk0s2) and can be selected. If the workflow has the option to erase the volume, the selected filevault volume will be erased prior to any additional actions from the workflow. If the volume is not erased and is encrypted with Filevault, the workflow will fail since it will not be able to access the volume.
If the encrypted target is an encrypted APFS volume, the volume will be erased with the APFS filesystem. If the encrypted target is a CoreStorage volume, the CoreStorage volume will be deleted and converted to a HFS+ partition. The macOS installer will typically convert the HFS+ volume to CoreStorage or APFS depending on the macOS that is installed on the target volume.
Please join the MacAdmins #macdeploystick Slack channel by joining at http://macadmins.org.