Smart Card Utility for macOS User Guide
Note: If you received your Twocanoes Reader, see the Quick Start Guide.
Overview
Smart Card Utility is an application that allows you to use and manage smart cards on your iOS or macOS device. Smart Card Utility imports certificates from an inserted smart card via Twocanoes’ Bluetooth, Lighting, and USB-C readers. Then Smart Card Utility makes the certificates available to any application that requests them.
Applications such as Safari, VPN, and WiFi can use these inserted certificates. Certificates are also available in a third-party apps. When an app selects a certificate for authentication, the Smart Card Utility Reader app extension talks to the smart card reader to perform the authentication with the reader.
Why Smart Card Utility for macOS?
We believe that the security of a smart card shouldn’t compromise convenience and functionality. Twocanoes created Smart Card Utility macOS in 2018, augmenting the use of and providing easier access to smart cards within macOS.
Smart Card Utility for macOS adds smart card authentication support for Bluetooth readers and features such as certificate viewing/selecting and PIN verification/changing.
Requirements
macOS Device
To run the current version of Smart Card Utility for macOS, you’ll need the following:
- macOS 10.10 or later is required for the Smart Card Utility Bluetooth, Lighting, or USB-C readers using a wired connection with a macOS device.
- macOS 10.13 or later is required for the Smart Card Utility Bluetooth using a wireless connection with a macOS device.
Smart Card Hardware
Smart Card Utility also requires compatible hardware for full functionality: a smart card and a smart card reader. This includes:
- One of the following compatible smart cards:
- Any PIV-compatible smart card
- A PIV-Transitional (CAC) Card. Tested on:
- Giesecke & Devrient Sm@rtCafe Expert v7.0 (G+D FIPS 201 SCE 7.0)
—and—
- One of the following compatible smart card readers:
- A Twocanoes’ Bluetooth, Lightning, or USB-C or reader for Smart Card Utility.
- 3rd party reader that supports CCID
Using Compatible Devices
Whether you purchase a smart card reader from Twocanoes or a third party, knowing how to use your compatible devices with Smart Card Utility is essential. Below are some instructions on how to use all smart card readers compatible with our software.
Twocanoes Store Purchases
Twocanoes currently offers three hardware packages for Smart Card Utility. Each hardware purchase includes a license of our Smart Card Utility software at the price of the package.
The Smart Card Utility Bluetooth reader provides both a wireless and wired solution for macOS. The Smart Card Utility USB-C and Smart Card Utility Lightning provide a wired solution for macOS.
Listed below are the technical specifications for hardware packages sold through the Twocanoes Store.
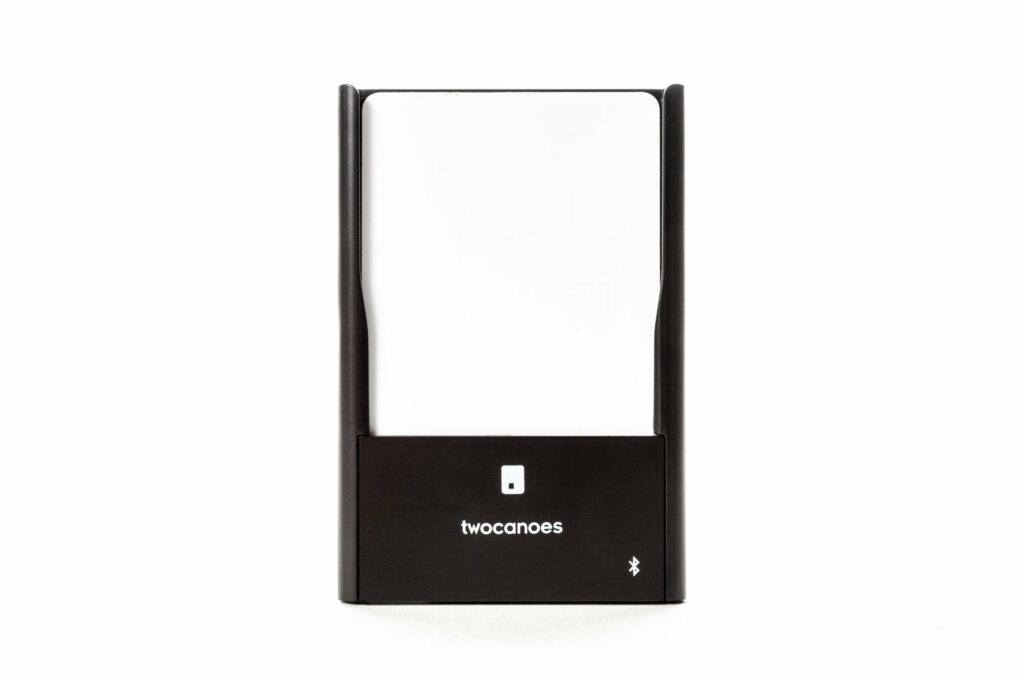
Smart Card Utility Bluetooth
Smart Card Utility USB-C
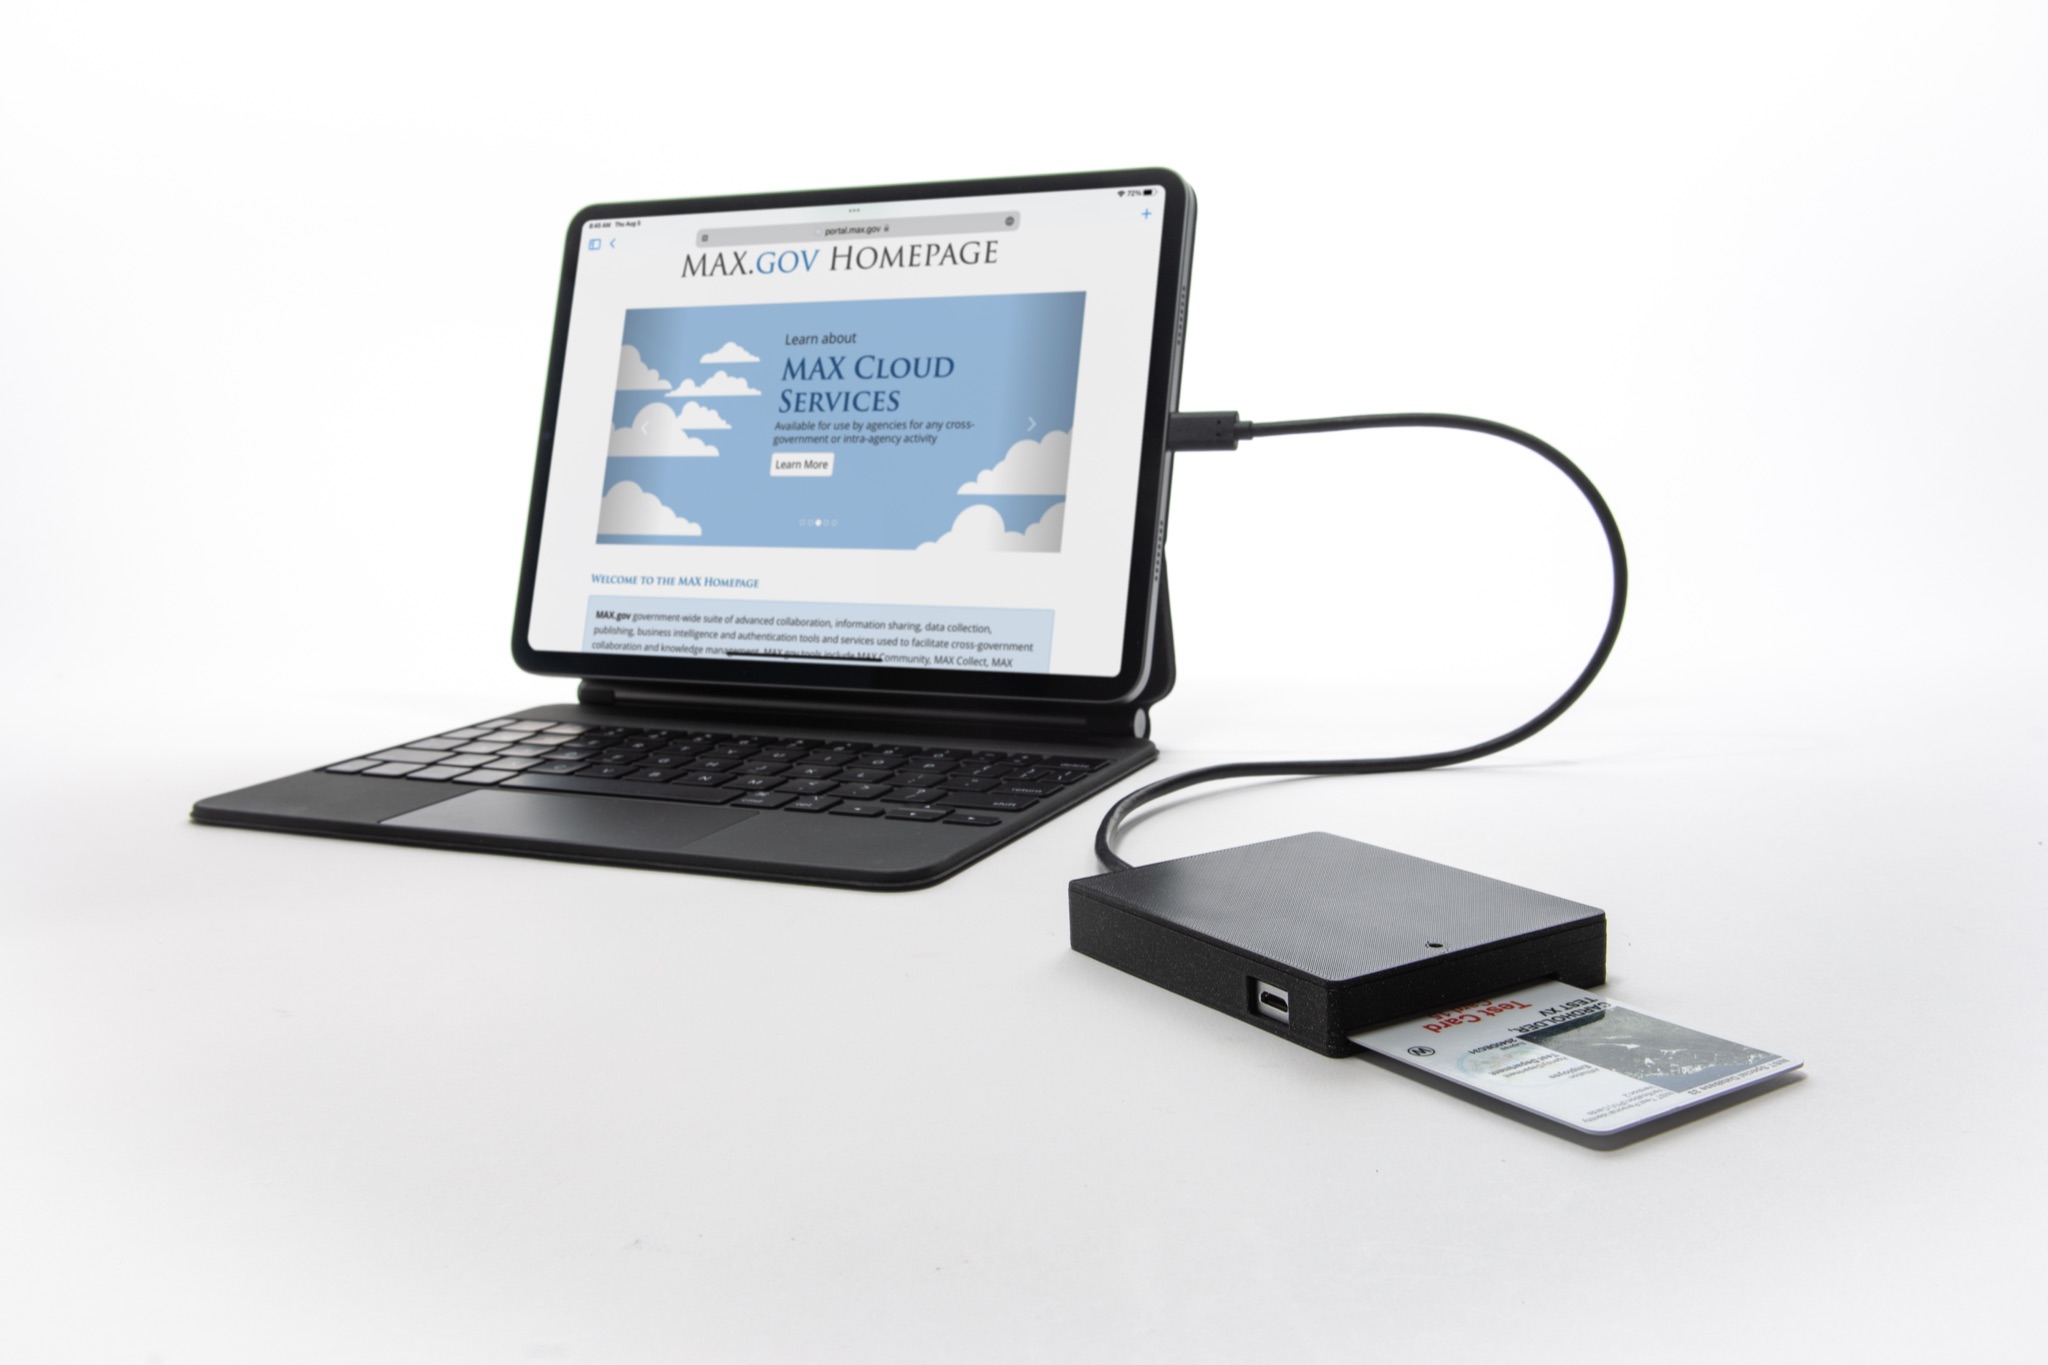
(iPad, iPad case, and keyboard not included)
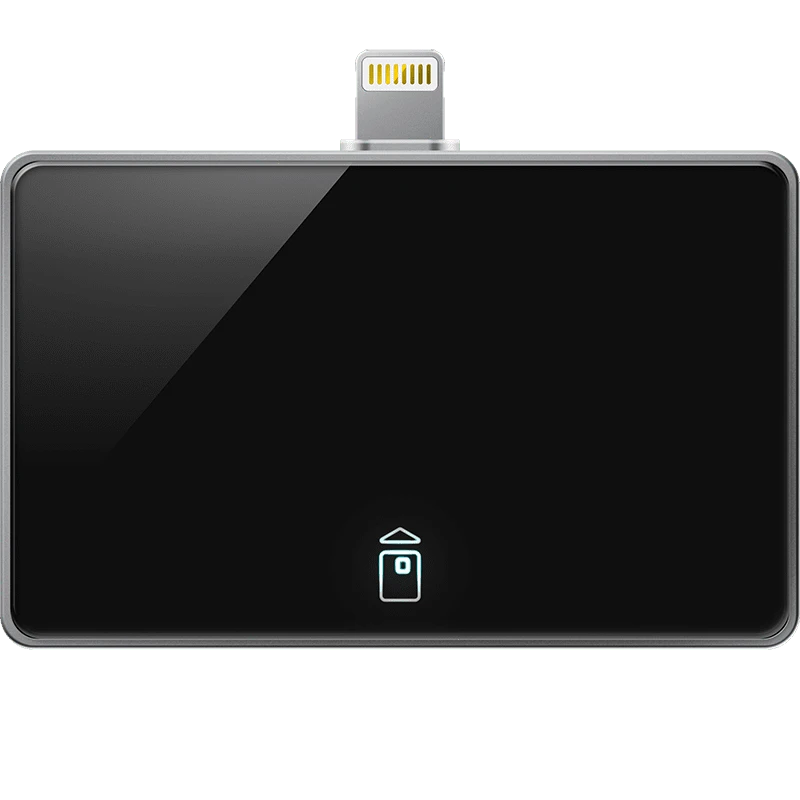
Smart Card Utility Lightning
Setup for use with Smart Card Utility on macOS
Plug-in (Lightning or USB-C Devices)
Connect a smart card reader to your Mac device via USB or USB-C. Verify that your smart card reader and Mac connect.
Bluetooth
Smart Card Utility Bluetooth is a wireless, Bluetooth reader. In order to use the reader with your Mac, make sure Bluetooth is enabled on your computer before using Smart Card Utility.
To turn on the reader, press the button on the bottom, between the indicator lights and the USB connector. To turn off the reader, press and hold the same button. You may need to turn your reader on again throughout your use of Smart Card Utility, as the reader may automatically turns off when switching from an application. Press the power button again and your reader should connect to your device. If you have any trouble, See the Troubleshooting section.
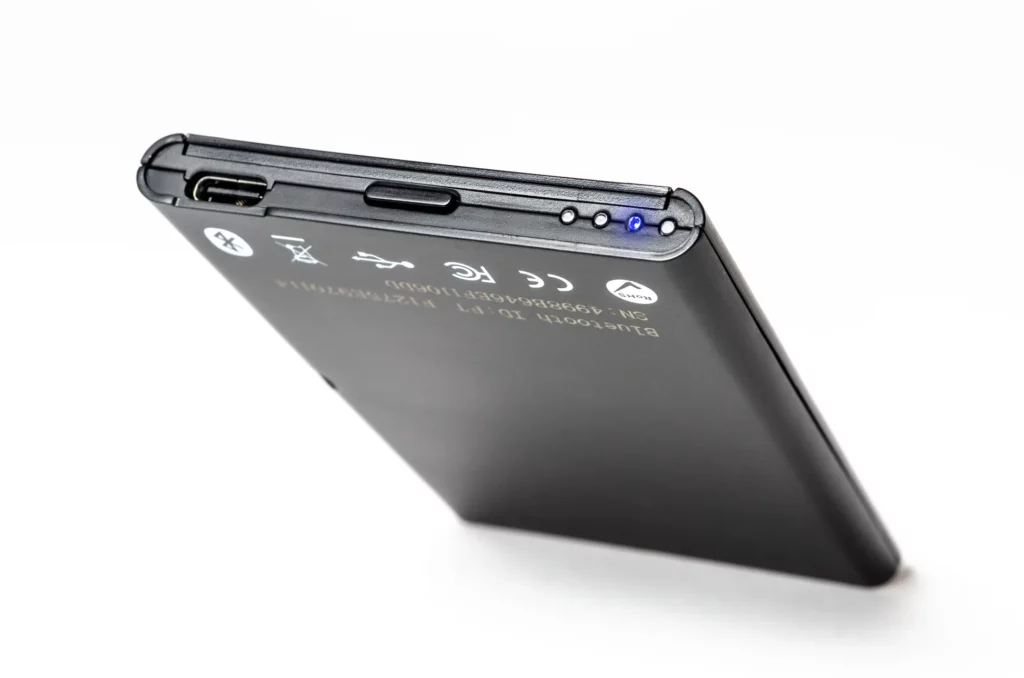
The green indicator light (second from the left) indicates power, while the blue light (third from the left) indicates Bluetooth connection. When the blue light is flashing, the Bluetooth reader is searching for a Bluetooth connection. When the green indicator light is flashing, the contents of the inserted smart card are being accessed.
App
To download Smart Card Utility on macOS, search for “Smart Card Utility” on the Apple App Store. Twocanoes readers arrive already activated. If using your own supported hardware purchased via a third party, you must purchase the full version of the app within Smart Card Utility at the end of your free trial. See Trial/Purchase for more details.
Initial Setup
Trial/Purchase
Smart Card Utility is free to download and has a two-week trial period. However, the full use of our software requires an in-app purchase or activation to allow for continued use. Those who purchased Smart Card Utility Bluetooth, Smart Card Utility USB-C, or Smart Card Utility Lightning automatically activate.
Main Interface
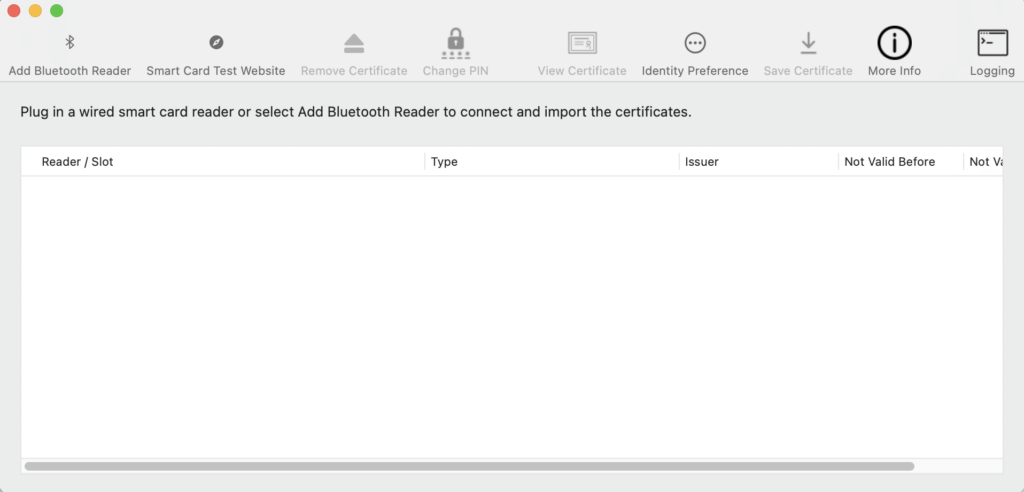
After acknowledging purchasing the full version (or acknowledging the free trial) of Smart Card Utility, you will see the Main Interface. Before further use, it is recommended to activate your Twocanoes smart card reader, as the free trial prompt will continue to appear in front of the Main Interface until the full app is purchased or your hardware is activated. See Activate Reader below for more information.
Each element of the interface above is listed below:
- Logging: Shows the scan log for the app. To learn more, please see Twocanoes Log Capturing Guide.
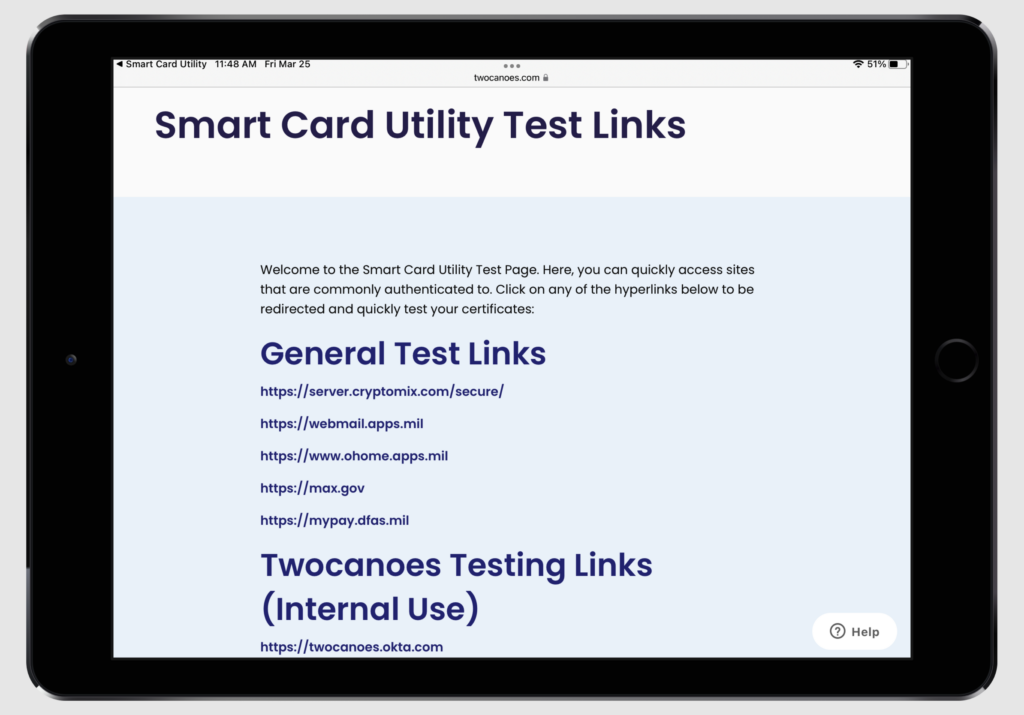
- Test: Tapping Test redirects to the Smart Card Utility Test Links website for use with inserted identities without leaving the app; this is done on an in-app browser. Logging allows you to capture any issue you have with certificate authentication.
- More Info Button (ⓘ): Redirects to the More Information Guide.
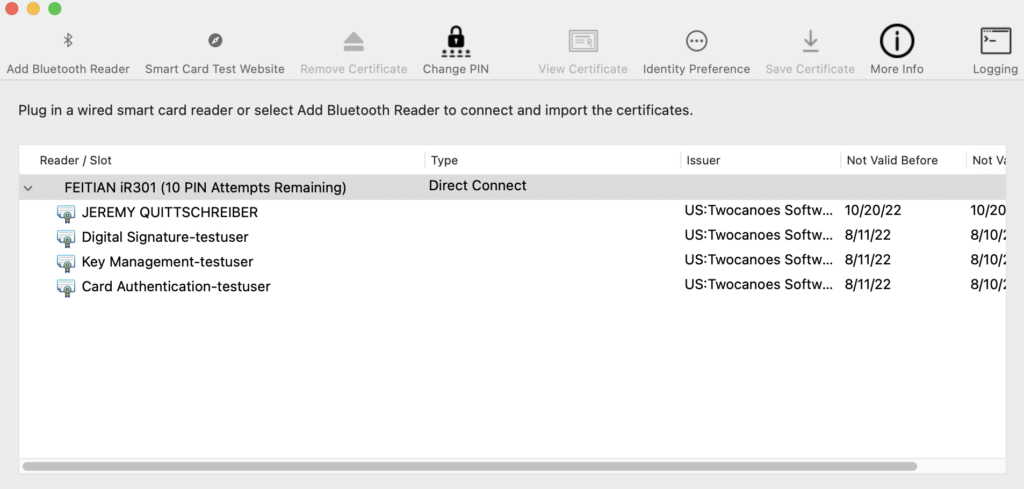
- Reader / Slot: The reader currently connected with Smart Card Utility.
- Type: Shows the Current Stats of certificates.
- Remove Certificate: Used to remove inserted identities from the main window.
- Change PIN: Used to change the PIN of the CAC/PIV card currently paired with Smart Card Utility.
- View Certificate: Displays detailed information about the certificate currently inserted.
- Identity Preference: Maps a single certificate to a specific website.
- Save Certificate: Used to download the inserted certificate.
Read Certificates
To view or store certificate identities in Smart Card Utility, you must first Scan them. Below, we’ll walk you through a Scan to familiarize you with the process.
Wired Connection
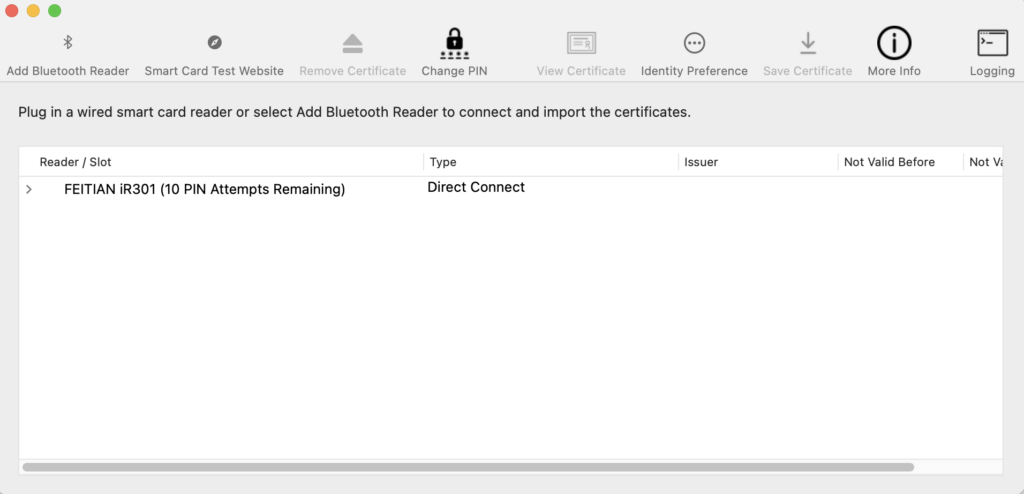
- Connect a reader to the Mac via USB/USB-C, and insert a CAC/PIV card. The reader will appear under Reader / Slot.
- Click the disclosure triangle next to the reader. All certificates will display.
- Twocanoes Lighting reader and USB-C require a wired connection, and the Bluetooth reader can also use this method.
Bluetooth Connection
- Make sure the Mac Bluetooth is turned on.
- Insert a CAC/PIV card into the Bluetooth reader and put it into pairing mode.
- See the Twocanoes Bluetooth Reader Quick Start Guide for more details.
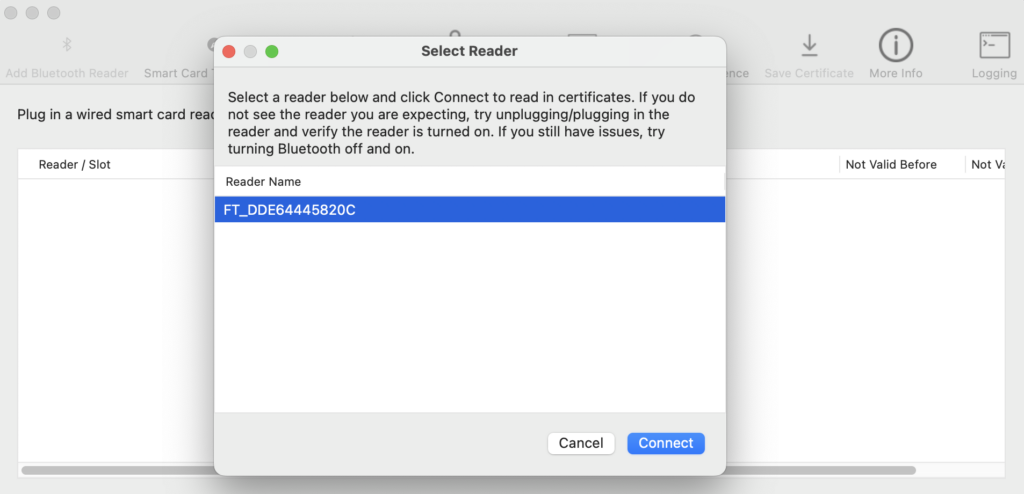
- Select the reader you wish to pair with. A prompt will come up If using a PIN Pairing Bluetooth reader. Enter the PIN.
- After reader selection, the scanning process begins. You will be redirected to the Certificate Selector page when it completes. While the scan is running, do not attempt to interact with the Main Interface, as inputs are disabled.
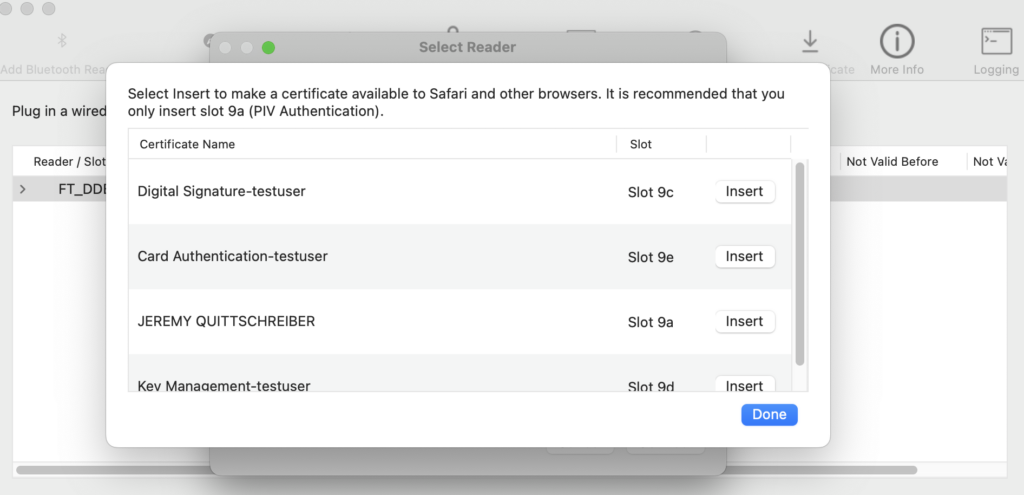
- After connecting with the reader, insert the 9a Certificate.
Removing Identities from the Main Interface
Simply unplugging a reader when using a wired connection will clear all identities and certificates.
To remove only certain identities when using a Bluetooth connection, Click the disclosure triangle next to the reader. Then select the inserted certificate and click Remove Certificate.
Certificates
After scanning your smart card via the Scan methods detailed above, you can view the certificates contained on the smart card itself on the main page. There are also options to Save Certificates and set Identity Preferences for specific websites to use a particular certificate.
Trusted Certificates
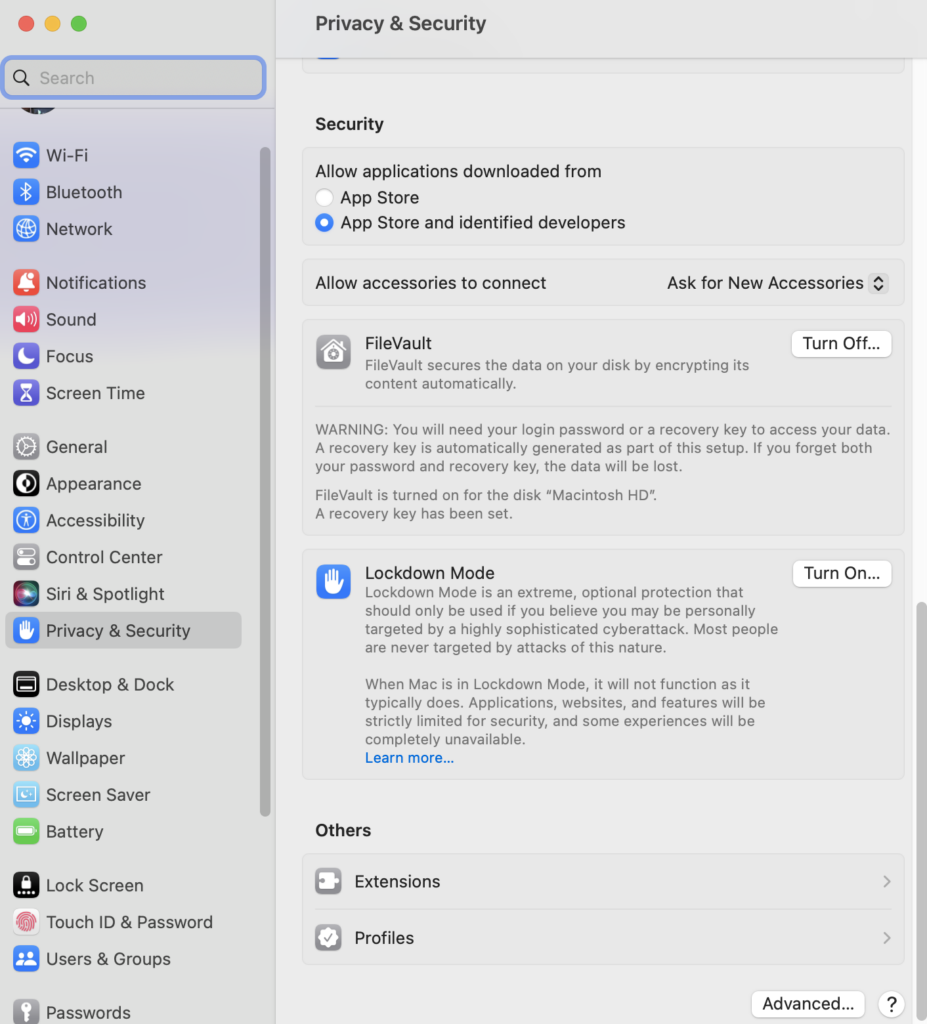
Like in the example above, the certificates on your smart card can appear colored red: this means they are untrusted certificates. The certificates on the smart card do not need to be trusted to be used by websites; however, certificates presented by websites do need to be trusted. To trust the web site certificates, begin by speaking with your administrator to install intermediate and/or root certificates on your device via the Settings app as needed. For DOD, visit Using US Government and Department of Defense (DoD) Certificates in Smart Card Utility to download.
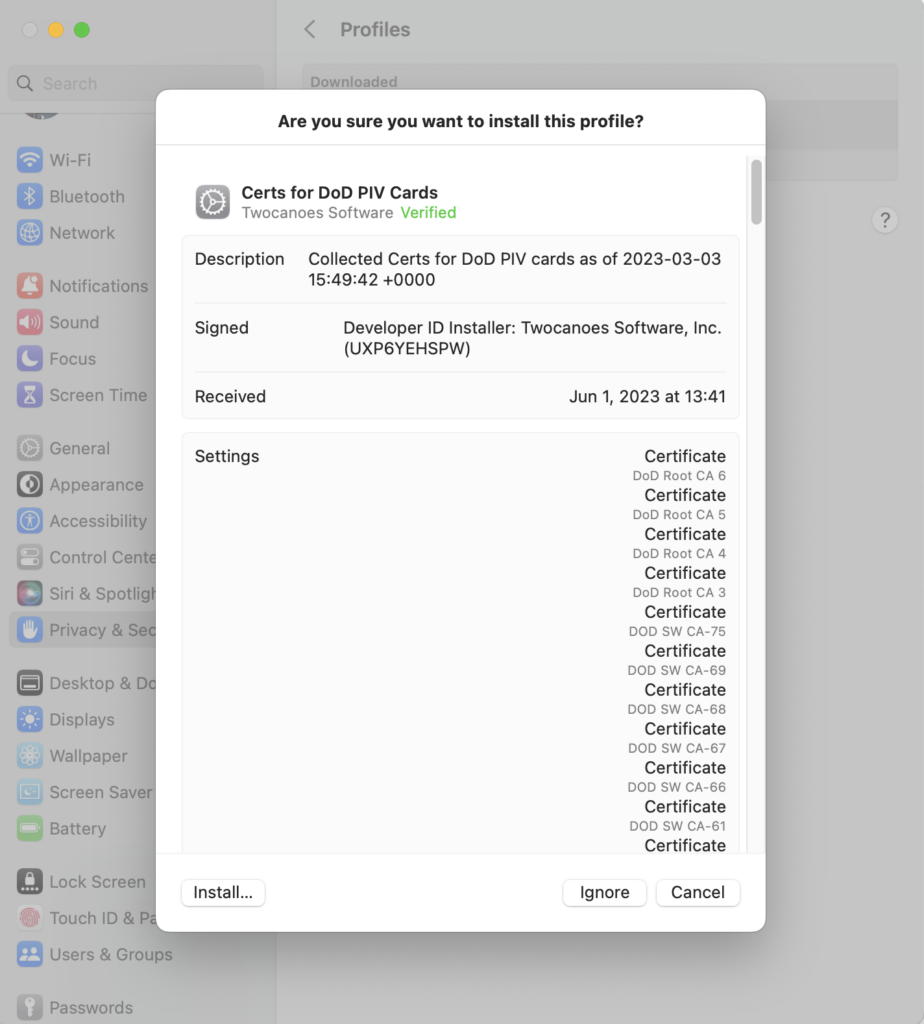
Once you’ve downloaded the intermediate and/or root certificates visit the Settings App. Select Privacy & Security and then click on Profiles at the bottom.
Follow the instructions to install the profile and certificates. Click Install in the bottom left corner.
Take note of warnings and contact your administrator to ensure that your intermediate and/or root certificates are not expired. Tap Install in the top right again, then tap the “Install” option in the Install Profile prompt:
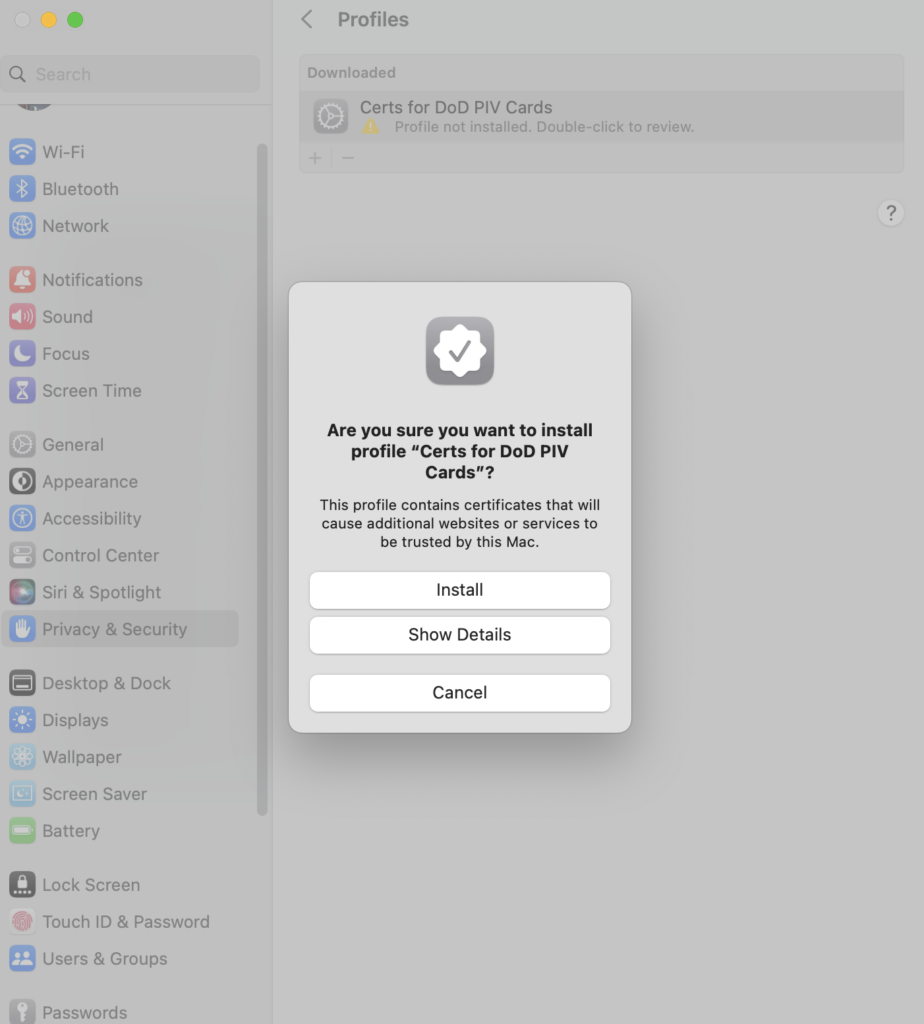
Once installation is complete, they can be used by Smart Card Utility to verify Certificates as trusted.
Refer to Apple’s documentation if you need more support after receiving the intermediate and/or root certificates to install.
Using Certificates
After inserting a certificate identity, you can use it in any capacity that requires PIV authentication. Below are some common examples.
Safari
These videos may appear slightly different from your version of Smart Card Utility but demonstrate the process of using Safari with certificates inserted via Smart Card Utility.
After inserting a certificate on macOS, you can use PIV authentication on websites in Safari, Edge, and Chrome.
With your smart card/smart card reader connected, the website you attempt to use PIV authentication will prompt you for a PIN. Enter your PIN as you normally would, and authentication should occur normally. View the above video for an example of using a PIV smart card in Safari. Note: your Bluetooth reader may power off when leaving an application; turned it on again if it turns off. See Bluetooth Quick Start Guide for details.
VPN Setup
VPN Configurations can also be made with the help of stored certificates, including those inserted via Smart Card Utility.
To set up a VPN on macOS, go to Settings → Network → …v → Add VPN Configuration.
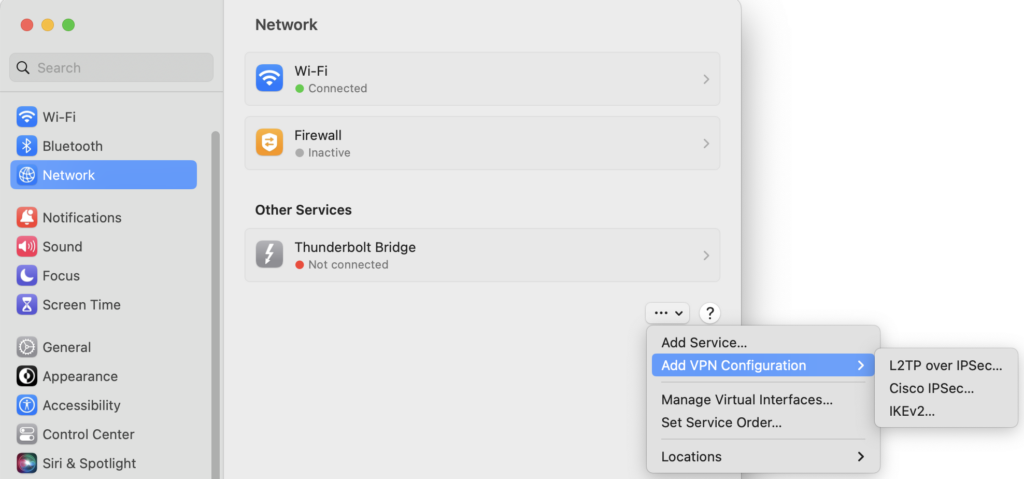
Tapping Add VPN Configuration will redirect you to the VPN Setup screen.
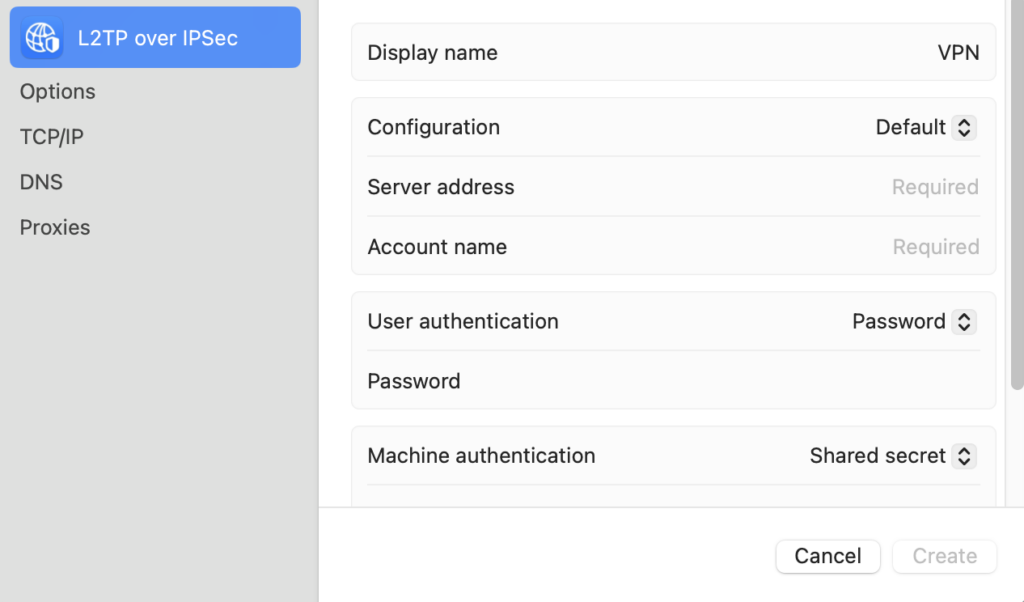
Setup your VPN as you would in any other instance on macOS (contact your administrator for more information on setting up a VPN). Within the Add VPN Configuration menu, change your User Authentication option to Certificate. Return to the Add VPN Configuration Menu, select the new Certificate option below “User Authentication” in the AUTHENTICATION section, and choose your previously inserted certificate from the list shown. Below is an example.
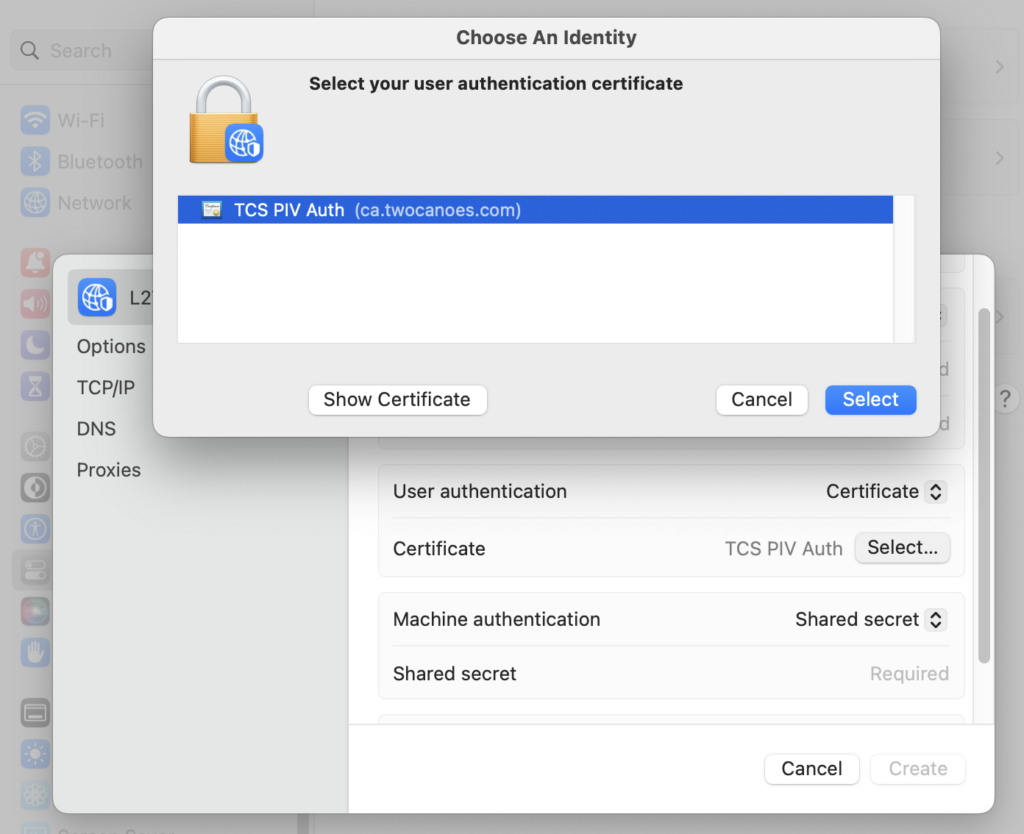
Select the certificate from the list that you’d like to use. It may be that there’s only one certificate on the list.
If you do not see your certificate in your list, it may be that the certificate was not inserted properly. Try insertion again by removing your identities, going through the Scan process, and inserting your desired certificate identities.
You may also have to browse a list of available certificates to find the one you wish to use. To help distinguish between certificates during selection, Apple includes the Issuer and the Expiration Date of the certificate alongside the name. If your listed certificates use duplicate or similar names, view Certificate Details to match the Issuer and Expiration Date of the certificate you wish to use to your certificate on this list.
Wi-Fi
You may use an installed certificate from Smart Card Utility to set up a WPA2 Enterprise or WPA3 Enterprise network connection on your macOS device.
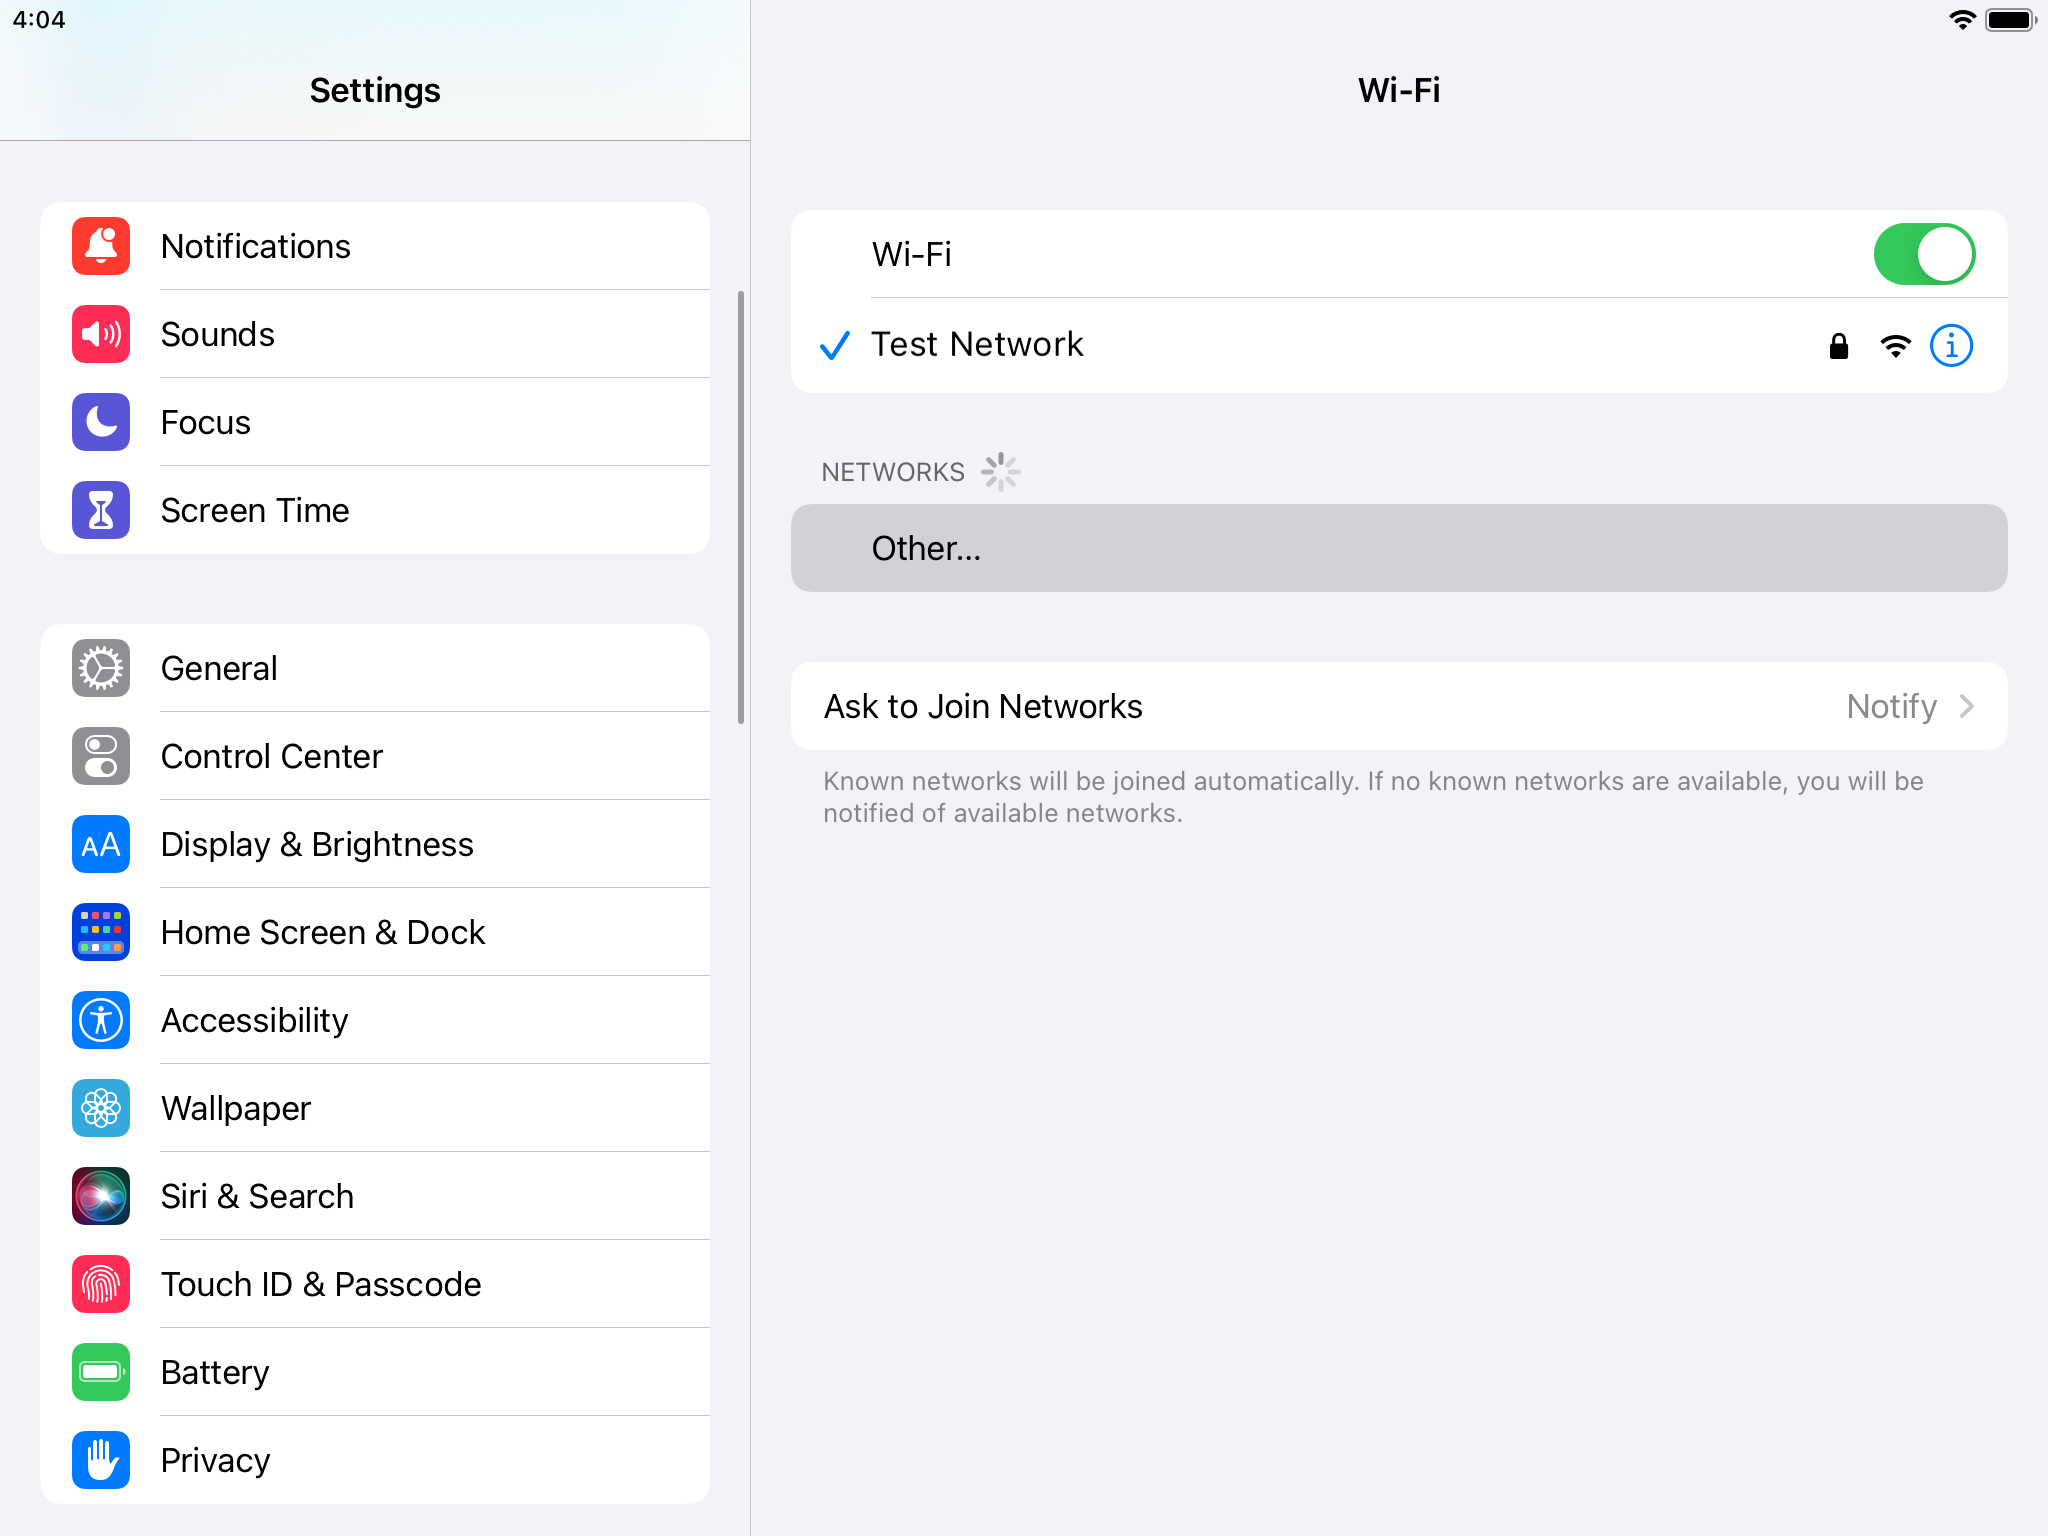
Go to Settings → Wi-Fi → Other… to go to the Add a Wi-Fi Network Profile screen in Settings. You may have to scroll down past your Known Networks and Other Networks to reach this option.
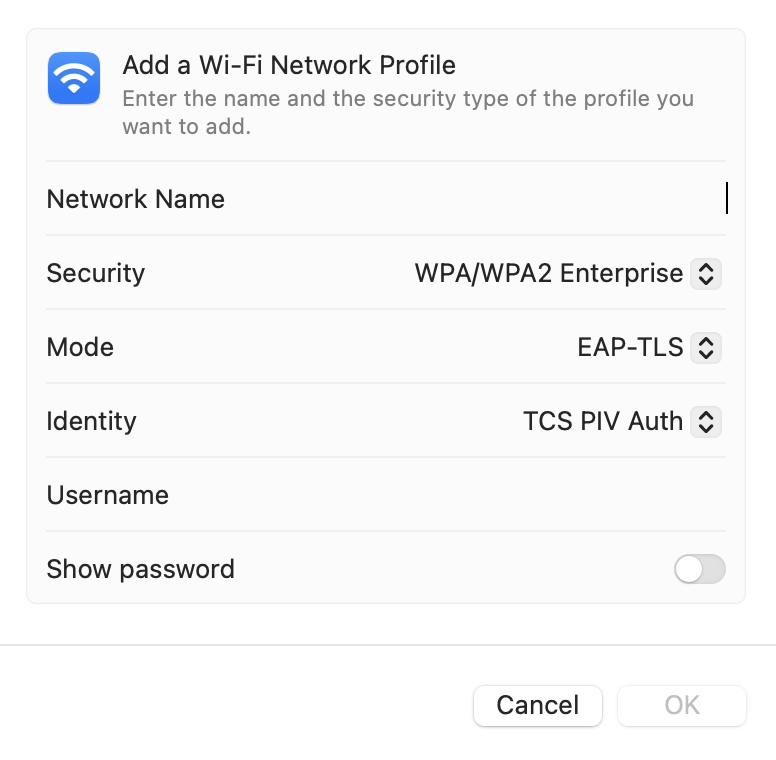
Then, select the desired encryption type in Security (WPA2 Enterprise or WPA3 Enterprise). Change the Mode from Automatic to EAP-TLS. Identity should appear. Click Identity and select your inserted identity for use. Below is an example.
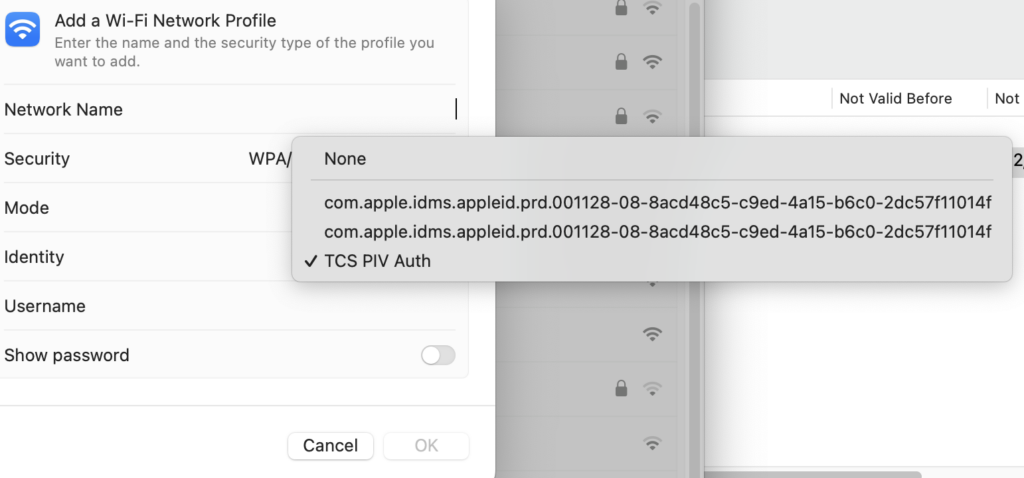
Select the identity from the list that you’d like to use. All considerations from the Certificate list in VPN Setup apply here as well.
Example Walkthrough
For those who wish to see a Full Example Walkthrough, below is a demonstration video created on an earlier build of Smart Card Utility, though most instructions still apply to current builds.
For customers who would like to see an updated walkthrough of testing, you can do so by watching the Test portion of the Smart Card Utility Reader Setup video.
Dark Mode
For use at all times of day and all viewing experiences, we’ve also included support for Dark Mode with Smart Card Utility. Turn on Dark Mode as you normally would in Settings. Smart Card Utility will automatically match your device’s settings in-app. Visit Apple’s support page to learn more about using Dark Mode.
Support
We know that using smart cards can be tricky sometimes. Smart Card Utility was created to make the process easier. While we hope you don’t run into any problems with our software, we are here to help if you do!
Below you’ll find some resources that will be useful if you run into any issues when using Smart Card Utility.
Troubleshooting
To troubleshoot third-party smart card readers, including Bluetooth issues, please see our article on using FEITIAN-based readers with Smart Card Utility.
For troubleshooting software, please see the issues below. This page will be updated with troubleshooting guidance upon new releases of Smart Card Utility if necessary.
Authentication Issues
If authentication with your certificate is unsuccessful, try the following steps:
- Verify you have the required certificates installed. For US Government/Department of Defense customers, install the root and intermediate certificates by following the instructions on the Installing Intermediate Certificates page.
- Toggle Bluetooth on and off on the macOS device
- Verify the reader is on when the PIN prompt is showing
- Click on “Test” and verify that the inserted certificates are seen by macOS.
- Try rebooting your device.
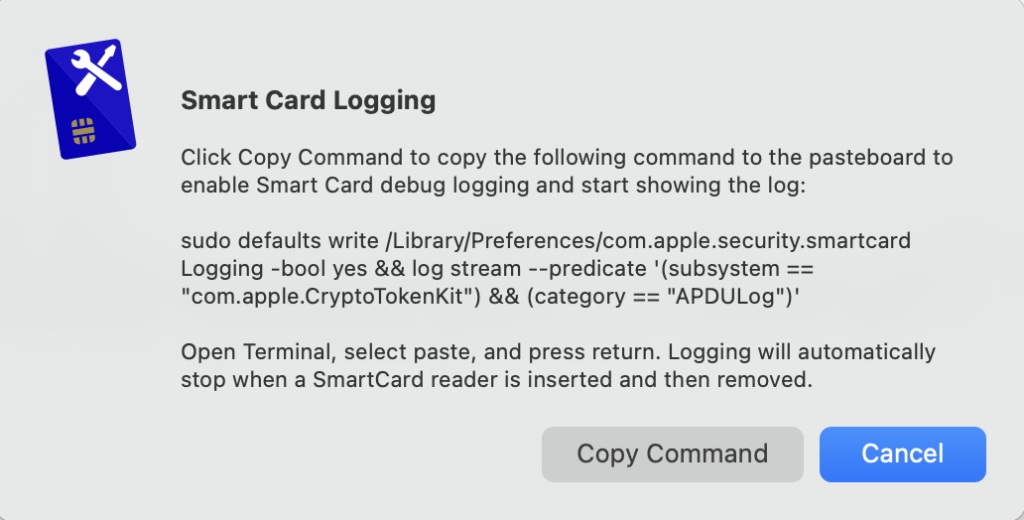
- If the certificates are not shown, perform Log Capturing. To resolve the issue, you may either:
- View the log on your own, or
- Share this log with support@twocanoes.com
- Use “subsystem:com.twocanoes.logger” as a filter, shown in the screenshot below:
Identifying Certificates as Trusted or Untrusted
In certain cases, your certificate may need to be trusted for authentication.
If attempting to accurately view which certificates are trusted immediately after installing an intermediate and/or root certificate, it’s best to:
- Refresh the Main Interface by pressing command+r, or
- Re-Scan your smart card (to view which certificates are trusted if not yet inserted)
Free Trial Troubleshooting
If running into issues with your free trial length, make sure your time is set to “Automatic” in your Settings app.
Keep In Touch
Sign up for Smart Card Utility security and product updates.
Sign Up for Smart Card Utility product and security updates
Knowledge Base
While this User Guide is updated regularly, we frequently add articles about all our products to the Twocanoes Knowledge Base to guide users through specific concerns. Visit our Knowledge Base page or the Smart Card Utility Category for specific help.
Customer Support
All customers who purchase Smart Card Utility Bluetooth, Smart Card Utility USB-C, or Smart Card Utility Lightning receive a 90-Day Support Package; use the information in your purchase email to access both email and phone support. Additionally, customers can purchase additional Assessment Support to help you assess the needs of your organization. If you’d like to inquire further about what Assessment Support includes, or would like to contact us for Support Inquiries as part of your Support Plan, please contact us. If you are interested in purchasing support for yourself or for your organization, you may also contact us for information support plans. For information on quotes, please visit our quotes page.